- Chapter Objectives
- EXERCISE 3-1 Drawing a Rectangular Conference Room, Including Furniture
- Making a Drawing Template
- Polyline
- OFFSET
- EXPLODE
- ID Point
- TRIM
- Rectangle
- CHAMFER
- FILLET
- COPY and Osnap-Midpoint
- ROTATE
- POINT
- DIVIDE
- MEASURE
- OSNAP
- MIRROR
- Osnap Modes That Snap to Specific Drawing Features
- Running Osnap Modes
- Osnap Settings: Marker, Aperture, Magnet, Tooltip
- EXERCISE 3-2 Drawing a Rectangular Lecture Room, Including Furniture
- Making Solid Walls Using Polyline and Solid Hatch
- From
- BREAK
- Polyline Edit
- HATCH
- ARRAY
- ARRAYEDIT
- Distance
- Exercise 3-3 Drawing a Curved Conference Room, Including Furniture
- Polyline
- POLYGON
- Grips—Add Vertex
- Grips—Convert to Arc
- ARRAY
- Exercise 3-4 Drawing a Conference Room Using Polar Tracking
- Polar Tracking
- Polyline Edit
- Specifying Points with Tracking
- Drawing the Chairs around the Conference Table
- Completing the Conference Room
- Using Command Preview
- Choosing Selection Options
This chapter is from the book
This chapter is from the book
This chapter is from the book
Polar Tracking
Polar tracking lets you specify angles at which to draw. Polar tracking is similar to Ortho mode, but unlike Ortho, polar tracking merely indicates your specified angles and does not force you to draw horizontally or vertically like Ortho does.
Step 7. Set polar tracking angles at 15°, as described next:
polar tracking: A means of specifying points using your own increment angle.
Prompt
Response
Type a command:
Place your mouse over Polar Tracking on the status bar and right-click
A right-click menu appears:
Click Tracking Settings…
The Drafting Settings dialog box appears with the Polar Tracking tab selected:
Click the list under Increment angle: and click 15 (as shown in Figure 3-48)
Click OK
Polar Tracking (<F10>): Shows temporary alignment paths along specific angles of interest (for example, 15 degrees). Although the default increment for PolarSnap is 90 degrees, one can change it easily to 60, 45, 30, 15, and so on, as shown in Figure 3-48. You can use the system variable POLARANG to reset PolarSnap.
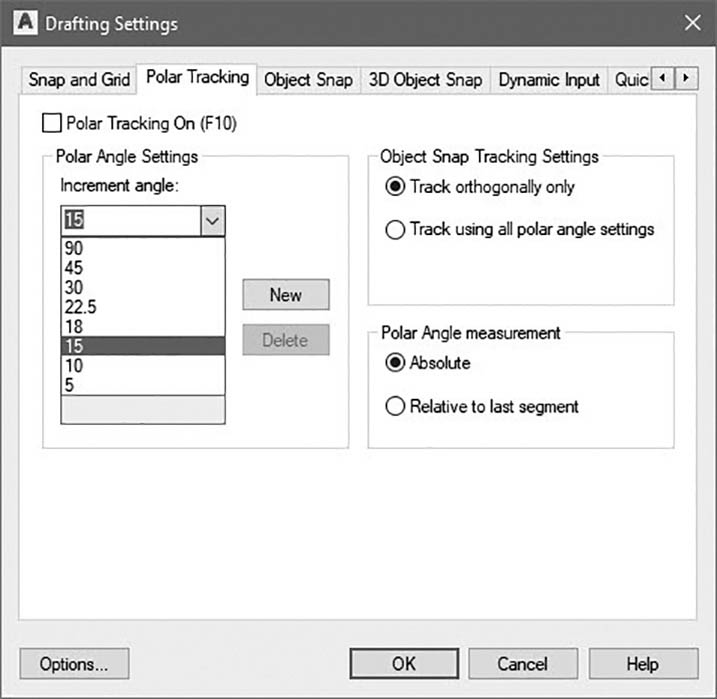
Figure 3-48 Set polar tracking angles
Step 8. Use the LINE command with direct distance entry and polar tracking to draw the inside lines of the conference room walls (Figure 3-49), as described next:
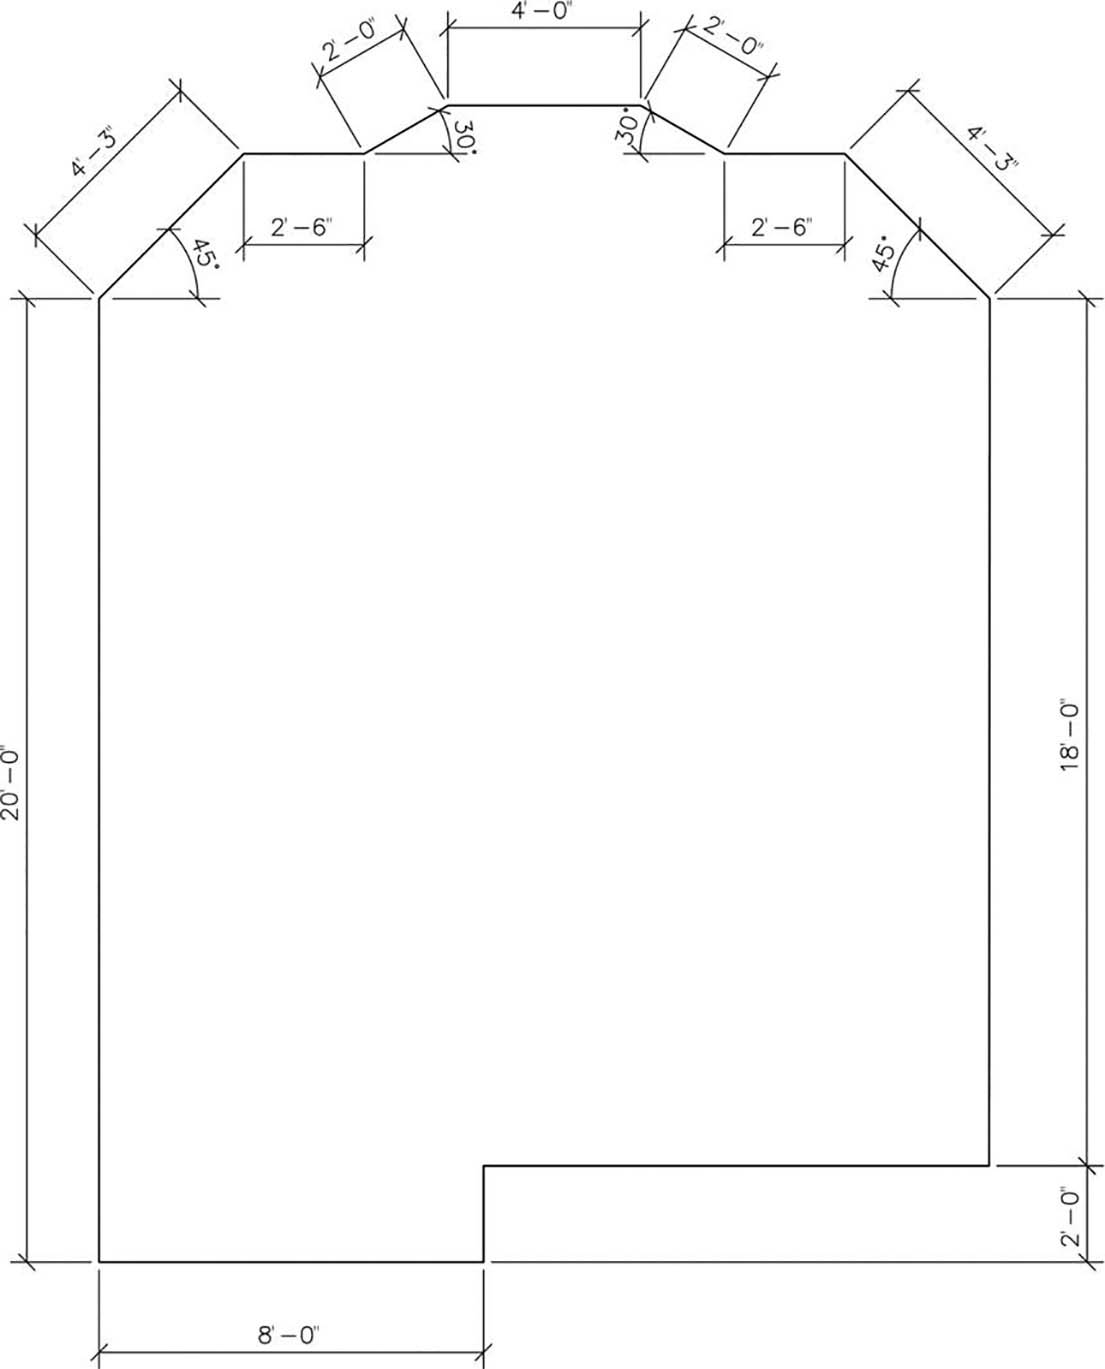
Figure 3-49 Measurements for the walls
Prompt
Response
Type a command:
Line (or type L <Enter>)
Specify first point:
Type 11′6,4′ <Enter>
Specify next point or [Undo]:
Turn ORTHO on
Move your mouse down and type 2′ <Enter>
Specify next point or [Undo]:
Move your mouse to the left and type 8′ <Enter>
Specify next point or [Close Undo]:
Move your mouse straight up and type 20′ <Enter>
Specify next point or [Close Undo]:
Turn POLAR on (ORTHO turns off automatically)
Move your mouse so that 45° shows and type 4′3 <Enter>
Specify next point or [Close Undo]:
Move your mouse so that <0° shows and type 2′6 <Enter>
Specify next point or [Close Undo]:
Move your mouse so that <30° shows and type 2′ <Enter>
Specify next point or [Close Undo]:
Move your mouse so that <0° shows and type 4′ <Enter>
Specify next point or [Close Undo]:
Move your mouse so that <330° shows and type 2′ <Enter>
Specify next point or [Close Undo]:
Move your mouse so that <0° shows and type 2′6 <Enter>
Specify next point or [Close Undo]:
Move your mouse so that <315° shows and type 4′3 <Enter>
Specify next point or [Close Undo]:
Move your mouse straight down so that <270° shows and type 18′ <Enter>
Specify next point or [Close Undo]:
Type C <Enter> (to complete the LINE command)
)
)