- Chapter Objectives
- EXERCISE 3-1 Drawing a Rectangular Conference Room, Including Furniture
- Making a Drawing Template
- Polyline
- OFFSET
- EXPLODE
- ID Point
- TRIM
- Rectangle
- CHAMFER
- FILLET
- COPY and Osnap-Midpoint
- ROTATE
- POINT
- DIVIDE
- MEASURE
- OSNAP
- MIRROR
- Osnap Modes That Snap to Specific Drawing Features
- Running Osnap Modes
- Osnap Settings: Marker, Aperture, Magnet, Tooltip
- EXERCISE 3-2 Drawing a Rectangular Lecture Room, Including Furniture
- Making Solid Walls Using Polyline and Solid Hatch
- From
- BREAK
- Polyline Edit
- HATCH
- ARRAY
- ARRAYEDIT
- Distance
- Exercise 3-3 Drawing a Curved Conference Room, Including Furniture
- Polyline
- POLYGON
- Grips—Add Vertex
- Grips—Convert to Arc
- ARRAY
- Exercise 3-4 Drawing a Conference Room Using Polar Tracking
- Polar Tracking
- Polyline Edit
- Specifying Points with Tracking
- Drawing the Chairs around the Conference Table
- Completing the Conference Room
- Using Command Preview
- Choosing Selection Options
This chapter is from the book
This chapter is from the book
This chapter is from the book
Drawing the Chairs around the Conference Table
Step 18. Zoom in on a portion of the grid so you can begin to draw the chair symbol.
Step 19. Draw a rectangle 20″ wide by 22″ deep (change chamfer distance to 0) using the LINE or Rectangle command (Figure 3-52A).
Step 20. Draw the 2″ × 10″ left chair arm using Rectangle and Tracking (Figure 3-52B).
Step 21. Use MIRROR and TRIM to place the right arm and trim the extra lines out (Figure 3-52C).
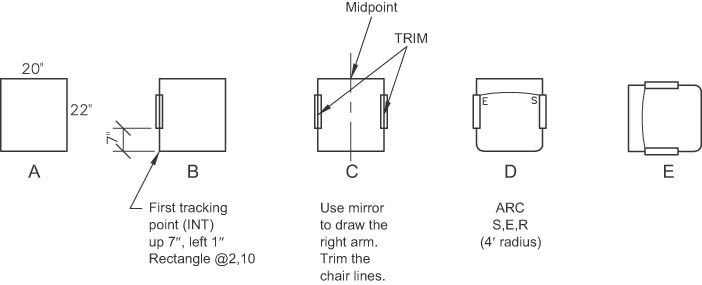
Figure 3-52 Draw the conference room chair
Step 22. Draw a 2″ fillet on the bottom two corners of the chair (Figure 3-52D).
Step 23. Use Arc-Start, End, Radius (4′ radius) to complete the chair symbol (Figure 3-52D).
Step 24. Rotate the chair to appear as shown in Figure 3-52E.
Step 25. Explode the table, and then offset the line that defines the long left side of the table 6″ to the outside of the table. Alternatively, place a line 6″ away from the edge of the table to the left, using the Line command and From option of Osnap, as shown in Figure 3-53. Use Explode at a minimum, especially when you can avoid it.
Step 26. Set the Point Style to X and size to 6″.
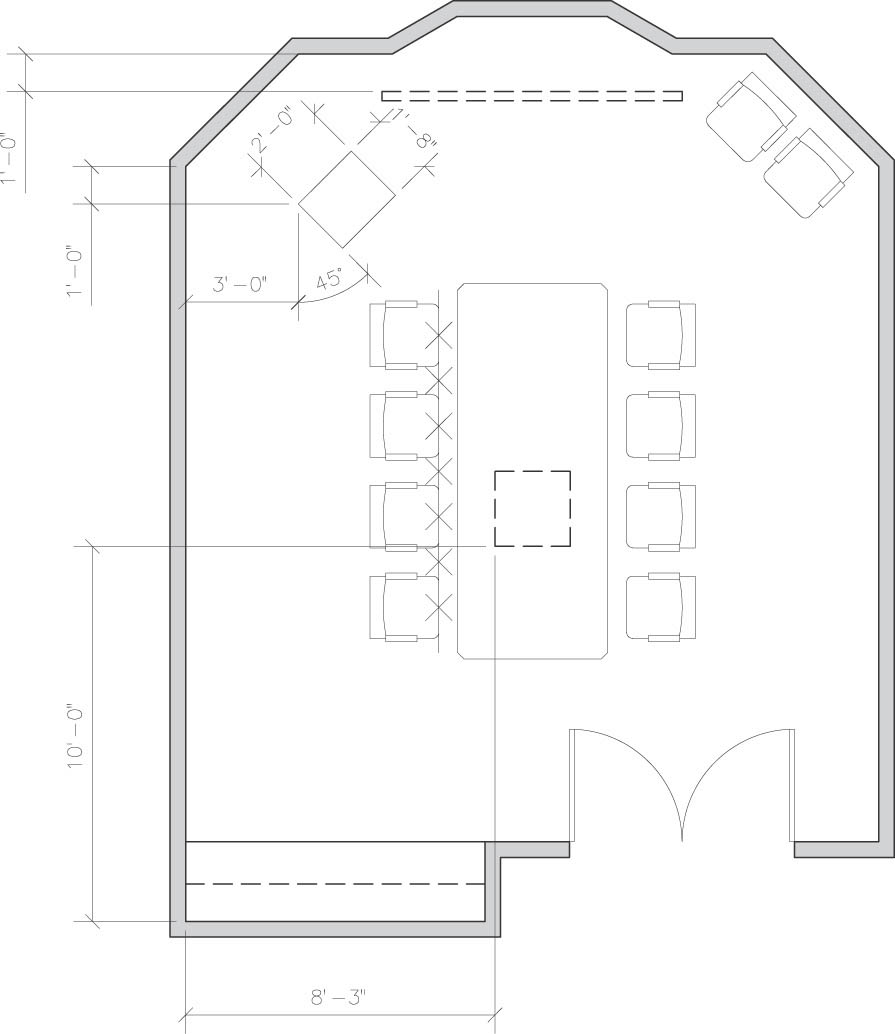
Figure 3-53 Complete the conference room
Step 27. Divide the offset line into eight equal segments.
Step 28. Use COPY and Osnap-Midpoint to pick up the chair and Osnap-Node to copy the chair on the points of the divided line (Figure 3-53).
Step 29. Use the MIRROR command to draw the chairs on the right side of the conference table (Figure 3-53).
Step 30. Set PDMODE to 1 (invisible).
Step 31. Erase the offset line used to locate the chairs.
)
)