- Chapter Objectives
- EXERCISE 3-1 Drawing a Rectangular Conference Room, Including Furniture
- Making a Drawing Template
- Polyline
- OFFSET
- EXPLODE
- ID Point
- TRIM
- Rectangle
- CHAMFER
- FILLET
- COPY and Osnap-Midpoint
- ROTATE
- POINT
- DIVIDE
- MEASURE
- OSNAP
- MIRROR
- Osnap Modes That Snap to Specific Drawing Features
- Running Osnap Modes
- Osnap Settings: Marker, Aperture, Magnet, Tooltip
- EXERCISE 3-2 Drawing a Rectangular Lecture Room, Including Furniture
- Making Solid Walls Using Polyline and Solid Hatch
- From
- BREAK
- Polyline Edit
- HATCH
- ARRAY
- ARRAYEDIT
- Distance
- Exercise 3-3 Drawing a Curved Conference Room, Including Furniture
- Polyline
- POLYGON
- Grips—Add Vertex
- Grips—Convert to Arc
- ARRAY
- Exercise 3-4 Drawing a Conference Room Using Polar Tracking
- Polar Tracking
- Polyline Edit
- Specifying Points with Tracking
- Drawing the Chairs around the Conference Table
- Completing the Conference Room
- Using Command Preview
- Choosing Selection Options
This chapter is from the book
This chapter is from the book
This chapter is from the book
ID Point
A useful command, ID Point (located under the expanded Utilities panel of the Home tab on the ribbon) allows you to locate a point on a drawing and have the position of the point displayed in coordinates. AutoCAD remembers the coordinate location of the point. You can initiate a command, such as LINE, immediately after the ID Point command has located a point on the drawing. You can enter the start point of the LINE command by using relative or polar coordinates, or you may also use direct distance entry to specify a distance from the established ID point location. Alternatively, you can use the From option of the Osnap menu (shown later in Figure 3-16 and used in Step 39) to define a reference point and then define the x- and y-offset from that point. The upcoming steps explain this further. Let’s continue with the exercise using ID Point.
ID POINT |
|
|---|---|
Ribbon/Panel |
Home/Utilities
|
Draw Toolbar: |
|
Menu Bar: |
Tools/Inquiry/ID Point |
Type a Command: |
ID |


)
Step 7. Use Zoom-Window to magnify the lower-right corner of the conference room where the door will be located.
Step 8. Use ID Point to locate a point on the drawing. Use LINE to draw the right side of the door opening (Figure 3-5), as described next:
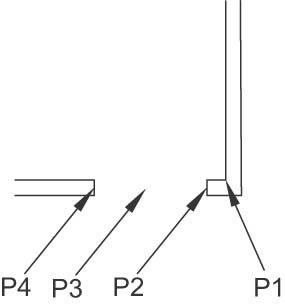
Figure 3-5 Draw the door opening
Prompt
Response
Type a command: Specify point:
ID Point (or type ID <Enter>) P1→ (with SNAP on, snap to the inside lower-right corner of the conference room, Figure 3-5)
Point: X = 20′-0″ Y = 5′-0″ Z = 0′-0″ Type a command: Specify first point:
Type L <Enter> Type @6<180 <Enter> (you have just entered polar coordinates; move your mouse so you can see where the line is attached)
Specify next point or [Undo]:
Type @5<−90 <Enter> (using polar coordinates; the line 5″) is extended downward
Specify next point or [Undo]:
<Enter>
Step 9. Offset the line 3′ to the left to form the door opening, as described next:
Prompt
Response
Type a command:
Offset (or type O <Enter>)
Specify offset distance or [Through Erase Layer] <0′-5″>:
Type 3′ <Enter>
Select object to offset or [Exit Undo]<Exit>:
P2→ (the 5″ line you just drew; Figure 3-5)
Specify point on side to offset or [Exit Multiple Undo]<Exit>:
P3→ (pick to the left)
Select object to offset or [Exit Undo]<Exit>:
<Enter>
)