Organize photos in Adobe Photoshop Elements
Get up and running with Adobe Photoshop Elements. Locate, identify, and organize your photos with tools and functions in the Organizer workspace.
This chapter is from the book
This chapter is from the book
This chapter is from the book
Digital photography can be a double-edged sword. Ironically, its greatest advantage to the amateur photographer—the ability to quickly and easily capture a large number of images, and then instantly download them to a computer—can also be its greatest source of frustration. Once hundreds of images have been downloaded, photographers find themselves faced with the daunting task of sorting through myriad files, with incomprehensible filenames, to find those dozen or so “keepers” to assemble into an album or post online for friends.
The Organizer workspace comes to the rescue with a set of tools and functions to help you locate, identify, and organize your photos.
Because we need some source material to work with, this chapter jumps right into importing photos from a digital camera and opening images already on your hard disk.
Import Images
Often, digital cameras come with their own software to help you browse and manage photos—but don’t bother. Access your camera from within Photoshop Elements and then import your images from the camera, or copy photos first to your hard drive and then open them in the Organizer.
To import images from a digital camera (Standard dialog):
Connect your digital camera to your computer using the instructions provided by the camera manufacturer, or connect a card reader containing the camera’s memory card.
If the Photo Downloader launches automatically, skip to step 3. If you don’t see the Photo Downloader, continue to step 2.
If you’re in the Home screen or in the Editor, click the Organizer button to launch the Organizer.
If you’re in the Organizer already, click Import and choose From Camera Or Card Reader (FIGURE 3.1). You can also choose File > Get Photos And Videos, or press Ctrl+G/Command+G.
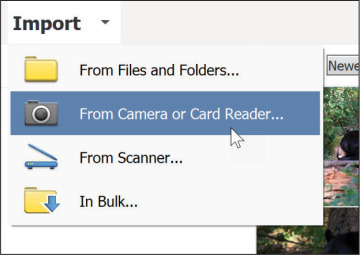
FIGURE 3.1 Choose From Camera Or Card Reader to download photos from your digital camera.
The Photo Downloader dialog opens in its Standard mode (FIGURE 3.2). For more importing options, see “To import images from a digital camera (Advanced dialog),” just ahead in this chapter.
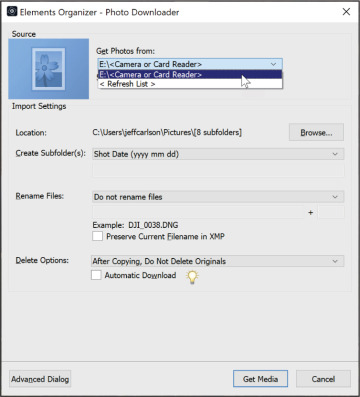
FIGURE 3.2 The Photo Downloader’s Standard dialog makes it easy to import all photos in one fell swoop.
Your camera or card will likely be selected in the Get Photos From menu, but if not, choose it.
Listed below the menu are the number of pictures, and their combined size.
By default, the Photo Downloader saves images to your Pictures folder; hold your pointer over the path listed next to Location to view the full destination if it’s truncated.
If you want to save the files to a different location, click the Browse (Windows)/Choose (macOS) button and select a folder or create a new one. Then click OK.
By default, the Photo Downloader creates new subfolders to store each batch of imported images, named according to the shot dates. From the Create Subfolder(s) menu, you can customize this behavior by choosing one of the following options:
▸ None saves the files in the folder specified by Location, normally your My Pictures folder.
▸ Custom Name creates a folder with a name that you enter (FIGURE 3.3).
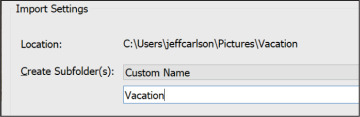
FIGURE 3.3 To make it easier to find images on disk later, specify a custom name for subfolders.
▸ Today’s Date automatically creates a folder named with the current date.
▸ Shot Date creates folders with the date the images were captured; choose your preferred date format from one of the options (FIGURE 3.4).
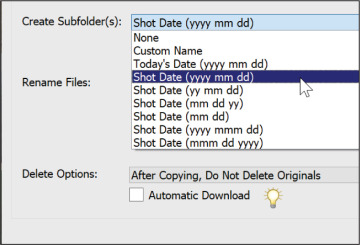
FIGURE 3.4 Choose a date format for naming subfolders with the images’ capture dates.
Choose an option from the Rename Files menu to automatically name the imported files something more descriptive than what your camera assigns.
For example, your camera’s default naming scheme is probably something like IMG_1031.JPG. With a Rename Files option selected, you can name and number a set of photos “Vacation,” for instance. Then your photos will be saved and named Vacation001.jpg, Vacation002.jpg, and so on.
In the Delete Options area, choose what happens to the files on the memory card. Just to be safe, I recommend leaving the option set to After Copying, Do Not Delete Originals, and then erase the card in-camera later.
In the Windows version of the Organizer, the Automatic Download option is useful if you want to offload pictures onto the computer without going through the Photo Downloader. Images download automatically when a camera or other device is attached. You can turn it off later in the Organizer’s preferences.
Click Get Media to download the selected images to your computer.
Your photos first appear in their own Organizer window. Click the Back button (which sometimes reads All Media, depending on context) to return to the main Organizer window (FIGURE 3.5).
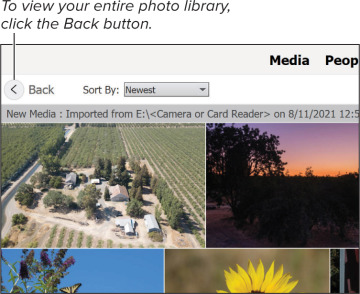
FIGURE 3.5 Photos downloaded from the camera or memory card appear in the Organizer.
)
)
)
)
)
To import images from a digital camera (Advanced dialog):
Follow steps 1 through 8 in the previous sequence, but in step 2 click the Advanced Dialog button to view the Advanced options (FIGURE 3.6).
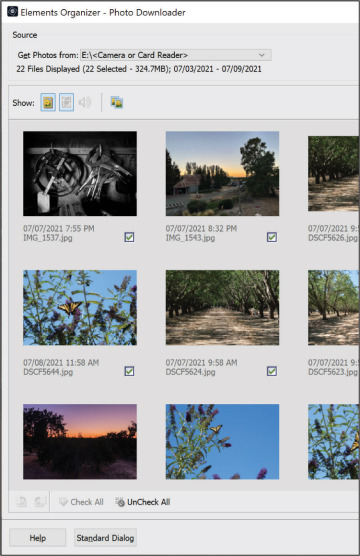
FIGURE 3.6 Preview all photos on your camera before importing them in the Advanced dialog (the left side of the window is shown here).
Click to deselect the box under any photos you do not want to import. By default, the Organizer assumes you want to download every image.
In the Advanced Options area, choose to enable or disable the following (FIGURE 3.7):
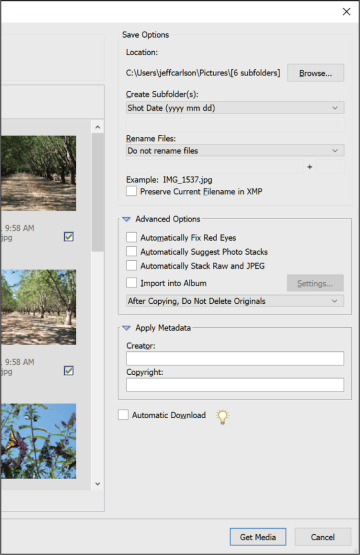
FIGURE 3.7 Further customize the importing process in the Advanced dialog (right side of window here).
▸ Automatically Fix Red Eyes attempts to find and correct red eye problems in your photos as they’re downloaded.
▸ Automatically Suggest Photo Stacks groups similar photos together for easy organization and review later (see “Use Stacks to Organize Similar Photos,” later in this chapter).
▸ Automatically Stack Raw And JPEG pairs both image files captured when your camera is set to Raw+JPEG.
▸ Import into Album assigns the photos to a photo album you’ve previously set up (see “Use Albums to Arrange and Group Photos,” later in this chapter).
Type your name (or the name of whoever took the photos) and a copyright notice in the Apply Metadata fields. This text is embedded in the image files (but not visible in the image itself).
To rotate an image as it’s imported, select it and click the Rotate Left or Rotate Right button at the lower-left corner (FIGURE 3.8).
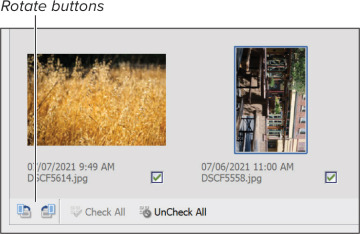
FIGURE 3.8 Rotate images during import so you won’t have to do it later.
)
)
)
To import images from files or folders:
In the Organizer, click Import and choose From Files And Folders.
In Windows, if you insert media that contains photos, you may be asked what action you’d like to take (if you haven’t specified it already). Click the icon labeled Organize And Edit Adobe Elements 2022 Organizer, which opens a dialog to locate files.
Select the files you want to import (FIGURE 3.9); Shift-click to select a consecutive range of files, or Ctrl-click/Command-click to select nonconsecutive files.
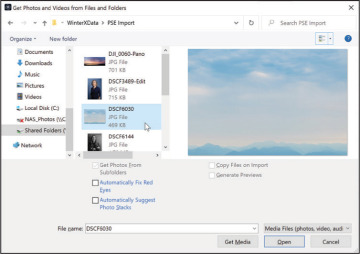
FIGURE 3.9 Import images from other areas of your hard disk or from removable media.
If the images are stored on removable media and you want to import only low-resolution versions, disable the Copy Files On Import option and enable the Generate Previews option (see the sidebar for more information).
As in the Advanced dialog mentioned on the previous pages, select from the processing options below the preview.
Click the Get Media button to import the photos. If the photos already include keyword tags, you have the option to import them.
)
WORKING WITH OFFLINE IMAGES
With removable media, you have the option of importing just a low-resolution file to the hard disk. This feature can save hard disk space, especially if lots of files are stored on a shared network drive or on several CDs or DVDs. Importing them as offline images allows you to view and track your entire media catalog.
Offline images are designated with an icon in the upper-left corner of the image in the Organizer (FIGURE 3.10). You can apply tags, build collections, and perform other tasks. However, if you want to edit the image, the Organizer asks you to connect the original media. If it’s not available, you can still edit the low-resolution proxy, but the results won’t look good. Once you make the original available again, Elements copies the source image to your catalog as an online image.
)
FIGURE 3.10 Offline images are denoted by a corner icon.
To import images using Watch Folders:
You can specify one or more folders that the Organizer watches in the background for new files. Choose File > Watch Folders.
Click Add and navigate to the folder you wish to watch (FIGURE 3.11). Repeat for as many folders as you’d like.
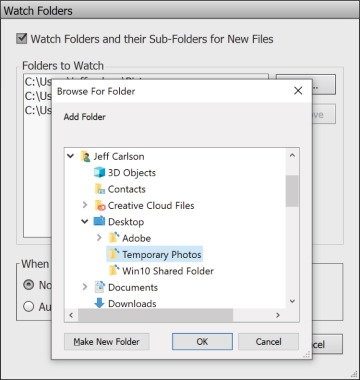
FIGURE 3.11 The Organizer can keep an eye on one or more folders and automatically import photos when they’re added.
Select an action under When New Files Are Found In Watched Folders; the Organizer can notify you when files are found or add them to the library automatically.
Click OK when you’re done.
When you add photos to your watched folder, you’re asked if you want to import them (if you opted to be notified in step 3). Click Yes to add the photos, which are moved from the watched folder to the directory where the Organizer stores your catalog.
)
To scan an image into the Organizer (Windows only):
Connect a scanner to your computer using the instructions provided by the scanner manufacturer.
In the Organizer, click the Import button and choose From Scanner. Or, you can choose File > Get Photos And Videos > From Scanner (or press Ctrl+U).
Choose your scanner software from the Scanner menu.
Select an image format and quality level.
Click OK. The Organizer hands off the actual scanning duties to the scanner’s software for you to complete the scan.
When you complete the scan and exit the scanner’s software, the image is imported into your catalog.
![]() VIDEO 3.1
VIDEO 3.1
Work with HEIC/HEIF Images in Windows