- Getting started
- Lightroom is your digital notebook
- The import process
- Importing photos from a digital camera
- Importing images from a hard disk
- Importing via drag and drop
- Evaluating photos before importing
- Images that are already imported
- Importing to a specific folder
- Importing from a watched folder
- Tethered shooting
- Viewing imported photos in the work area
- Review questions
- Review answers
This chapter is from the book
This chapter is from the book
This chapter is from the book
Importing photos from a digital camera
While this next section outlines the process of importing from a camera pretty clearly, I recommend that you try this with some sample images of your own. Take your camera and make 10–15 images of anything, really, just have something on the memory card that we can use for the import process.
The first step is to ensure the Lightroom preferences are set so that the import process is triggered automatically whenever you connect your camera or a memory card to your computer.
Choose Lightroom Classic > Preferences (macOS)/Edit > Preferences (Windows). In the Preferences dialog box, click the General tab. Under Import Options, select Show Import Dialog When A Memory Card Is Detected.
Some cameras generate folder names on the memory card. If you don’t find these folder names helpful for organizing your images, select Ignore Camera-Generated Folder Names When Naming Folders. You’ll learn more about folder naming options later in this lesson.
Click the Close button or OK to close the Preferences dialog box.
Connect your digital camera or card reader to your computer, following the manufacturer’s instructions.
This step may vary depending on your operating system and the image management software on your computer:
In Windows, if the AutoPlay dialog box or settings pane appears, select the option to open image files in Lightroom Classic. If you wish, you can set this option as the default.
If you have more than one Adobe image management application—such as Adobe Bridge—installed on your computer and the Adobe Downloader dialog box appears, click Cancel.
If the Import dialog box appears, continue to step 5.
If the Import dialog box does not appear, choose File > Import Photos And Video, or click the Import button below the left panel group.
If the Import dialog box appears in compact mode, click the Show More Options button at the lower left of the dialog box to see all of the options in the expanded Import dialog box.
The top panel of the Import dialog box—visible in both the compact and expanded modes—presents three steps in the import process, arranged from left to right:
Selecting the source location of the images you wish to add to your catalog.
Specifying how you want Lightroom to handle the files you’re importing.
Setting the destination to which the image files will be copied, with the option to choose any develop presets, keywords, or other metadata that you would like applied to your photos as they are added to your catalog below this panel.
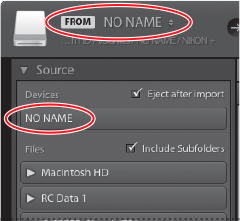
Your camera or memory card is now shown as the import source in the FROM area at the left of the top panel and under Devices in the Source panel at the left of the Import dialog box.
Depending on your computer setup, it’s possible that your camera’s memory card will be recognized as a removable storage disk. If this is the case, you may see some differences in the options available in the Import dialog box, but it shouldn’t affect anything.
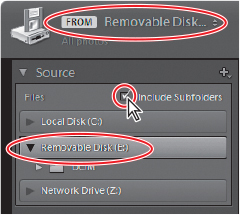
If your memory card is listed as a removable disk—rather than a device—in the Source panel, click to select it from the Files list and make sure that Include Subfolders is selected.
From the import type options in the center of the top panel, choose Copy, so that the photos are copied from your camera to your hard disk and then added to your catalog, leaving the original files on your camera’s memory card.
Lightroom displays a brief description of the action that will be taken for whichever option is currently selected.
Move your pointer over each of the options shown in the bar across the top of the Preview pane to see a tool tip describing the option. For this exercise, leave the default All Photos option selected and don’t click the Import button yet.
)
)
)
)
A checkmark in the upper-left corner of an image cell indicates that the photo will be imported. By default, all of the photos on your memory card will be selected for import. If you do not want to import an image, you can exclude it by clicking its checkbox to deselect it.
You can select multiple images and then change all of their checkmarks simultaneously. To select a contiguous range of images, select the first image in the range by clicking the thumbnail or the surrounding image cell, and then hold down the Shift key and select the last image in the series. To select individual additional images, Command-click/Ctrl-click their thumbnails. Click the checkmark of any selected image to change the import status for the entire selection.
Notice that at the top of the import dialog, Copy is selected rather than Add. Keep in mind that, during the import process, Lightroom does not actually import the image files themselves; it only adds entries to the Lightroom catalog to record their locations. Because you’re copying the files, you’ll need to specify a destination.
If you selected Add rather than Copy, you wouldn’t have to specify a destination folder; the photos would stay where they are already stored. However, because memory cards are expected to be erased and reused, they should not be the permanent home for your pictures. Thus, you’re not offered the Add and Move options when you import from a camera—Lightroom expects to copy your photos from your memory card to a more permanent location.
The next step, then, is to specify a destination folder to which your photos should be copied. This is the time to give some thought to how you intend to organize your photos on your hard drive. For now, leave the Import Photos dialog box open; you’ll choose a destination folder and deal with the rest of the import options in the following exercises.
Organizing your copied photos in folders
By default, Lightroom tries to organize your images in the Pictures folder. You can choose any other location, but as a general rule, it is a good idea to keep all of your images organized into one location—no matter where that is. Nailing down that location (or workflow) early will help a ton in finding missing images (we’ll talk about the workflow later in the book).
Before beginning the lessons in this book, you created a folder named LRC2022CIB inside your Users/username/Documents folder on your computer. This folder already contains subfolders for your LRC2022CIB Catalog file and for the image files used for the lessons in this book. For the purposes of this exercise, you’ll create another subfolder inside the LRC2022CIB folder as the destination for the images that you import from your camera’s memory card:
In the right panel group of the Import dialog box, collapse the File Handling, File Renaming, and Apply During Import panels; then, expand the Destination panel.
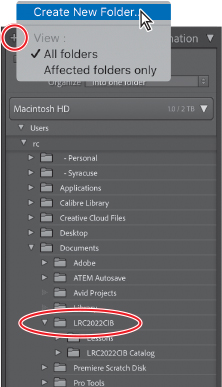
In the Destination panel, navigate to and select your LRC2022CIB folder; then, click the plus sign (+) button at the left of the Destination panel header and choose Create New Folder from the menu.
In the Browse For Folder/Create New Folder dialog box, navigate to and select your LRC2022CIB folder, if it’s not already selected. Click the New Folder button, type Imported From Camera as the name for your new folder, and then click Create (macOS) or press Enter (Windows).
Make sure the new Imported From Camera folder is selected in the Browse For Folder/Create New Folder dialog box, and then click the Choose/Select Folder button to close the dialog box. Note that the new folder is now listed and selected in the Destination panel.
The name of the new destination folder also appears in the TO area at the right of the top panel of the Import dialog box.

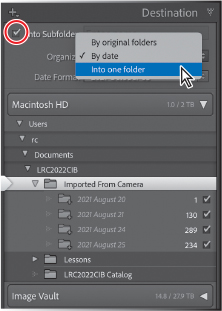
The Organize menu, near the top of the Destination panel, offers various options to help you organize your photos into folders as you copy them onto your hard disk:
Into One Folder With the current settings, the images would be copied into the new Imported From Camera folder. Instead, you could select Into Subfolder to create a new subfolder for each import from your camera.
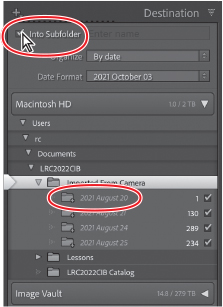
By Date: [Date Format] These options are all variations on organizing your photos by capture date. Your images would be copied into one or more subfolders, depending on your choice of date format. Choosing the format “2021/10/03” for example, would result in one folder per year, containing one folder per month, containing one folder per day for each capture date. Or, choosing 2021 October 03 simply creates one folder per date, as shown in the illustration at the right.
Think about which system of folder organization best suits your needs before you import photos from your camera, and then maintain that system for all your camera imports.
For the purposes of this exercise (and what I recommend to everyone as a default), choose Into One Folder from the Organize menu.
Select the Into Subfolder option at the top of the panel, type Lesson 2 Import in the adjacent text box as the new subfolder’s name, and press Return/Enter. The subfolder should then appear inside the folder you chose in the bottom section of the Destination panel.
CREATING IMPORT PRESETS
When you import photos on a regular basis, you’ll probably find that you’re setting up the same configurations of options over and over. Lightroom Classic enables you to streamline your import workflow by saving your preferred settings as import presets. To create an import preset, set up your import in the expanded Import dialog box, and then choose Save Current Settings As New Preset from the Import Preset menu below the Preview pane.
)
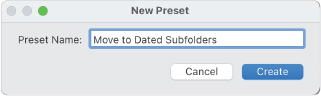
Type a descriptive name for your new preset, and then click Create.
Your new preset will include all of your current settings: the source, import type (Copy as DNG, Copy, Move, or Add), file handling and renaming options, develop and metadata presets, keywords, and destination. You might set up one preset to move photos from a memory card to your computer, and another preset to import from a memory card to a network-attached storage device. You could even create separate import presets tailored to the characteristics of different cameras, so you can quickly apply your favorite noise reduction, lens correction, and camera calibration settings during the import process, saving yourself time in the Develop module later.
USING THE IMPORT DIALOG BOX IN COMPACT MODE
Once you’ve created the presets you need, you can speed up the process even more by using the Import dialog box in compact mode, where you can use your import preset as a starting point and then change the source, metadata, keywords, and destination settings, as required.
)
Backup strategies
Your next choice is whether to make backup copies of the images from your camera at the same time as Lightroom creates primary copies in the location you’ve just specified and adds them to the library catalog. For some, it’s a good idea to create backup copies on a separate hard disk or on external storage media so you don’t lose your images if your hard disk fails or you accidentally delete them.
In the right panel group of the Import dialog box, expand the File Handling panel and select the Make A Second Copy To option.
Click the small triangle to the right and select Choose Folder to specify a destination for your backup copies.
In the Browse For Folder/Choose Folder dialog box, navigate to the folder in which you wish to store the backup copies of your images, and then click Choose/Select Folder.
)
Keep in mind that the purpose of this backup is mainly as a precaution against loss of data due to disk failure or human error during the import process; it’s not meant to replace the standard backup procedure you have in place—or should have in place—for the files on your hard disk.
For the most part, I don’t use this backup option, but rely instead on a combination of my computer’s backup system (Time Machine) and the use of my network-attached storage device. This is part of my personal workflow strategy, which I’ll share with you and explain later on in the book.
Renaming files as they are imported
The cryptic filenames created by digital cameras are not particularly helpful when it comes to sorting and searching your photo library. Lightroom can help by renaming your images for you as they are imported. You can choose from a list of predefined naming options or create your own customized naming templates.
In the right panel group of the Import dialog box, expand the File Renaming panel and select Rename Files. Choose Custom Name - Sequence from the Template menu, type a descriptive name in the Custom Text box, and then press the Tab key on your keyboard. A sample name at the bottom of the File Renaming panel shows how your settings will be applied for the first image imported. You can enter a number other than 1 in the Start Number text box; this is useful if you’re importing more than one batch of images from the same shoot or series (often from multiple memory cards).

Click the small triangle to the right of the Custom Text box; your new text has been added to a list of recently entered names. You can choose from this list if you import another batch of files that belong in the same series. This not only saves time and effort, but helps you ensure that subsequent batches are named identically. To clear the list, choose Clear List from the menu.
Choose Custom Name (x of y) from the Template menu. Note that the sample name at the bottom of the File Renaming panel is updated to reflect the change.
Choose Edit from the Template menu to open the Filename Template Editor. Choose Custom Name - Sequence from the Preset menu.
In the Filename Template Editor dialog box, you can set up a filename template that makes use of metadata information stored in your image files—such as filenames, capture dates, or ISO settings—adding automatically generated sequence numbers and any custom text you specify. A filename template includes placeholders—or tokens —that will be replaced by actual values during the renaming process. A token is highlighted in blue on macOS and framed by curly brackets on Windows.
You could rename your photos vacation_images-20211004-0001, and so on, by setting up a filename template with a custom text token, a date token, and a four-digit sequence number token, separated by typed hyphens, as shown at the right. Let's remove the Custom Text token by selecting and deleting it.


Choose Save Current Settings As New Preset from the Preset menu at the top.
Type Date and 4 Digit Sequence for your preset name, click Create, and then click Done.
Despite all of the options available for renaming your images during the import process, there’s only so much information you can squeeze into a single filename. While you may be tempted to be descriptive in your filenames, consistency is key for your archive, and the more streamlined you keep it, the better. This simple organization of dates and sequences in the actual files will pay off in speed and efficiency. Lightroom’s strength is in its ability to find your images through the use of things like metadata, keywords, and collections. In these areas, you can be a lot more descriptive than the limited confines of the filename.
TIPS FOR NAMING YOUR FILES AND FOLDERS
We’ve talked about the importance of naming your files and folders to better organize your photos, and I gave you an example of how to name them. Here are some tips and suggestions for renaming:
Name your files and folders similarly to make it easier to find the photos you want later.
Start the name of every file with the year, then add a month and day.
Use lowercase when naming your files and folders.
If you believe it is necessary, add a descriptive word about the shoot after the date, and keep it as short as possible.
If you need to add a space in your name, use an underscore (_) instead of a space.
At the end of the filename, add C1, C2, C3, and so on, for card 1, card 2, card 3. This helps when you have a shoot that spans multiple memory cards.

For example, if I want to import images that I took of my family on October 4, 2021, my folder would be named 20211004_family. If I only shot one card during that shoot, the filename would be 20211004_family_c1_sequential file number. Is the filename long? Yes. Does it give you all of the information about the shoot? Absolutely.
Here’s the practical reason for adding the C1 to your filenames: Every now and then, during a Lightroom import, you will run into a file that looks like the one here. While it may make for an interesting art project, it’s actually something a lot more sinister. It is a corrupt picture, a quick sign that the card you used may not be as reliable as you thought. Memory cards, like everything else, can fail over time, and you cannot afford to lose an important shoot because of it. If you are importing from multiple cards, how do you tell which one is the bad one?

As soon as I purchase a memory card, I make it a point to label it using those C numbers. Then, I add that C number to the filename. The moment I see a potential problem with an image, I can look at the name and know exactly which card failed, so I can take that card out of rotation…and give it to a friend. Kidding! Simply labeling your memory cards and adding that C1 or C2 to your filenames can go a long way to helping you troubleshoot. Anal? Yes. Vital? Absolutely.
You’ll learn about working with metadata, keywords, and collections in the following exercises and in Lesson 4, “Managing Your Photo Library.”
For now, click Import if you wish to bring your photos into the LRC2022CIB catalog or Cancel to close the Import dialog box without importing any images.
You have now completed this exercise on importing photos from a digital camera or a memory card. You’ll learn about the other options that are available in the Import dialog box in the exercises to follow.