- Chapter Goals
- Understanding Perspective
- Using Photomerge Guided Edits
- Matching Color
- Adding Subjects in Grass
This chapter is from the book
This chapter is from the book
This chapter is from the book
Using Photomerge Guided Edits
In the Guided Edits panel, there are six separate guided edits you can choose from for compositing images. That should give you an idea for how important photo compositing is.
The Guided Edits for Photomerge can provide for some quick photo compositing. In some cases, the final edits are very satisfactory. In other cases, you might want to also do some manual edits when merging photos. However, sometimes you may want to avoid a Guided Edit altogether and perform all steps manually. It all depends on the images you use and the results you want.
Using Photomerge Compose
The first Guided Edit is the Photomerge Compose item. This Guided Edit walks you through steps to bring objects from one photo into another photo. Open two files in the Photo Editor. In the Photo Bin, you should see only two photos.
Open the Guided Edit panel and click the Photomerge tab. Click the first item where you see Photomerge Compose. The first screen that opens asks you to drag and drop the file from which you intend to extract a subject or object.
Unfortunately, selections in the Guided Edit are very crude. You can muddle through the options for selecting and extracting a subject, but in the Photo Editor, you have so many more refined tools and methods for creating selections and extracting subjects. All in all, you’re better off following manual methods than using this Guided Edit for compositing images.
Using Photomerge Exposure
You can use Photomerge Exposure in two ways. First, you can bring two totally different photos together in a composite and match exposures. The second option enables you to merge two or more identical photos. This feature is similar to merging HDR photos in Photoshop.
Merging Different Photos
Let’s first take a look at merging two completely different photos. As a general rule, I wouldn’t recommend using the Guided Edit for this kind of merge. You can match exposures much better manually than when using the Guided Edit.
You have an option for choosing Automatic or Manual. If you have two completely different photos, the Automatic setting lays one photo on top of the other and creates a double exposure look.
If you choose Manual, you can cut out one photo and merge it with the target document. In the Photomerge Exposure panel, click Manual at the top of the panel. Click the Pencil tool and draw around the object you want to add to another photo. You don’t have to paint inside the object. Just draw an outline around it.
Painting the image for the cutout is very crude. You can do so much better with selection tools in the Photo Editor. For compositing images where you take a cutout from one image and add it to another, it’s best to avoid this Guided Edit for compositing.
You may, however, find a different benefit for using this Guided Edit. Let’s say you have two very different photos. You don’t want to superimpose them; you just want to match the brightness in one image with another image. As a workaround, you could offset the photos so they don’t overlap.
As an example, take a look at Figure 8.12. This photo has a reasonably good exposure, and the brightness values appear quite nice. Now look at Figure 8.13. This photo is a little dark, and the overall exposure isn’t quite as good as the photo in Figure 8.12.
)
FIGURE 8.12 Photo with a reasonably good exposure.
)
FIGURE 8.13 Photo that’s a bit underexposed.
If I take both these photos and bring them into the Photomerge Exposure edit, the final result is two photos superimposed. But I don’t want to merge the photos; I simply want to match the exposure,
To set up the files, first size them to the same resolution and physical size by using the Image > Resize > Image menu command. After you size the photos to the same size, resize the canvas area. On one photo, you want to add more canvas (double the width of the photo) to the right. On the other photo, you want to add the same amount of canvas area to the left. After I’ve added more canvas area to the photos, they look like Figure 8.14.
)
FIGURE 8.14 More canvas area added to the two photos.
As you might suspect, after using the Guided Edit, when the photos are merged, they won’t superimpose one on top of the other. Each photo merges with the empty space added by resizing the canvas.
With the two photos open in the Photo Editor, click the Guided tab to open the Guided Edits. Click the Photomerge tab and click Photomerge Exposure. As you can see in Figure 8.15, the photos appear adjacent to each other. Use the tools in the Photomerge Exposure panel to refine the brightness. When you are finished editing, click Next and click Expert to open the merged photos in the Photo Editor. At this point, if you want the photos saved separately, duplicate the image and crop each one to retain the image you want to save.
)
FIGURE 8.15 Photos appearing adjacent to each other in the Guided Edit Exposure panel.
As you can see in Figure 8.16, the photo on the right more closely matches the overall brightness of the photo on the left. At this point, you might add some refinement by adding a Levels Adjustment layer to refine the brightness.
)
FIGURE 8.16 Three photos shot for creating an HDR image.
If you need a quick fix for matching exposure between documents, this Guided Edit may be helpful.
Merging Photos for an HDR Effect
Remember, an HDR photo is one derived from three or more exposures of the same scene. You use your camera to shoot a scene underexposed, overexposed, and normal exposure. The photos can then be merged using the Photomerge Exposure Guided Edit. For this kind of edit, you don’t have a manual method to achieve the same result. If you shoot three exposures of the same scene, you must use this Guided Edit to merge the photos when using the Photo Editor.
Figure 8.16 shows the three photos I use in this example. You can use five or seven photos. Whatever bracketing your camera accommodates is what you can use to merge the photos. Typically, three photos work quite well for most images.
In Figure 8.16, the photo on the left was shot with an average exposure. The middle photo was an overexposed photo capturing as much detail as possible in the highlights. The photo on the right was underexposed to capture as much detail as possible in the shadows.
With the three photos open in the Photo Editor, click the Guided Edit tab. Click Photomerge Exposure.
When you click Photomerge Exposure, the Guided Edit merges the three photos. The default option is Automatic, and this option is typically your best choice for merging photos for an HDR effect.
The Guided Edit panel, shown in Figure 8.17, provides some options for tweaking the composite image. When merging photos for an HDR effect, it’s best to avoid using any settings in the Guided Edit panel. Click Next (see Figure 8.17). On the next screen, click Expert to return to the Expert editing mode.
)
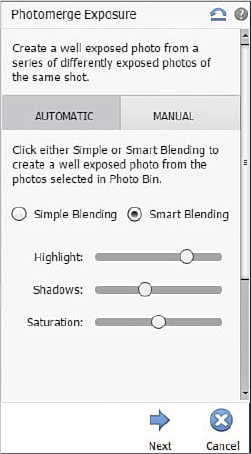
FIGURE 8.17 The Photomerge Exposure panel.
You may want to tweak the overall exposure using a Levels Adjustment Layer and add some sharpening.
Figure 8.18 shows the photo shot with an average exposure. Figure 8.19 shows the same photo shot as an HDR and merged using the Photomerge Exposure Guided Edit. Notice the clouds have more detail in the HDR photo, and you also find much more detail in the shadows in the HDR photo.
)
FIGURE 8.18 The merged HDR files.
)
FIGURE 8.19 The final HDR image after editing the merged files in the Camera Raw Editor.
Photomerging a Group Shot
When taking group shots, you often find one person smiling in one photo and the same person frowning in another photo, one person looking away from the others, or one individual who has their eyes open in one photo and closed in another photo. An easy fix to these kinds of problems is to use the Photomerge Group Shot Guided Edit. It’s not perfect and sometimes doesn’t work well, but in some cases, you may find it useful.
Figure 8.20 shows a nice photo of a group of people. However, the man on the left is not looking at the individual who is talking.
)
FIGURE 8.20 Group photo with one individual who’s not looking at the speaker.
If you have a second photo showing the individual looking in a different direction more consistent with the other subjects, you can merge the files. Use the second image as your final photo. Move the subject with the face forward from another photo to the final.
Open both images in the Photo Editor. Click the Guided Edit tab and click on the Photomerge Group Shot Guided Edit thumbnail. Drag the final image to the right placeholder. Select in the Photo Bin the image with the correct posture. Use the Pencil tool to draw around the subject in the left image in the Photo Bin. You can change the size of the pencil, and you can erase any unwanted selection. After you draw with the Pencil tool, you see a dynamic preview of the results, as shown in Figure 8.21.
Click Next and either save the photo or open it in Expert mode. In Figure 8.21, you can see the results of merging the photos. However, before I end this editing session, there’s one more problem with the photo on the right. I need to do something about that sky. As you can see in the original image in Figure 8.20, the highlights in the sky are blown out.
)
FIGURE 8.21 Draw around the correct pose (left) to replace it in the final image (right).
Editing Skies
Quite often you can find photos that look good with foregrounds, but there are problems with the highlights, particularly with skies. You can see that the photo in Figure 8.20 has no detail in the sky. I need to add some color in the sky and perhaps add some clouds. Making these edits is quite simple.
You can edit a sky in a few different ways. You can copy a photo with a sky that will work well with your target image, or you can add a filter to create artificial skies.
Create a selection of the sky and press Ctrl/ + J to create a new layer of just the selected area. Once you have a selection, you can copy a sky from another photo and choose Edit > Place into Selection.
If using a filter, click the foreground color swatch to open the Color Picker and choose a blue tone. Make sure you don’t choose a highly saturated color. Click OK to return to the Document Window.
Choose Filter > Render > Clouds. Look over the results. Quite often, you may find the saturation of the sky color is too strong. If you create a layer, you can easily fix the problem of the oversaturated sky by moving the Opacity slider in the Layers panel to reduce the opacity in the layer.
The advantage you have with copying and pasting a sky photo is that you can easily see a preview of the sky. With a filter, you need to experiment and try different iterations of the clouds image.
In Figure 8.22, I copied a sky and pasted it into the target document.
)
FIGURE 8.22 The final image after edits to the sky.
Photomerging a Panorama
This Guided Edit is used to stitch photos together from multiple photos to create a panorama photo. Before using the Guided Edit, you should make adjustments to the photos you’ll be using to make preliminary adjustments for brightness, contrast, and color. You can add additional edits on the merged photo after composing in the Photomerge Guided Edit.
Editing Panorama Images
If you shoot Raw images, open all photos to be merged in the Raw Editor and synchronize edits. Make adjustments for Exposure, Contrast, Highlights, Shadows, Vibrance, and Saturation. Open the photos in Expert mode in the Photo Editor and choose Image > Mode > 8 Bits/Channel to reduce bit depth for each photo. Save the files; then open the Guided Edits and use the Photomerge Panorama option.
Open all images in the Photo Editor and click the Photomerge Panorama thumbnail in the Guided Edit panel. When you arrive at the panel, your first choice is to decide what setting you want. You can choose Auto Panorama or click the down arrow to open a pop-up menu and make a choice from the available options. First, choose the Auto Panorama (see Figure 8.23). If you don’t like the results, you can choose another option from the pop-up menu.
)
FIGURE 8.23 Photomerge Panorama panel with Auto Panorama selected.
You can make some choices for Settings below the panorama layouts. Among your choices is the Content-Aware Fill Transparent Areas. You can try checking this box to see how well the content-aware fill handles the transparent areas. If you don’t like the results, you can take care of the fills later when you open the image in the Photo Editor.
When you click Create Panorama at the bottom of the Photomerge Panorama panel, Elements goes about automatically creating layers and masks and merges the photos into a composite image. After merging the photos, a dialog box opens and prompts you to confirm whether you want to automatically fill edges with content-aware fill. If you click No, the merging process completes, and the Photomerge Panorama panel offers options for sharing or opening the file. Click Expert in the panel, and the file opens in Expert mode. You see something similar to Figure 8.24, where the Layers, Layer Masks, and composite image are shown. As you can see, I chose not to fill the transparent areas.
)
FIGURE 8.24 Composite image without edges filled.
Filling in Edges
You can choose to autofill the edges when you create a composite using the Photomerge Panorama Guided edit. Autofilling edges works quite well in many cases. However, if there are some slight adjustments you need to finesse, it’s much easier to control the fills after creating the composite without autofilling the edges.
If you choose to manually fill edges, start by selecting one part of the photo to work on. This could be half or quarter of the photo. If the photo is very large, Elements will perform slowly, and you may need to wait some time before it finishes filling the edges. For this example, I chose to select half the photo edges to perform the fills in two steps.
Before selecting any area, open the Layers panel menu and choose Flatten Image. Save the flattened image. This reduces the memory, and you can perform steps much faster when editing a smaller photo.
Select the area you want to fill using the Magic Wand or Quick Selection tool. If you want to take the fills-in steps, select just a part of the photo. After making a selection, choose Select > Modify > Expand. Enter 5 in the Expand By text box to expand the selection 5 pixels. You need to grab some of the image edges so Content-Aware Fill will have a reference for the area to clone.
Press Shift + Backspace/Delete to open the Fill Layer dialog box. Choose Content-Aware from the Use drop-down list, as shown in Figure 8.25.
Notice in Figure 8.25 that only half the photo is selected. Click OK in the Fill Layer dialog box and the edge is filled with a clone sample of the edges.
)
FIGURE 8.25 Fill selections using content-aware fills.
Check the results. If the fill looks okay, move on to another part of the photo. Continue filling the edges. If you need to polish up an edge, you might try using the Clone Stamp tool. In Figure 8.26, you can see the final result of creating a panorama image.
)
FIGURE 8.26 Final panorama image after using the Photomerge Panorama Guided Edit.
Other than the Panorama Exposure for HDR photos and the Photomerge Panorama, it may be a trade-off as to whether you want to use some of the other Photomerge Guided Edits. The Scene Cleaner and Group Shots can be helpful for some quick edits. Just be certain that the perspective matches in all photos you merge. For more on matching perspectives, see the section “Understanding Perspective” earlier in this chapter.