
This chapter is from the book
This chapter is from the book
This chapter is from the book
Edit Clips
Once clips are marked, editing determines their order in the timeline.
197. The Magnetic Timeline Is Not Evil!
It’s incredibly helpful—once you learn what it does.
Nothing has been so vilified in Final Cut Pro as the magnetic timeline. But once you understand it, it becomes an amazing tool. Prior to Final Cut Pro (X), a big problem in all video editing systems was very quick flashes of black caused by one to two frame gaps in the timeline. These were impossible to see unless you were zoomed way in to the timeline. These were so bothersome that Final Cut Pro 7 even added a special shortcut to find and remove these gaps.
Final Cut Pro (X) fixed that. When clips were edited into the Primary Storyline, which is the black channel in the middle of the timeline, they would automatically shift position so that edit points always touched. This made editing faster because you no longer needed to perfectly position the playhead or skimmer before making the edit.
Clips edited to higher layers (Apple prefers not to call these tracks) always connect to clips in the Primary Storyline. This speeds editing because if you move, say, a talking head clip in the Primary Storyline, all the B-roll and sound effects clips connected to it move in sync with it.
These two operational changes make editing a lot faster and more secure than on any other NLE. However, as you’ll learn in this chapter, there are many techniques that temporarily suspend this magnetic behavior to create exactly the edits you have in mind.
198. Final Cut Pro Supports Four Edit Options
Append, insert, overwrite, and connected.
Final Cut supports four types of edits: append, insert, overwrite, and connected. These four edits determine how and where clips are edited from the Browser into the timeline.
Append (shortcut: E). This places the selected Browser clip, or clips, into the Primary Storyline at the end of all existing clips in the timeline. It ignores the position of the playhead or skimmer. Append edits do not alter, move, or replace any existing clips.
Insert (shortcut: W). This inserts the selected Browser clip, or clips, into the Primary Storyline at the position of the playhead (skimmer) and pushes all clips to the right of the edit point downstream for the duration of the inserted clip. Insert edits do not alter or replace any existing clips.
Overwrite (shortcut: D). This edits the selected Browser clip, or clips, into the Primary Storyline at the position of the playhead (skimmer) and replaces whatever clips are currently in the Primary Storyline for the duration of the incoming clip. Overwrite edits do not move any existing clips.
Connected (shortcut: Q). This places the selected Browser clip, or clips, onto the next highest layer above (for video) or below (for audio) the Primary Storyline such that no existing clips are replaced, overwritten, or moved.
199. Editing Icons, Tools, and Shortcuts
Yes, you can drag a clip, but these shortcuts are faster!
When it comes time to move a shot from the Browser into the timeline, you have three choices:
Drag it.
Use an editing icon/button.
Use a keyboard shortcut.
Dragging works. It’s easy, but it isn’t very precise, and it isn’t very fast.
FIGURE 4.5 illustrates the five editing icons (yup, one is hidden). The numbers for the icons correspond with the callout numbers in FIGURE 4.5:
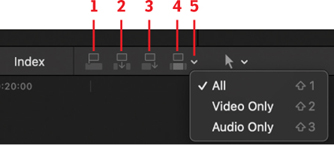
FIGURE 4.5 Editing icons: 1. Connected, 2. Insert, 3. Append, 4. Overwrite, 5. Menu.
Connected edit
Insert edit
Append edit
Overwrite edit
Chevron menu to select between editing audio only, video only, or both
The chevron menu remains set until you change it. It doesn’t automatically reset.
Although these editing icons are helpful to editors who are new to the program, my preference is shortcuts. I’m a keyboard junkie. These shortcuts mean I can keep one hand on the mouse and the other on the keyboard while editing.
E. Append edit.
W. Insert edit.
D. Overwrite edit.
Q. Connected edit.
Shift+1. Edit clip audio and video.
Shift+2. Edit clip audio only.
Shift+3. Edit clip video only.
200. What’s a Connected Clip?
A connected clip is any clip not in the Primary Storyline.
Either a clip is in the Primary Storyline or it is connected to it. These connections are visible as light blue dots on top of the Primary Storyline clip representing the In of the connected clip. There is no limit to the number of clips connected to a Primary Storyline clip, nor the number of layers in a project.
The big advantage to connected clips is that they always stay in sync with the Primary Storyline clip. This means that if you have B-roll, sound effects, or even a music cue connected to a Primary Storyline clip, then decide that the Primary Storyline clip would work better elsewhere in the project, simply move the Primary Storyline clip. All the clips connected to it tag along without losing sync.
201. What’s a Clip Connection?
All clips are connected vertically, but you can move the connection.
All clips not on the Primary Storyline are connected to the Primary Storyline clip; see FIGURE 4.6. These clips are called, not surprisingly, connected clips. This connection means that if the Primary Storyline clip moves, all clips attached to it move as well.
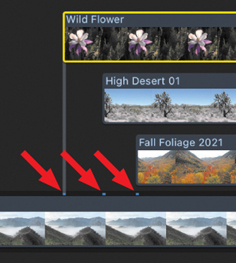
FIGURE 4.6 Clips on layers always connect to the clip on the Primary Storyline.
Those connections are indicated by light blue dots at the top of the Primary Storyline clip unless the connected clip is selected, in which case you see a faint blue line. By default, connections are set to the In of the connected clip.
Most of the time, this connection location is fine. Sometimes, though, you need to move the connection to a different Primary Storyline clip. To do so, press and hold Option+Command then click anywhere inside the connected clip. The connection moves to wherever you click.
202. What’s a Storyline?
A storyline is a collection of connected clips and transitions.
Apple has evolved the storyline function since FCP was first released. Now, a storyline is a collection of clips and transitions that are treated as a single entity; see FIGURE 4.7. A storyline can contain audio or video clips.
)
FIGURE 4.7 Two separate connected clips (left) and a connected storyline (right). The connected storyline has only one connection and a gray bar on top. The separate clips each have a timeline connection and no bar on top.
A connected storyline treats a group of clips as though they were on the Primary Storyline:
Clip edges touch.
Spaces between clips are not allowed, unless inserted as a gap clip.
Dragging one clip shuffles other clips.
Transitions are supported.
The most common use of storylines is when transitions are added; see Chapter 7, “Transitions & Titles.” However, a connected storyline is used whenever you want to group one or more clips. Storylines can group clips only on the same layer. (To group clips on multiple layers, use a Compound clip. See Tip 245, What’s a Compound Clip?)
To create a storyline, select the clips you want to group and choose Clip > Create Storyline (shortcut: Cmd+G). If there’s a gap between clips, Final Cut adds a gap clip between them.
To break apart an existing storyline, choose Clip > Break apart clip items (shortcut: Shift+Cmd+G).
To move a storyline, drag it by the top bar.
To rearrange or trim a clip inside a storyline, select it and drag the clip, just like a clip in the Primary Storyline.
To delete a clip from inside a storyline, select it and press Delete.
You’ll find yourself using storylines the most when adding transitions.
203. Move Primary Storyline Clips
Move the clip; leave the connections. This is a grave decision.
Usually, if you delete a Primary Storyline clip, all the clips connected to it are deleted as well. (They aren’t actually deleted, but they are removed from the timeline.) However, if you have a clip connected to a Primary Storyline clip, it’s possible to move or delete the Primary Storyline clip without changing the position of the connected clip around it.
The trick is to press and hold the grave (`) accent key on your keyboard before you do anything. (This is the same key as tilde [~], just below Esc on U.S. keyboards.) You’ll see an odd little orange globe icon next to the cursor; see FIGURE 4.8. You can now move or remove the Primary Storyline clip from under the connected clip without the connected clips moving! All the clips to the right then move left to fill the gap.
)
FIGURE 4.8 Pressing the grave (`) key while dragging moves a Primary Storyline clip without moving the clips attached to it.
204. Constrain Clip Movement
Press and hold Shift while dragging a clip.
Moving clips by dragging them sideways in the timeline adjusts the timing of your story. However, when you drag a clip vertically from one layer to another, the one thing you don’t want is for the clip to change its horizontal position, because that changes its timing.
So here’s the secret: Press and hold the Shift key while dragging a clip up or down in the timeline to prevent it from shifting from side to side. (See, a pun!)
205. Change Clip Durations
If you know what you need, this is faster than dragging.
Most of the time, we change the duration of a clip by dragging an edge; this is called trimming. However, there is a faster way, provided you know the duration you need. Good uses for this are changing the duration of a transition, title, or still image. You can also use this to change the duration of several selected timeline clips. Here’s how:
Select the elements you want to change.
Press Control+D. This switches the Timecode field under the Viewer to Duration mode.
Enter the duration you want—without using punctuation—then press Return.
This shortcut can change multiple selected clips at once, with each clip having the same duration. If a clip lacks sufficient duration, Final Cut extends the Out to the end of the clip but doesn’t change clip speed or invent new media.
Final Cut automatically calculates the correct duration based upon the frame rate of the project and adjusts the duration of the element accordingly. I use this technique frequently in every project I edit, especially for transitions.
206. Use Three-Point Edits for Greater Precision
These edits are designed for speed and precision.
There are two general philosophies about how to edit a clip into the timeline:
Drag the clip to the timeline, then figure out what to do with it.
Figure out what to do with the clip, then edit it to the timeline.
Ultimately, they probably take the same amount of time; it just depends upon where you want to do your thinking. This tip falls into the second philosophical camp.
A three-point edit is when the duration of a range in the Timeline determines where an edited clip from the Browser will begin and end. These are used in an already edited project where you need to insert a shot, without changing the duration of the overall sequence. These edits provide both precision and speed. Here’s how it works:
Set an In for a clip in the Browser.
Use the Range tool to set an In and Out in the timeline. (You can’t just select a clip.)
Press D to perform an overwrite edit.
This edits the Browser clip into the selected range in the timeline, matching the In of the Browser clip to the In of the timeline range, then replacing the remainder of the timeline range with the Browser clip.
Press Q to perform the same edit, but place the new clip on a higher layer.
The benefit to a three-point edit is precision. You can precisely control where an edited clip starts and ends without changing the duration of the project.
207. Create a Back-Time Edit
Back-time edits emphasize the end of a clip.
Back-time edits are a variation of the three-point edit. They are used when you care more about where a clip ends than where it starts. Sports is the classic example. You want to see the runner crossing the finish line more than where they started.
In technical terms, a back-time edit is one where the Out of the clip in the Browser is matched to the Out of a range in the timeline. Then Final Cut automatically calculates where to place the In. It doesn’t play the clip backward; it simply determines the edit from the Out, rather than the In. Here’s how:
Set an Out in a clip in the Browser.
Set an Out in the timeline, or use the Range tool to set both the In and Out.
Press Shift+D to back-time edit the clip into the timeline.
Or—press Shift+Q to back-time edit the clip to a higher layer.
208. Replace Edits Replace a Timeline Clip
Final Cut supports three variations of replace edits.
Yesterday, you edited a clip into the timeline. Today, you realize it’s the right duration but the wrong clip. Replace edit to the rescue. A replace edit always replaces a clip in the timeline with a clip from the Browser. You can’t replace a timeline clip with another timeline clip.
To create a replace edit, you don’t need to select the timeline clip. Mark (set an In and Out) in the Browser clip, then drag it on top of the timeline clip you want to replace. A menu pops up (see FIGURE 4.9), displaying the Replace options.
)
FIGURE 4.9 The five options for a replace edit. Drag a Browser clip on top of a timeline clip to display this list.
Replace. This replaces the timeline clip with the Browser clip and uses the duration of the Browser clip (shortcut: Shift+R).
Replace from Start. This replaces the timeline clip with the Browser clip and uses the duration of the timeline clip (shortcut: Option+R).
Replace from End. This replaces the timeline clip with the Browser clip by editing the Out of the Browser clip to the Out of the timeline clip, then using the duration of the timeline clip to set the In of the Browser clip. This is basically a back-time edit, except it replaces the timeline clip. (A shortcut is available, but not assigned to a key.)
Replace with Retime to Fit. This is discussed in Tip 210, When to Use Replace with Retime to Fit.
Replace and Add to Audition. This is discussed in Chapter 5, “Advanced Editing.” See Tip 244, Create Auditions in the Timeline.
209. Use a Replace Edit to Replace Audio
Find and fix missing audio in less than a second.
You edited a clip into your project yesterday only to realize that you accidentally deleted the audio. Suddenly you really, really need that audio today. In this case, Undo won’t work. The mistake happened too long ago. Replace edit to the rescue.
Here’s a fast way to fix the missing audio problem:
Put the playhead (skimmer) anywhere in the timeline clip you want to fix. Don’t even select the clip.
Press Shift+F.
This creates a match frame of the timeline clip in the Browser.
Press Shift+1.
This makes sure you are editing both audio and video into the timeline.
Once you press Shift+1, you don’t need to press it again. Final Cut leaves this setting unchanged from one edit to the next.
Press Option+R.
This replaces the timeline clip with the clip in the Browser, but matches the duration of the Timeline clip.
You can replace missing audio in less than half a second!
210. When to Use Replace with Retime to Fit
Fit-to-fill edits always change the speed of the incoming clip.
A variation on the replace edit is the Replace with Retime to Fit option, also called a fit-to-fill edit. This is used to create a speed effect or if the B-roll clip is too short to fill the timeline clip. This is similar to the Replace from Start option, but it requires a duration for the Browser clip. Unlike the three replace edits discussed in Tip 208, Replace Edits Replace a Timeline Clip, this changes the speed of the Browser clip so that the duration of the new clip matches the duration of the original timeline clip.
Set an In and Out for the Browser clip you want to use. The duration is important.
Drag the Browser clip on top of the timeline clip you want to replace; see FIGURE 4.10. (A shortcut is available, but not assigned to any key.)
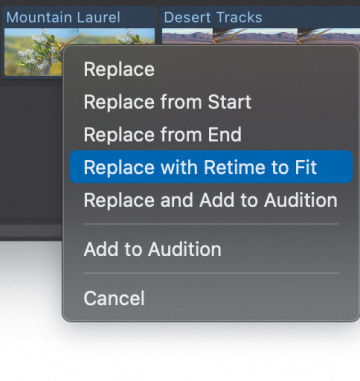
FIGURE 4.10 Drag a Browser clip on top of a timeline clip to reveal this menu.
In the menu, select Replace with Retime to Fit.
)
Final Cut changes the speed of the Browser clip to precisely match the duration of the timeline clip. The Retime to Fit option always changes the new clip’s speed.
211. Markers
Markers are the yellow sticky notes of video editing.
I love markers; see FIGURE 4.11. These cheerful little flags scattered throughout a project serve as navigational beacons, a list of tasks to do or that are done, even chapter markers for QuickTime movies and DVDs. Whether you create markers in the timeline or Browser, the process is the same.

FIGURE 4.11 The four marker types: 1. Marker, 2. Chapter, 3. To-do, 4. Completed to-do. (Jewelry image ©2022 EmilyHewittPhotography.com)
To create a marker, put the playhead (skimmer) where you want it, and press M.
To modify a marker, double-click the marker icon to open the Marker dialog.
To move a marker, right-click it and choose Edit > Cut. Move the playhead (skimmer) to the new location, and choose Edit > Paste.
Or—place the playhead (skimmer) on the marker and press Control+, [comma] or . [period] to move the marker left or right one frame at a time.
To jump the playhead to a marker, press Control+; [semicolon] or Control+’ [apostrophe].
To delete a marker, either double-click it and click the Delete button in the Marker dialog or right-click it and select Delete from the menu.
When you modify a marker, the Marker dialog appears; see FIGURE 4.12.
)
FIGURE 4.12 The Marker dialog. The top buttons create a: 1. Marker, 2. To-do marker, and 3. Chapter marker. (Jewelry image ©2022 EmilyHewitt Photography.com)
212. Create Chapter Markers
Chapter markers are great for QuickTime navigation, not just DVDs.
I use chapter markers in many of my QuickTime and MP4 movies; see Figure 4.12. They create little navigational thumbnails used in QuickTime Player, and other video players, to jump to a specific scene in a movie. You don’t need to create DVDs to use chapter markers.
If a marker already exists, double-click it to open the Marker dialog box.
Otherwise, put the playhead (skimmer) where you want it, and press M.
Press M a second time to open the Marker dialog box.
Click the far-right icon (3 in Figure 4.12) to create a chapter marker.
Chapter markers generally display a poster frame in the video player. That round orange dot (see FIGURE 4.13) selects the frame used for the poster frame. It is located 16 frames after the marker to avoid displaying the middle of a dissolve as the poster frame. To choose a different frame, drag the round dot to the frame you want to use, which need not be in the same clip.
)
FIGURE 4.13 The orange marker is a chapter marker. The round orange dot selects the poster frame for that marker. Drag the dot to change the frame. (Jewelry image ©2022 EmilyHewittPhotography.com)
213. Gaps and Timeline Placeholders
Gaps and placeholders have a variety of uses.
A gap is a clip that is opaque and solid black, with a default duration of two seconds, though the duration can vary as much as you want. I use gaps to separate scenes, to add a short pause, or simply as an indicator that something is missing. To add a gap, choose Edit > Insert Generator > Gap (shortcut: Option+W). This inserts a two-second gap clip at the position of the playhead (skimmer). You can adjust the duration of a gap the same as any other clip.
Placeholders are similar to gaps in that they are variable duration clips edited into the timeline but used to simulate missing shots. The content of the placeholder is adjusted in the Inspector.
To add a new placeholder, choose Edit > Insert Generator > Placeholder (shortcut: Option+Cmd+W).
To modify an existing timeline placeholder, select the clip in the timeline. Click the Generator icon (red arrow) at the top of the Inspector; see FIGURE 4.14. In the panel that appears, select the objects you want to appear in the placeholder.
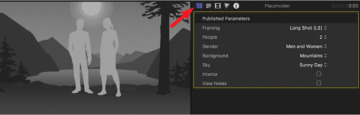
FIGURE 4.14 Placeholder content options in the Generator Inspector.
)
214. Find Duplicated Media
This is a fast way to find shots used more than once.
Apple recently added a feature that quickly finds duplicated media in a project. Apple calls these duplicated ranges. This feature is off by default. To display media used more than once in a project:
Open the Clip Appearance button in the top-right corner of the timeline (see FIGURE 4.15), and select the Duplicate Ranges checkbox.
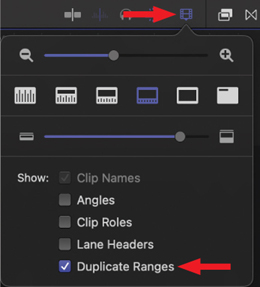
FIGURE 4.15 Display duplicated media using the Clip Appearance menu.
Clips that use the same media are flagged in the timeline with hash marks at the top of the clip; see FIGURE 4.16.
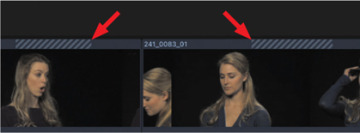
FIGURE 4.16 Clips that share the same media are indicated with hash marks (above).
Open the Timeline Index, click the chevron (red arrow), and choose Show Clips with Duplicated Ranges; see FIGURE 4.17.
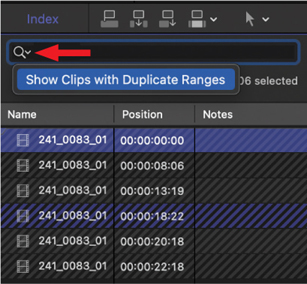
FIGURE 4.17 The Timeline Index shows clips that share media. When you select a clip, other clips sharing its media are highlighted in blue (right).
)
)
)
)
)
)
Selecting a clip in the Timeline Index selects it in the timeline and moves the playhead to the In of that clip.