Publishers of technology books, eBooks, and videos for creative people

Home > Articles

Sampling Audio

This chapter is from the book

Chopping Loops in a Take Folder

While a sampler can often greatly speed up your workflow, you can do sampling work without one. To cut up your samples, mangle them by processing them through effects, and splice them, you are free to use any other tool at your disposal. One of the most obvious and immediate techniques is to drag your samples directly to the Tracks view, and then edit the regions to cut and process your samples.

Packing Regions into a Take Folder

In the previous lesson, you recorded several takes of a guitar performance packed into a take folder. That lets you experiment with different ideas during the recording session, and then later assemble a composite take by choosing sections from multiple takes—a process called comping.

Comping techniques can be useful, for example, when a musician can’t get an entire song right in one single take. You record several takes, each with its own good and bad qualities, and later you create a perfect comp using the best parts of each take.

In this exercise, you’ll use a take folder for a more creative music production goal. You’ll pack four loops of various instruments playing different melodies, and then create a comp by selecting slices from the different loops to combine them into a patchwork loop—like a rhythmic collage of bits and pieces that each have a different timbre.

  1. In the Loop Browser, search for the following loops and drag them to create new tracks at the bottom of the workspace at bar 13.

    Throwback Funk Brass 01

    Throwback Funk Synth Bass

    Throwdown Synth Lead

    Tiny Toy Synth

    To help identify the loops, let’s give them different colors and simple names.

  2. Click the Throwback Funk Brass 01 region to select it.

  3. Press Shift-N and enter Brass.

  4. Choose View > Show Colors (or press Option-C).

    The Color palette opens.

  5. Click a yellow color square.

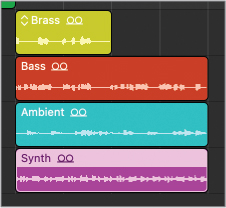
    The Brass region is yellow.

    Repeat this process to rename and color the remaining three loops in the take folder.

  6. Rename Throwback Funk Synth Bass Bass, and color it brown.

  7. Rename Throwdown Synth Lead Ambient, and color it turquoise.

  8. Rename Tiny Toy Synth Synth, and color it pink.

    f0272-02.jpg
  9. Choose View > Hide Colors (or press Option-C) to close the Color palette.

  10. Select the four regions at bar 13.

  11. In the Tracks view menu bar, choose Functions > Folder > Pack Take Folder.

    The four loops are packed inside a take folder on the selected track, leaving you with three empty tracks that you can delete.

  12. Choose Track > Delete Unused Tracks (or press Shift-Command-Delete).

    The empty tracks are deleted. Let’s rename the track where the take folder is.

  13. On the Throwback Funk Brass 01 track header, double-click the track name and enter Splice.

    The take folder is selected, and you can name it after the track name.

  14. Choose Functions > Name Regions/Cells by Track Name (or press Option-Shift-N).

  15. Control-click the icon on the Splice track, and choose the desired icon.

  16. Resize the take folder to shorten it to two bars long.

  17. Double-click the take folder to open it.

  18. Choose Navigate > Set Rounded Locators by Selection and Enable Cycle (or press U).

    To zoom in on the selection, you can press Z (Toggle Zoom to Fit Selection or All Contents).

  19. Press Z.

    The take folder fills the workspace, making it comfortable for you to see the waveforms on each take.

You’ve imported four Apple Loops into your workspace and packed them into a take folder. A little organization goes a long way, and taking the time to give your region simple descriptive names and easy-to-identify colors, and optimizing your zoom level sets you up nicely for the next exercise, where you’ll assemble your composite take.

Comping Takes

Before you start comping, you need to preview the takes so that you can become familiar with them. Then you’ll start comping the takes, swiping your mouse across the parts of the takes you want to hear in your comp. To create a rhythmic effect synced to the project tempo, you’ll snap your edits to the nearest 1/16 note.

  1. In the Tracks view menu bar, click the Snap pop-up menu, and choose Snap Quick Swipe Comping.

  2. Click the Snap pop-up menu again, and choose Division.

    By default, the division is a 1/16 note, so swiping takes will snap to the nearest 1/16 note on the grid.

  3. Option-click the Brass take to select it.

  4. On the Bass take, drag to select from 13 1 3 0 to 13 2 0 0 so that the help tag reads Position 1 1 3 1, Length 0 0 2 0.

    The pointer snaps to a 1/16 note grid, making it easy for you to select a section that has musical meaning (for example, a 1/16 note, an 1/8 note, or a beat).

  5. Listen to your comp.

    The comp starts with a brass note, and then the following syncopated note is from the distorted bass synth loop.

  6. On the Ambient take, select the note right after the bass slice so that the help tag reads Position 1 2 1 1, Length 0 1 1 0.

    The comp now plays successive notes from the brass, then the distorted bass synth, then the ambient synth. The rapid rhythmic timbre switching creates an exhilarating sensation that is sure to make people get up and dance!

    When you select a section, you can hear that section in different takes.

  7. Try clicking different takes in the same section as that last note.

    A different take is selected only for that section. This gives you an easy way to experiment with selecting the same section in different takes.

  8. Within that section, click the Ambient take again.

  9. Continue making selections of single or multiple notes (or even portions of notes) from different takes throughout the rest of the take folder.

    Feel free to have fun and experiment to find what sounds good to you; then, for the next exercise try to reproduce the comp on the previous screenshot as close as possible.

You’ve comped the four loops into an exciting 1/16 note–based rhythmic collage. Keep this technique in mind and be creative with your use of material. For example, think of comping vocal regions to create a vocal chop, or drum regions to create a breakbeat.

Processing a Selection with Audio Effect Plug-ins

When you are happy with your comp, you can flatten it to export all the selections as individual audio regions on the track so that you can further edit or process them. You’ll now flatten the take folder you comped in the previous exercise so that you can use the Region inspector to transpose individual notes and apply selection-based processing to process individual sections with audio effect plug-ins.

  1. At the upper left of the take folder, click the Take Folder pop-up menu, and choose Flatten.

    Each section of the comp is now an individual region of the color of the original take. All regions have the same name (Splice: Comp A). Let’s give the regions individual names. When multiple regions are selected, giving one of them a name that ends with a number results in the regions getting the same name but with incremental numbers.

  2. Press Shift-N.

    A text field opens on top of the first region.

  3. Enter Slice 1.

    The regions are named Slice with incremental numbers. Let’s transpose the Slice 3 region (the turquoise region that contains a note from the Ambient loop).

  4. Click the background in the workspace to deselect all regions (or press Shift-D).

  5. Click the Slice 3 region to select it.

  6. In the Region inspector, click the double-arrow symbol next to Transpose, and choose –12.

    f0279-02.jpg

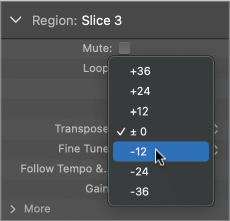
    Use the Space bar to start and stop playback when you need to hear your work. The Slice 3 region now plays one octave lower. Continue transposing some of the regions to +12 or –12 semitones so that they play an octave higher or lower. Feel free to experiment with other values; however, in that case, make sure the transposition amounts you choose maintain all the notes in the right key or the loop may sound out of key with the other sections in the project.

    You’ll now apply an effect plug-in to only one region using selection-based processing. To make it easier for you to hear the result of your processing, you may want to start with one of your longer regions. If you reproduced the same comp as in the screenshot in the previous exercise, you’ll apply the effect to the Slice 7 region.

  7. Select the Slice 7 region (or one of your longer regions) on the Splice track.

  8. In the Tracks view menu bar, choose Functions > Selection-Based Processing (or press Shift-Option-P).

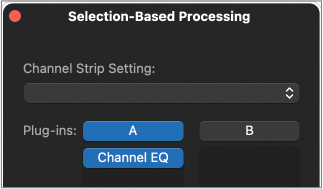
    The Selection-Based Processing window lets you choose between two sets of plug-ins (A or B) so that you can experiment with and compare two audio processing signal chains. You’ll use only one plug-in, so let’s insert it in set A.

  9. Click an empty slot in set A, and choose EQ > Channel EQ.

    f0280-02.jpg

    The Channel EQ plug-in window opens.

  10. In the Channel EQ plug-in header, click the Setting pop-up menu, and choose 07 EQ Tools > Phone Filter Notch.

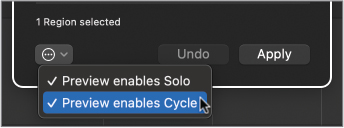
    This severe EQ preset filters most of the low and high frequencies, letting through only a narrow band of midrange frequency, reminiscent of the low-fidelity sound of older phones. Before you preview the result, you’ll make sure the preview function does not affect your current cycle area so that you can preview the effect of the EQ plug-in in the context of the entire loop.

  11. At the lower left of the Selection-Based Processing window, click the action menu and deselect “Preview enables Cycle.”

    f0281-02.jpg
  12. Click the Preview button.

    f0281-03.jpg

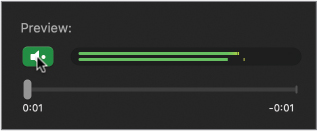
    Playback starts at the beginning of the cycle area at bar 13, and you can hear the EQ’ed Slice 7 region in the context of the entire section. The EQ cuts off so many frequencies that the processed region sounds too soft now.

  13. Click the Preview button to stop playback.

  14. In the Selection-Based Processing window, click the Gain pop-up menu, and choose Loudness Compensation.

    f0282-01.jpg

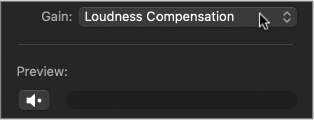
    The loudness compensation will be processed only after you apply the effect.

  15. At the lower right of the Selection-Based Processing window, click Apply.

    f0282-02.jpg

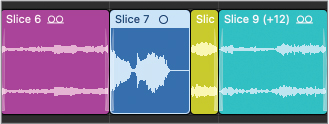
    In the workspace, the selected region is processed by the Phone Filter Notch Channel EQ preset. The new region is automatically assigned the color of the track (blue).

  16. Press the Space bar.

    The processed region now sounds loud enough. All the different timbres in the samples combined together create a fun, syncopated new loop!

  17. Close the Selection-Based Processing and Channel EQ plug-in windows.

  18. Click the cycle area (or press C) to turn off Cycle mode.

You flattened your take folder to export the selected portions of your takes into individual regions in the workspace. You then transposed some of the regions in the Region inspector and processed one region with a plug-in, completing your patchwork sample collage.

Peachpit Promotional Mailings & Special Offers

I would like to receive exclusive offers and hear about products from Peachpit and its family of brands. I can unsubscribe at any time.

Overview


Pearson Education, Inc., 221 River Street, Hoboken, New Jersey 07030, (Pearson) presents this site to provide information about Peachpit products and services that can be purchased through this site.

This privacy notice provides an overview of our commitment to privacy and describes how we collect, protect, use and share personal information collected through this site. Please note that other Pearson websites and online products and services have their own separate privacy policies.

Collection and Use of Information


To conduct business and deliver products and services, Pearson collects and uses personal information in several ways in connection with this site, including:

Questions and Inquiries

For inquiries and questions, we collect the inquiry or question, together with name, contact details (email address, phone number and mailing address) and any other additional information voluntarily submitted to us through a Contact Us form or an email. We use this information to address the inquiry and respond to the question.

Online Store

For orders and purchases placed through our online store on this site, we collect order details, name, institution name and address (if applicable), email address, phone number, shipping and billing addresses, credit/debit card information, shipping options and any instructions. We use this information to complete transactions, fulfill orders, communicate with individuals placing orders or visiting the online store, and for related purposes.

Surveys

Pearson may offer opportunities to provide feedback or participate in surveys, including surveys evaluating Pearson products, services or sites. Participation is voluntary. Pearson collects information requested in the survey questions and uses the information to evaluate, support, maintain and improve products, services or sites; develop new products and services; conduct educational research; and for other purposes specified in the survey.

Contests and Drawings

Occasionally, we may sponsor a contest or drawing. Participation is optional. Pearson collects name, contact information and other information specified on the entry form for the contest or drawing to conduct the contest or drawing. Pearson may collect additional personal information from the winners of a contest or drawing in order to award the prize and for tax reporting purposes, as required by law.

Newsletters

If you have elected to receive email newsletters or promotional mailings and special offers but want to unsubscribe, simply email ask@peachpit.com.

Service Announcements

On rare occasions it is necessary to send out a strictly service related announcement. For instance, if our service is temporarily suspended for maintenance we might send users an email. Generally, users may not opt-out of these communications, though they can deactivate their account information. However, these communications are not promotional in nature.

Customer Service

We communicate with users on a regular basis to provide requested services and in regard to issues relating to their account we reply via email or phone in accordance with the users' wishes when a user submits their information through our Contact Us form.

Other Collection and Use of Information


Application and System Logs

Pearson automatically collects log data to help ensure the delivery, availability and security of this site. Log data may include technical information about how a user or visitor connected to this site, such as browser type, type of computer/device, operating system, internet service provider and IP address. We use this information for support purposes and to monitor the health of the site, identify problems, improve service, detect unauthorized access and fraudulent activity, prevent and respond to security incidents and appropriately scale computing resources.

Web Analytics

Pearson may use third party web trend analytical services, including Google Analytics, to collect visitor information, such as IP addresses, browser types, referring pages, pages visited and time spent on a particular site. While these analytical services collect and report information on an anonymous basis, they may use cookies to gather web trend information. The information gathered may enable Pearson (but not the third party web trend services) to link information with application and system log data. Pearson uses this information for system administration and to identify problems, improve service, detect unauthorized access and fraudulent activity, prevent and respond to security incidents, appropriately scale computing resources and otherwise support and deliver this site and its services.

Cookies and Related Technologies

This site uses cookies and similar technologies to personalize content, measure traffic patterns, control security, track use and access of information on this site, and provide interest-based messages and advertising. Users can manage and block the use of cookies through their browser. Disabling or blocking certain cookies may limit the functionality of this site.

Do Not Track

This site currently does not respond to Do Not Track signals.

Security


Pearson uses appropriate physical, administrative and technical security measures to protect personal information from unauthorized access, use and disclosure.

Children


This site is not directed to children under the age of 13.

Marketing


Pearson may send or direct marketing communications to users, provided that

  • Pearson will not use personal information collected or processed as a K-12 school service provider for the purpose of directed or targeted advertising.
  • Such marketing is consistent with applicable law and Pearson's legal obligations.
  • Pearson will not knowingly direct or send marketing communications to an individual who has expressed a preference not to receive marketing.
  • Where required by applicable law, express or implied consent to marketing exists and has not been withdrawn.

Pearson may provide personal information to a third party service provider on a restricted basis to provide marketing solely on behalf of Pearson or an affiliate or customer for whom Pearson is a service provider. Marketing preferences may be changed at any time.

Correcting/Updating Personal Information


If a user's personally identifiable information changes (such as your postal address or email address), we provide a way to correct or update that user's personal data provided to us. This can be done on the Account page. If a user no longer desires our service and desires to delete his or her account, please contact us at customer-service@informit.com and we will process the deletion of a user's account.

Choice/Opt-out


Users can always make an informed choice as to whether they should proceed with certain services offered by Adobe Press. If you choose to remove yourself from our mailing list(s) simply visit the following page and uncheck any communication you no longer want to receive: www.peachpit.com/u.aspx.

Sale of Personal Information


Pearson does not rent or sell personal information in exchange for any payment of money.

While Pearson does not sell personal information, as defined in Nevada law, Nevada residents may email a request for no sale of their personal information to NevadaDesignatedRequest@pearson.com.

Supplemental Privacy Statement for California Residents


California residents should read our Supplemental privacy statement for California residents in conjunction with this Privacy Notice. The Supplemental privacy statement for California residents explains Pearson's commitment to comply with California law and applies to personal information of California residents collected in connection with this site and the Services.

Sharing and Disclosure


Pearson may disclose personal information, as follows:

  • As required by law.
  • With the consent of the individual (or their parent, if the individual is a minor)
  • In response to a subpoena, court order or legal process, to the extent permitted or required by law
  • To protect the security and safety of individuals, data, assets and systems, consistent with applicable law
  • In connection the sale, joint venture or other transfer of some or all of its company or assets, subject to the provisions of this Privacy Notice
  • To investigate or address actual or suspected fraud or other illegal activities
  • To exercise its legal rights, including enforcement of the Terms of Use for this site or another contract
  • To affiliated Pearson companies and other companies and organizations who perform work for Pearson and are obligated to protect the privacy of personal information consistent with this Privacy Notice
  • To a school, organization, company or government agency, where Pearson collects or processes the personal information in a school setting or on behalf of such organization, company or government agency.

Links


This web site contains links to other sites. Please be aware that we are not responsible for the privacy practices of such other sites. We encourage our users to be aware when they leave our site and to read the privacy statements of each and every web site that collects Personal Information. This privacy statement applies solely to information collected by this web site.

Requests and Contact


Please contact us about this Privacy Notice or if you have any requests or questions relating to the privacy of your personal information.

Changes to this Privacy Notice


We may revise this Privacy Notice through an updated posting. We will identify the effective date of the revision in the posting. Often, updates are made to provide greater clarity or to comply with changes in regulatory requirements. If the updates involve material changes to the collection, protection, use or disclosure of Personal Information, Pearson will provide notice of the change through a conspicuous notice on this site or other appropriate way. Continued use of the site after the effective date of a posted revision evidences acceptance. Please contact us if you have questions or concerns about the Privacy Notice or any objection to any revisions.

Last Update: November 17, 2020