This chapter is from the book
This chapter is from the book
This chapter is from the book
Adding video transition effects
Premiere Pro gives you multiple video transition effects to choose from. Most options are available in the Video Transitions group in the Effects panel.
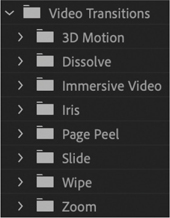
Video transitions are organized into eight subcategories. You’ll find some additional transitions in the Video Effects > Transition group in the Effects panel. However, these effects are meant to be applied to an entire clip and are used to reveal the visual contents of the clip over time between its start and end frames (not using clip handles overlapping another clip). This second category works well for superimposing text or graphics.
Applying a single-sided transition
The easiest transition to understand is one that applies to just one end of a single clip. This could be a fade from black on the first clip in a sequence or a dissolve into an animated graphic. Let’s give it a try.
If it’s not already open, open the sequence called Transitions.
This sequence has four video clips and background music. The clips have handles, so transition effects can be applied between them (no tiny triangles are visible at the ends of the clips, which would indicate the last frame is already visible).
In the Effects panel, open the Video Transitions > Dissolve group. Find the Cross Dissolve effect.
Drag the effect onto the start of the first video clip. A highlight shows you where the transition effect will be added. When the transition is in the right position, release it.
Drag another Cross Dissolve effect onto the end of the last video clip.
The Cross Dissolve icon shows the timing of the effect. For example, the effect you just applied to the last clip in the sequence will start before the end of the clip and complete by the time it reaches the clip’s end.
Transitions of this kind don’t extend the clip (using a handle) because the transition doesn’t reach past the end of the clip.
Because you’re applying the Cross Dissolve transition effect at the end of the last clip, where there is no connected clip, the picture dissolves into the background of the Timeline, which is black. The result is that this looks like a Dip To Black effect.
In reality you are causing the clip to become gradually transparent in front of a black background. The difference is clearer when you work with multiple layers of clips, with different-colored background layers.
Play the sequence to see the result.
You should see a fade from black at the start of the sequence and a fade to black at the end.
)
)
)
)
Applying a transition between two clips
Let’s apply transitions between a few clips. For the purposes of exploration, you’ll break the less-is-best rule and try several options in one sequence. As you go through these steps, play the sequence regularly to view the results.
Continue working with the previous sequence, called Transitions.
Move the Timeline playhead to the edit point between clip 1 and clip 2 on the Timeline and then press the equals sign (=) key two or three times to zoom in fairly close. If your keyboard does not have the = key, use the navigator at the bottom of the Timeline panel to zoom. You can also create a custom keyboard shortcut for this purpose (see Lesson 1, “Touring Adobe Premiere Pro”).
Drag the Dip To White transition effect from the Dissolve group in the Effects panel onto the edit point between clip 1 and clip 2. The effect will snap to one of three positions, and the mouse pointer will change to indicate which position the transition will occupy.
Be sure to line up the effect with the middle of the edit, not the end of the first clip or beginning of the second clip.
The Dip To White transition effect gradually builds to a completely white screen, which obscures the cut between the first clip and the next.
In the Effects panel, click the disclosure triangle for the Slide group of video transitions to display its contents. Drag the Push transition onto the edit point between clip 2 and clip 3 in the sequence, centered on the cut.
Play through the transition to see the result, and then position the playhead on the edit between clip 2 and clip 3 by pressing the Up Arrow key on your keyboard. The Up and Down Arrow keys are shortcuts to move the Timeline playhead to the previous or next edit on targeted tracks.
Click the Push transition effect icon in the Timeline panel once to select it, and open the Effect Controls panel (remember, if you can’t see a panel, it will always be listed in the Window menu).
Change the direction of the clip from West To East to East To West by clicking the small direction control triangle to the right of the A/B thumbnail at the top left of the Effect Controls panel.
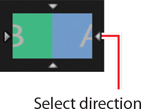
Each small white triangle changes the direction for the Push transition effect. Hover the pointer over a triangle to see a tool tip describing the option.
In the Timeline panel, play through the transition to see the result.
In the Effects panel, expand the Page Peel group in the Video Transitions category. Drag the Page Turn transition effect onto the edit point between clip 3 and clip 4, centered on the cut.
Review the sequence by playing it from beginning to end.
Having watched this sequence, you can probably see why it’s a good idea to use transitions with restraint!
Let’s try replacing an existing transition effect.
Drag the Split transition from the Slide group onto the existing Push transition effect icon, between clip 2 and clip 3. The new transition effect replaces the old one, taking the duration and timing of the existing effect.
Select the Split transition effect icon on the Timeline so its settings are displayed in the Effect Controls panel. Using the controls in that panel, set Border Width to 7 and Anti-aliasing Quality to Medium to create a thin black border at the edge between the two clips.
The anti-aliasing method reduces potential flicker when the line animates during the effect.
Play through the transition to view the result. The best way to do this is probably to click a little earlier in the sequence to watch the video leading up to the transition.
If the video does not play smoothly during transition effects, press the Return (macOS) or Enter (Windows) key to render, wait for the rendering to complete, and try again. See the sidebar “Red, yellow, and green render bars” later in this lesson for more information about rendering.
Video transitions have a default duration, which can be set in seconds or frames (it’s frames by default). If the default duration is set in frames, the effective playback duration of a transition effect will change depending on the sequence frame rate. The default transition duration can be changed in the Timeline section of the Preferences panel.
Choose Premiere Pro > Preferences > Timeline (macOS) or Edit > Preferences > Timeline (Windows). Depending on your geographic region, you may see a default Video Transition Duration setting of 30 Frames or 25 Frames.
This is a 24-frames-per-second sequence, but this doesn’t matter if you change the Video Transition Default Duration option to 1 second. Do so now, and click OK.
Existing transition effects keep their existing settings when you change the preference, but any future transitions you add will have the new default duration.
The duration of an effect can dramatically change its impact, and later in this lesson, you’ll learn about adjusting the timing of transitions.
)
)
)
)
)
Apply the default transition effect to multiple clips
So far, you’ve been applying transitions to video clips. You can also apply transitions to still images, graphics, color mattes, and even audio, as you’ll see shortly.
It’s common for editors to create a photomontage, which might look good with transitions between the multiple photos. Applying transitions between two or three photos is quick and easy, but if you have 100 images, it will take a long time!
Premiere Pro makes it straightforward to automate this process by allowing you to set a default transition effect.
In the Project panel, find and open the sequence Slideshow.
This sequence consists of several images placed in a particular order. Notice that a Constant Power audio crossfade has already been applied to the beginning and end of the music clip to create a fade in and out.
Play the sequence by making sure the Timeline panel is active and pressing the spacebar.
There’s a cut between each clip.
Press the backslash (\) key to zoom out the Timeline panel so the whole sequence is visible. If your keyboard does not have a \ key, drag the right end of the Timeline panel navigator to adjust the zoom.
If necessary, increase the height of the V1 track to see thumbnails on the clips (you can drag the dividing line between V1 and V2 in the track header).
Using the Selection tool, draw a marquee around all the clips to select them. Begin dragging in an empty area, away from the clips, or you’ll move the first clip you click instead.
Choose Sequence > Apply Default Transitions To Selection.
This applies the default transition between all the currently selected clips. Notice that the Constant Power audio crossfade at the beginning and end of the music clip is now shorter because the default audio transition duration has been applied.
To explain: The default video transition effect is a 30-frame or 25-frame Cross Dissolve (though you changed this earlier to 1 second), and the default audio transition effect is a 1-second Constant Power crossfade. The shortcut you used replaced the existing audio crossfades with new, shorter ones.
You can set the default transition by right-clicking any transition effect in the Effects panel and choosing Set Selected As Default Transition. The icon for the selected default transition effect has a blue outline.
Play the sequence to see the difference the new Cross Dissolves make to the montage.
)
)
Copy a transition effect to multiple edits
You can copy an existing transition effect to multiple edits using the keyboard.
Let’s try it.
Press Command+Z (macOS) or Ctrl+Z (Windows) to undo the last step, and press Esc to deselect the clips.
Select any transition effect in the Effects panel, and drag it onto the cut between the first two video clips in the Slideshow sequence.
Select the transition you just applied by clicking its effect icon once in the sequence.
Press Command+C (macOS) or Ctrl+C (Windows) to copy the effect. Then hold Command (macOS) or Ctrl (Windows) while you use the Selection tool to drag a marquee around multiple other edits to select them, rather than clips.
With the edits selected, press Command+V (macOS) or Ctrl+V (Windows) to paste the transition effect onto all the selected edits.
)
)
This is a great way to add transition effects with matching settings to multiple edits, especially if you have taken the time to customize the effect.
RED, YELLOW, AND GREEN RENDER BARS
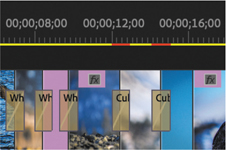
When you add a transition to a sequence, a red or yellow horizontal line (or render bar) may appear above it in the Timeline panel. A yellow bar indicates that Premiere Pro expects to be able to play the effect smoothly. A red bar means that this section of the sequence may need to be rendered before you can play a preview without dropped frames.
You can choose to render at any time to make these sections preview more smoothly on a less powerful computer.
The easiest way to render is to press the Return/Enter key. If you add In and Out points to select a part of your sequence and then render, only the selected section of the sequence will render. This is useful if you have many effects that need to render but you’re concerned with only one part for now.
Red or yellow bars will turn to green when those sections of a sequence are rendered. Premiere Pro creates a video file for each section where the bar has turned green. The new video files are stored in the Preview Files folder (as set in the project’s Scratch Disk settings). As long as the render bar is green, playback should be smooth.