- Starting the lesson
- What are transition effects?
- The importance of clip handles
- Adding video transition effects
- Using A/B mode to fine-tune a transition
- Adding audio transition effects
This chapter is from the book
This chapter is from the book
This chapter is from the book
Using A/B mode to fine-tune a transition
When you review transition effect settings in the Effect Controls panel, you have access to an A/B editing mode that splits a single video track into two. What would normally be displayed as two consecutive and contiguous clips on a single timeline track are now displayed as individual clips on separate tracks, with a transition between them. Separating the elements of the transition in this way allows you to manipulate the head and tail frames (or handles) and to change other transition options.
Changing parameters in the Effect Controls panel
You can customize all transitions in Premiere Pro. A major benefit of the Effect Controls panel is that, in addition to it giving you access to the settings for transition effects, you can see the outgoing and incoming clip handles (unused media in the original clip). This makes it easier to adjust the timing of an effect.
Let’s modify a transition.
In the Timeline panel, switch back to the Transitions sequence.
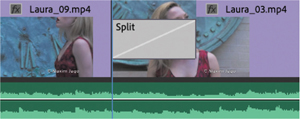
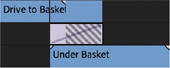
Position the Timeline playhead over the Split transition you added between clips 2 and 3, and click the transition to select it.
In the Effect Controls panel, select the box for Show Actual Sources to view frames from the actual clips.
This makes it easier to assess the changes you’ll make.
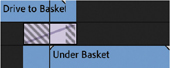
In the Effect Controls panel, open the Alignment menu, and choose Start At Cut.
The transition in the Effect Controls panel timeline, and in the sequence, switches to show the new position.
Click the small Play The Transition button
 at the upper-left corner of the Effect Controls panel to preview the transition beneath the button.
Now change the transition duration. In the Effect Controls panel, click the blue numbers for the Duration, type 300, and click away from the numbers or press the Tab key to apply the new setting. Premiere Pro will add the correct punctuation automatically, changing 300 into 00:00:03:00—that is, 3 seconds.
The Alignment menu changes to Custom Start because the effect now reaches beyond the beginning of the next transition effect. To make the new transition duration fit, Premiere Pro automatically sets its start two frames earlier.
Examine the A/B timeline display in the Effect Controls panel timeline, at the right side of the panel.
NOTE
If the Effect Controls panel timeline is not visible, click Show/Hide Timeline View
 at the upper-right corner of the panel. You may need to resize the panel to make the button visible.
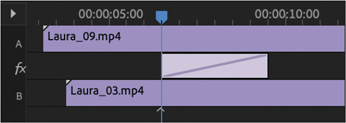
In this example, the Effect Controls panel playhead is centered on the cut, and you can see the way the effect timing has been adjusted automatically.
In the Timeline panel, play through the transition to see the change.
These automated adjustments can be subtle, so always double-check the results of new settings by playing through the effect. This way you can be sure you’re happy with the newly revealed media taken from the clip handles—the media that was hidden from view until you added the transition effect. Although it’s useful that Premiere Pro automatically modifies the timing of effects when necessary, it makes it even more important to check the transition before you move on.
Now let’s customize the transition.
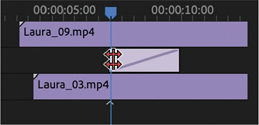
In the Effect Controls panel timeline, hover the pointer over the middle part of the vertical black line that crosses all three layers (the two video clips and the transition effect between them). The line is the edit point between the two clips. If your pointer is correctly positioned, it will change to the red Rolling Edit icon.
This edit line is close to the left edge of the effect, so you might want to zoom in to the Effect Controls panel timeline to conveniently make adjustments.
In the Effect Controls panel, the Rolling Edit pointer lets you reposition the timing of an edit between two clips by dragging the edit line.
Still in the Effect Controls panel, drag left and right with the Rolling Edit pointer. As you do, you’re changing the timing of the cut. The Out point of the clip on the left of the edit and the In point of the clip on the right of the edit update in the Timeline panel when you release the drag. This is a form of trimming.
You’ll explore trimming in more detail in Lesson 8, “Editing Video—Advanced Techniques.”
Move the pointer over the transition to the left or right of the edit line in the Effect Controls panel, and the pointer changes to the Slide tool. The blue line is the time ruler playhead.
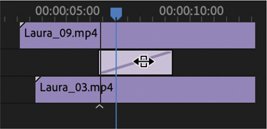
Using the Slide tool changes the start and end points of the transition without changing its overall duration. Unlike using the Rolling Edit tool, moving the transition rectangle by using the Slide tool does not change the edit point between the two sequence clips. Instead, it changes the timing of the transition effect.
Use the Slide tool to drag the transition rectangle left and right and compare the results.
)
Using a Morph Cut effect
Morph Cut is a special transition effect that aims to be invisible. It’s designed to help with “talking head” video interviews, where a single speaker looks in the direction of the camera. If your subject pauses a lot or there is inappropriate content in the footage, you may want to remove a section of the interview.
This would normally produce a jump cut (when the image seems to jump suddenly from one piece of content to another), but with the right media and a little experimentation, the Morph Cut effect might yield an invisible transition that seamlessly hides what you have removed. Let’s try it.
Open the sequence Morph Cut. Play the beginning of the sequence.
This sequence has one clip, with a jump cut near the start. It’s a small jump cut but enough to jar the audience.
In the Effects panel, look in the Video Transitions > Dissolve group for the Morph Cut effect. Drag this effect to the join between the two clips.
The Morph Cut transition effect begins by analyzing the two clips in the background. You can continue to work on your sequence while this analysis takes place.
Depending on your media, you may achieve improved results with the Morph Cut transition effect by experimenting with different durations.
Double-click the Morph Cut transition effect to display the Set Transition Duration dialog box. Change the duration to 16 frames (you can double-click any transition effect to access this setting).
When the analysis is complete, press Return/Enter to render the effect (if your system requires it) and play a preview.
The result is not perfect, but it’s close, and it’s unlikely an audience will notice the join.
)
)
Dealing with inadequate (or nonexistent) head or tail handles
If you try to extend a transition for a clip that doesn’t have enough frames in the handle for the new duration of the effect, the transition still appears but has diagonal warning bars through it. This means Premiere Pro is using a freeze frame to extend the duration of the clip. The last available frame is held on-screen to complete the transition effect.
You can adjust the duration and position of the transition to resolve the issue.
Open the sequence called Handles.
Locate the edit between the two clips.
These two sequence clips have no heads or tails. You can tell this immediately because of the little triangles in the corners of the clips; a triangle indicates the first or last frame of the original clip.
Select the Ripple Edit tool
 in the Tools panel, and use it to drag the right edge of the first clip to the left (begin dragging just to the left of the cut between the two clips). Drag to shorten the duration of the first clip to about 1:10, and then release. A tool tip appears while you trim to show the new clip duration.
The clip to the right of the edit point ripples left to close the gap. Notice that the little triangles at the end (the right edge) of the clip you just trimmed are no longer present.
Drag the Cross Dissolve transition effect from the Effects panel onto the edit point between the two clips.
You’ll discover that you can drag the transition onto the right side of the edit but not the left. That’s because there’s no handle available at the beginning of the second clip to create a dissolve that overlaps the end of the first clip without using freeze frames.
Press the V key to select the Selection tool, or click to select the tool
 in the Tools panel. In the Timeline panel, click the Cross Dissolve transition once to select it. You may need to zoom in to make it easier to select the transition.
In the Effect Controls panel, set the duration of the effect to 1:12.
The clip handle is not long enough to create this effect; the diagonal lines on the transition, both in the Effect Controls panel and in the Timeline panel, indicate Premiere Pro automatically added a freeze frame to fill the duration you set.
Play the transition to see the result.
In the Effect Controls panel, change the alignment of the transition to Center At Cut.
Drag the Timeline panel playhead slowly through the transition and watch the result.
For the first half of the transition (up to the edit point), the B clip is a freeze frame, while the A clip continues to play.
At the edit point, the A clip and the B clip start to play.
After the edit, a short freeze frame is used.
There are several ways to fix this kind of issue.
You can change the duration or timing of the transition effect.
You can drag the edit in the Timeline panel using the Rolling Edit tool
 (click and hold the Ripple Edit tool in the Tools panel to access it) to change the timing of the transition in the Timeline panel. Be sure to drag the edit between the clips and not the transition effect. This won’t necessarily remove all the freeze frames, but it may improve the overall result.
You can drag one side of the edit in the Timeline panel using the Ripple Edit tool
to shorten a clip, increasing the length of the handle. Again, be sure to click the edit between the clips and not the effect icon.
)
)
)
)
)
You’ll learn more about the Rolling Edit and Ripple Edit tools in Lesson 8. For now, make sure you have the Selection tool selected.