This chapter is from the book
This chapter is from the book
This chapter is from the book
Working with basic shapes
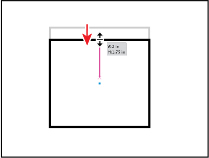
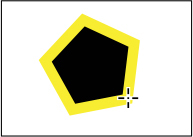
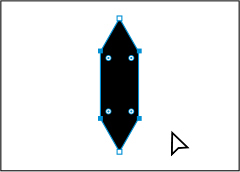
In the first part of this lesson, you’ll create a series of basic shapes, including rectangles, ellipses, and polygons. Shapes you create are composed of anchor points, with paths connecting the anchor points. A basic square, for instance, is made of four anchor points on the corners, with paths connecting those anchor points (see the upper figure at right). A shape is referred to as a closed path because the ends of the path are connected.
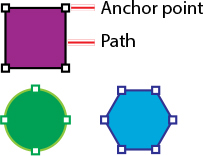
Examples of closed paths.
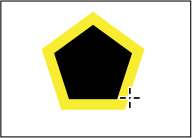
A path, like a line, can also be open. An open path has distinct anchor points on each end, called endpoints (see the lower figure at right). You can fill open and closed paths with color, gradients, or patterns.
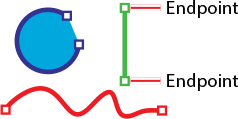
Examples of open paths.
Creating rectangles
The main logo art will be a toucan bird. You’ll start creating the bird with a few rectangles, and you’ll explore creating them using two distinct methods.
Select the Rectangle tool (
 ) in the toolbar.
First we’ll create the larger rectangle that will be the body of the bird.
In the middle of the artboard, drag to create a rectangle that is roughly a 2-inch square, then release the mouse button. It doesn’t have to be perfect; you’ll resize it shortly.

If you draw a perfect square, a magenta line appears diagonally in the shape. Also, as you create the shape, you can see the width and height of it in the little gray tool tip that appears next to the pointer—called the measurement label. The magenta line and label are a part of Smart Guides (View > Smart Guides).
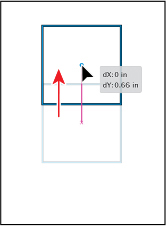
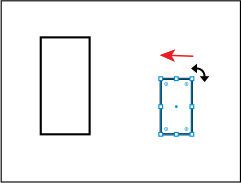
Move the pointer over the small blue dot in the center of the rectangle (called the center point widget). When the pointer changes (
 ), drag the shape up more into the top half of the artboard.
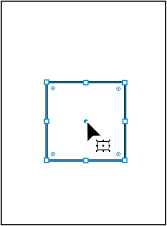
Next, you’ll create a smaller rectangle to serve as the bill (beak) of the bird.
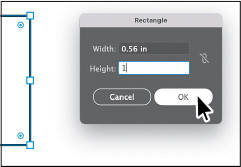
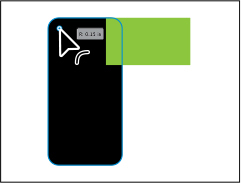
With the Rectangle tool (
) still selected, click to the right of the rectangle you made, to open the Rectangle dialog box.Change the Width to 0.56 inches and the Height to 1 inch. Click OK to create a new rectangle.
Creating a rectangle by clicking rather than dragging is useful when you know the size of the shape you need. For most drawing tools, you can either draw with the tool or click to create a shape of a specific size.
Editing rectangles
All of the shape tools, except for the Star tool and Flare tool, create Live Shapes. Live Shapes have attributes, such as width, height, rotation, and corner radius, that are editable without switching from the drawing tool you are using. With two rectangles created, you’ll make some changes to them so they look more like the body of a bird.
Select the Selection tool (
 ) in the toolbar.
Click anywhere in the larger rectangle to select it.
Drag the top, middle point of the rectangle down to make it a little shorter. When you see a height of approximately 1.75 inches in the measurement label (the gray tool tip next to the pointer), release the mouse button.
When you started, you created the larger rectangle at an approximate size. As you just saw, you can later resize the rectangle by dragging, but you can also do so with more precision in the Properties panel.
In the Transform section of the Properties panel on the right, make sure Maintain Width And Height Proportions to the right of Width (W:) and Height (H:) is deselected (it looks like this: (
 ).
).
Setting Maintain Width And Height Proportions (turning it on) is useful when you change the height or the width and want the other value to change proportionally.
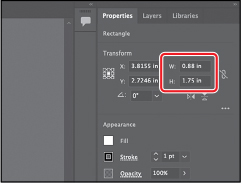
Select the Width (W:) value, and type 0.88 in. Press Return or Enter to accept the change.
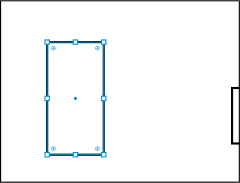
Now the smaller rectangle, the beak of the bird, needs to be rotated to look more like a beak.
Click the smaller rectangle to select it.
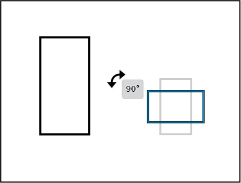
Move the pointer just off a corner of the shape. When you see rotate arrows (
 ), drag counterclockwise to rotate the shape. As you drag, press the Shift key to constrain the rotation to increments of 45 degrees. When an angle of 90° shows in the measurement label, release the mouse button and then the key. Leave the shape selected.
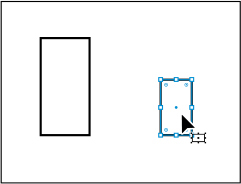
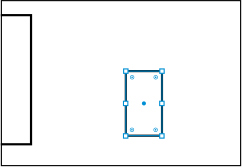
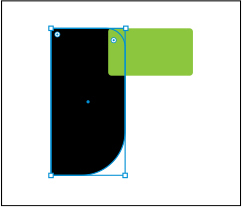
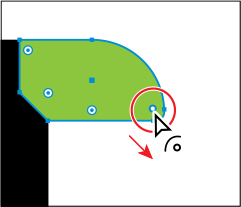
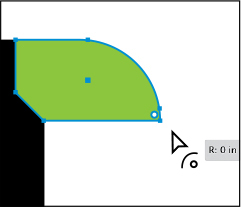
Drag the selected rectangle by the center point widget onto the first rectangle. Align the top edge with the top edge of the other rectangle. See the figure.
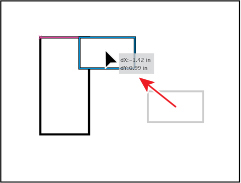
A magenta guide should show at the top edge when they are aligned.
Changing the color of the shapes
By default, shapes are filled with white and have a black stroke (border). Next, you’ll change the color of both rectangles to different colors.
With the smaller rectangle still selected, click the Fill color box in the Properties panel on the right.
In the panel that opens, make sure that the Swatches option (
 ) is selected at the top. Select a green color to fill the shape. Press the Escape key to hide the Swatches panel before moving on.
Click the Stroke color box in the Properties panel, make sure that the Swatches option (
) is selected, and select None to remove the stroke from the rectangle.Click the larger rectangle to select the body of the bird.
Click the Fill color box in the Properties panel on the right. In the panel that opens, make sure that the Swatches option (
) is selected at the top. Select black to fill the rectangle.Press the Escape key to hide the Swatches panel before moving on.
Click the Stroke color box in the Properties panel, make sure that the Swatches option (
) is selected, and select None to remove the stroke from the rectangle. Press the Escape key to hide the Swatches panel before moving on.Choose Select > Deselect, and then choose File > Save to save the file.
)
)
)
Dragging to round the corners of rectangles
The rectangles you created don’t look very much like a bird yet. Luckily, it’s easy to round off the corners of rectangles to make more interesting—and practical—shapes. In the next few sections, you’ll round the corners of the rectangles.
Click the larger rectangle to select it.
Choose View > Zoom In a few times.
You need to see the Live Corners widgets (
 ) in each corner of the rectangle. If you are zoomed out far enough, the Live Corners widgets are hidden on the shape. Zoom in until you see them.
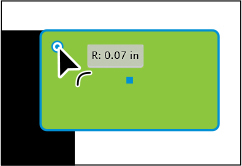
Drag any of the Live Corners widgets (
) in the rectangle toward the center to round all of the corners a little.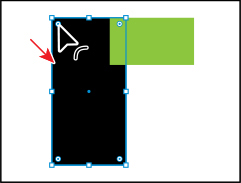
The more you drag toward the center, the more rounded the corners become. If you drag a Live Corners widget far enough, a red arc appears on the shape, indicating you’ve reached the maximum corner radius.
Click to select the smaller green rectangle, and drag any of the Live Corners widgets (
) to round the corners a little.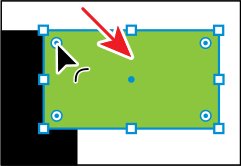
Rounding corners in the Properties panel
Aside from dragging to change the corner radius, you can also change the radius of all or individual corners in the Properties panel.
Select the larger rectangle.
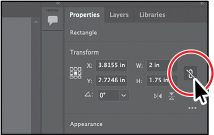
In the Properties panel, click More Options (
 ) in the Transform section to show more options. It’s circled in the following figure.
Ensure that Link Corner Radius Values is off—it should look like this:
 . You can click the button to toggle it on and off. It’s circled in the figure.
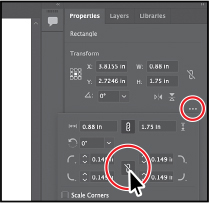
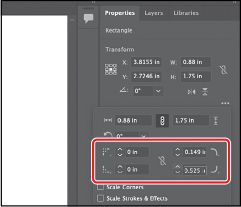
Each corner value in the panel corresponds to a corner in the shape.
Click the down arrow for the upper-left corner to make it 0 (zero)—removing the corner radius.
Do the same for the lower-left corner of the rectangle, removing the radius.
Click the up arrow for the lower-right corner several times until you see a value of approximately 0.525 inches. You can type the exact value in if you like.
Aside from changing the corner radius, you can also change the corner type. You can choose between Round (default), Inverted Round, and Chamfer.
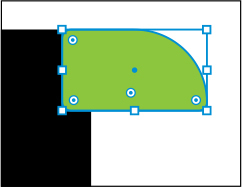
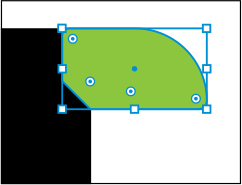
Click to select the smaller rectangle.
In the Properties panel, click More Options (
) in the Transform section to show more options.For the next step, pay attention to which corner is adjusted in the figure. Since the green shape was rotated earlier, the corner values in the panel no longer seem to correspond to the correct corner in the shape.
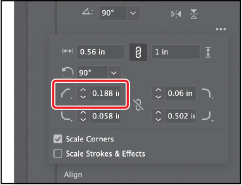
Ensure that Link Corner Radius Values is off—it should look like this:
. Change the corner radius for the upper-right corner of the rectangle to round it as much as you can. See the figure for the corner value to change.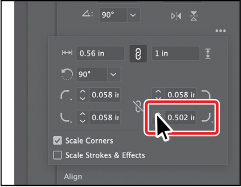
Choose Chamfer (
 ) from the Corner Type menu for the lower-left corner of the rectangle.
Make the corner radius for the same lower-left corner larger to see the chamfer.
Press the Escape key to close the options panel, and leave the rectangle selected.
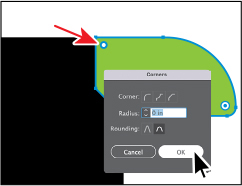
Rounding individual corners with the Direct Selection tool
You can also round individual corners using the Direct Selection tool. This can be useful if you want to round a corner or corners visually in the document. Next, you’ll explore rounding the individual corners of the smaller rectangle.
Select the Direct Selection tool (
 ) in the toolbar.
With the smaller rectangle still selected, double-click the upper-left Live Corners widget (
). An arrow is pointing to it in the figure.In the Corners dialog box, change the Radius value to zero (0). Click OK.
Notice that only one corner changed.
NOTE
The Corners dialog box allows you to also select an extra option, called Rounding, to set absolute versus relative rounding (see the previous figure). Absolute (
 ) means the rounded corner is exactly the radius value. Relative (
 ) bases the radius value on the angle of the corner point.
Click the Live Corners widget (
) in the lower-right corner to select it.Now, drag it away from the center of the shape to remove the rounding.
Choose Select > Deselect, and then choose File > Save.
Creating and editing ellipses
The Ellipse tool is used to create ellipses and perfect circles. Next, you’ll create a few ellipses with the Ellipse tool ( ) to make a colored area on the body of the bird.
Press and hold the mouse button on the Rectangle tool (
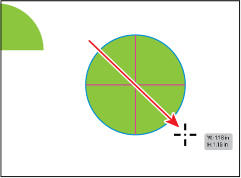
) in the toolbar, and select the Ellipse tool ().To the right of the green rectangle, drag to make an ellipse (circle) with an approximate width and height of 1.18 inches. You will most likely see magenta crosshairs in the ellipse as you are drawing it, when it is a perfect circle.
As with the rectangles, without switching to the Selection tool, you will reposition and modify the circle with the Ellipse tool.
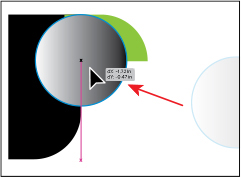
Click the Fill color box in the Properties panel on the right. In the panel that opens, make sure that the Swatches option (
) is selected at the top. Select the White, Black gradient color to fill the shape.Drag the circle by the blue center dot (the center point widget) onto the rectangles, as you see in the figure.
The ellipse will be covering the rectangles—and that’s okay for now.
Choose Select > Deselect, and then choose File > Save.
)
Practicing making the bird’s eye
Next, you’ll practice creating a circle with the Ellipse tool () to make the bird’s eye.
With the Ellipse tool (
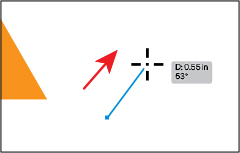
) still selected, to the right of the bird, press and drag to begin drawing an ellipse. As you drag, press the Shift key to make a perfect circle. When the width and height are both roughly 0.4 inches, release the mouse button and then the Shift key.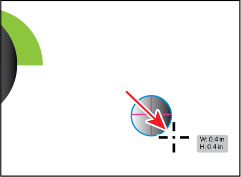
Click the Fill color box in the Properties panel on the right. In the panel that opens, make sure that the Swatches option (
) is selected at the top. Select the black color to fill the shape.Press the Escape key to hide the Swatches panel before moving on.
Click the Stroke color box in the Properties panel, make sure that the Swatches option (
) is selected, and select a yellow color to change the stroke color.Change the Stroke Weight in the Properties panel to 6.
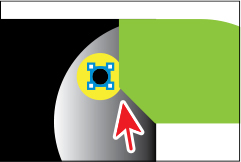
Now to move the circle into place and make it smaller.
Drag the circle from its center onto the bird to make the eye, as shown in the following figure.
To make it smaller, in the Transform section of the Properties panel on the right, make sure Maintain Width And Height Proportions to the right of Width (W:) and Height (H:) is selected (it looks like this:
 ) so they change proportionally. Change either value to 0.09 in.
Notice that the stroke weight (size) doesn’t change when you make the circle smaller, and the fill seems to have disappeared. You’ll learn why next.
)
)
)
)
Changing stroke alignment
As you’ve seen, strokes are visible outlines or borders of an object or path. By default, strokes center on a path, which means that along the path, half the stroke weight is on one side and half is on the other. You can adjust this alignment so the stroke appears in the center (default), inside, or outside. Next, you’ll change the stroke so you can still see the fill of the eye.
With the small circle still selected, click the word “Stroke” in the Properties panel to open the Stroke panel.
In the Stroke panel, click the Align Stroke To Outside button (
 ) to align the stroke to the outside edge of the circle.
The circle is small, but I hope you can see the difference when the stroke is aligned to the outside. If you need to, you can zoom in.
Choose Select > Deselect.
)
Creating a pie shape from an ellipse
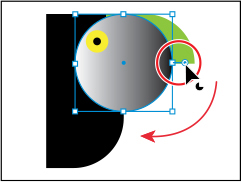
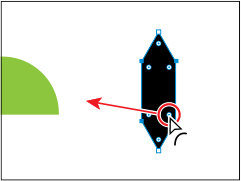
Ellipses have two pie widgets that you can drag to create a pie shape. Next, you’ll modify the gradient circle using those pie widgets to become a half circle.
Select the Selection tool (
), and click the gradient-filled circle on the body.With it selected, you see the pie widget (
 ) on the right side of the ellipse.
Drag that pie widget clockwise around the bottom of the ellipse just a little; then release.
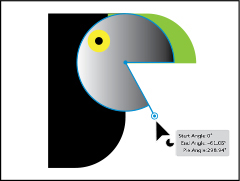
Notice that there is another pie widget in the same place from which you started dragging this one. The pie widget you just dragged is called the pie start angle and the other pie widget is called the pie end angle.
Drag the other pie widget (the pie end angle) from the same place counterclockwise around the top of the ellipse. Don’t worry about how far.
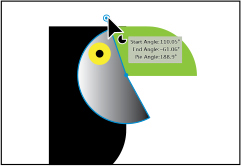
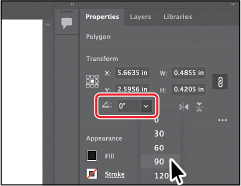
The circle will look best if we see exactly half of it. That requires the two pie widgets you dragged to be at precise angles to each other—showing 180 degrees of the circle. You can adjust them with precision in the Properties panel.
In the Properties panel to the right, click More Options (
) in the Transform section to show more options. Choose 90° from the Pie Start Angle ( ) menu.
Choose 270° from the Pie End Angle (
 ) menu.
Press the Escape key to hide the panel.
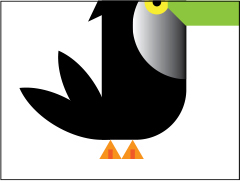
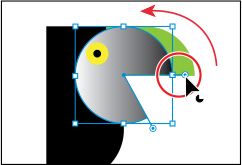
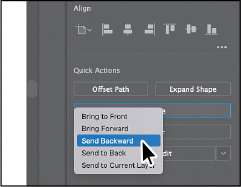
Click the Arrange button in the Properties panel, and choose Send Backward to send it behind the bird beak rectangle.

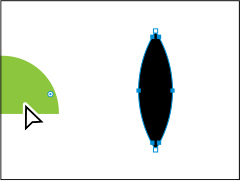
If necessary, drag the gradient-filled half circle so that its right edge aligns with the black bird shape. There is an arrow in the previous figure pointing to where to align the two shapes.
Select the yellow eye circle, click the Arrange button in the Properties panel, and choose Send Backward to send it behind the green beak shape. Drag the shape into position like you see in the figure if you need.
)
Creating polygons
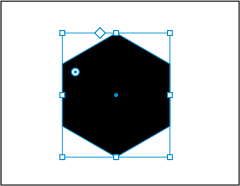
Using the Polygon tool ( ), you can create shapes with multiple straight sides. By default, the Polygon tool draws hexagons (six-sided shapes). What’s different about polygons is that they are drawn from the center. Polygons are also Live Shapes, which means attributes such as size, rotation, number of sides, and more remain editable after you create them.
Now you’ll create several polygons to make the tail feathers and feet of the bird.
Press and hold on the Ellipse tool (
) in the toolbar, and select the Polygon tool ().Choose View > Smart Guides to turn them off.
Move the pointer to the right of the bird. Drag to the right to begin drawing a polygon, but don’t release the mouse button yet. Press the Down Arrow key once to reduce the number of sides on the polygon to five, and don’t release the mouse button yet. Hold down the Shift key to straighten the shape. Release the mouse button and then the key. Leave the shape selected.
Notice that you didn’t see the gray measurement label (the tool tip), since it’s part of the Smart Guides that you turned off. Smart Guides can be helpful in certain situations, such as when more precision is necessary—maybe you want to know how large the shape is—and can be toggled on and off when needed.
Click the Stroke color box (
 ) in the Properties panel, make sure that the Swatches option () is selected, and select None to remove the yellow stroke.
Choose View > Smart Guides to turn them back on.
With the Polygon tool still selected, drag the little side widget (
 ) on the right side of the bounding box down to change the number of sides to 6.
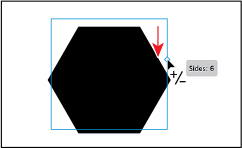
Choose File > Save.
Editing the polygon
Now you’ll change the size of the polygon and create a tail feather from it.
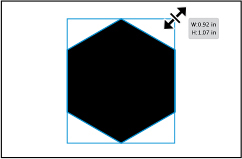
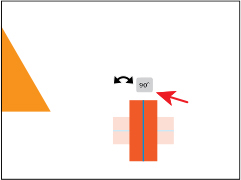
In the Transform section of the Properties panel on the right, choose 90 from the Rotate angle menu.
Press the Shift key and drag a corner to change the width and height proportionally (together). When the measurement label shows a height of approximately 1.07 inches, release the mouse button and then the key.
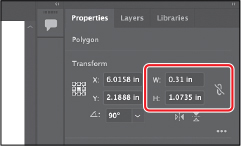
In the Transform section of the Properties panel on the right, make sure Maintain Width And Height Proportions is deselected (it looks like this:
) so you can change the values independently.Select the Width (W:) value and type 0.31. Press Return or Enter to accept the change.
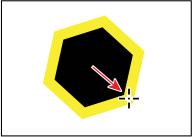
With the polygon shape now created, you’ll round some of the corners to make it look more like a feather. We only need to round some of the corners, so you will first select those corners you want to round.
Select the Direct Selection tool (
) in the toolbar.You should now see Live Corners widgets in each corner. If you don’t see them, zoom in! You’ll round four of the corners.
Drag across the four anchor points in the middle of the shape (see the following figure). With those anchors selected, you should see the Live Corners widgets (
) only for them.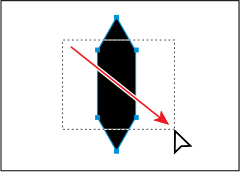
Drag one of the selected Live Corners widgets toward the center of the shape. Keep dragging past the center until you see the red lines, indicating that you can’t round them anymore. The shape now resembles a tail feather!

Making the tail feathers
Now you’ll make a copy of the tail feather, rotate both, and move them into place. This is a bit of review/practice, since you’ve copied, moved, and rotated content already!
Select the Selection tool (
) and with the polygon still selected, choose 120 from the Rotate angle menu in the Properties panel to rotate it.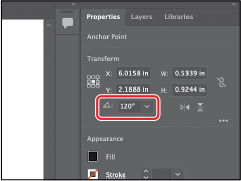
Drag the polygon into position like you see in the figure.
To make a copy, choose Edit > Copy and then Edit > Paste In Front.
A copy is placed directly on top of the original.
Rotate the copy by choosing 150 from the Rotate angle menu in the Properties panel.
Drag it into place like you see in the figure.
You may want to zoom in to the feather to more easily position it.
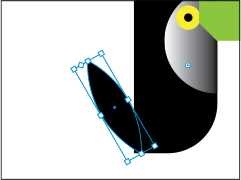
Practicing making the foot of the bird from a polygon
Now you’ll practice creating and editing a polygon to make a bird foot.
Select the Polygon tool (
) and move the pointer to the right of the bird.Drag to the right to begin drawing a polygon until you see 1 inch for Width in the measurement label, but don’t release the mouse button yet.
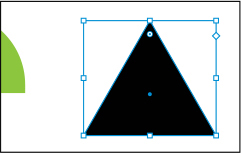
Press the Down Arrow key as many times as you need to reduce the number of sides on the polygon to three (a triangle), and don’t release the mouse button yet.
Hold down the Shift key to straighten the shape.
Release the mouse button and then the key. Leave the shape selected.
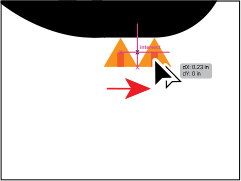
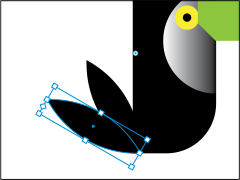
Drag the polygon from the center point below the bird to make a foot.
Click the Fill color box in the Properties panel on the right. In the panel that opens, make sure that the Swatches option (
) is selected at the top. Select an orange color to fill the shape.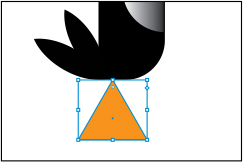
Later, you’ll edit the triangle so it’s smaller and the bird has two feet.
Creating a star
Next, you’ll use the Star tool ( ) to create a star that will be used as feathers on the bird’s head. Currently, the Star tool doesn’t create Live Shapes, so editing the star after the fact can be challenging.
When drawing with the Star tool, you use keyboard modifiers to get the number of points you want and to change the radius of the star’s arms (the length of the arms). Here are the keyboard modifiers you’ll use in this section when drawing the star:
Arrow keys: Pressing the Up Arrow key adds arms from the star as you draw it, and the Down Arrow key removes them.
Shift: This straightens the star (constrains it).
Command (macOS) or Ctrl (Windows): Pressing this key and dragging while creating a star allows you to change the radius of the arms of the star (make the arms longer or shorter).
Creating a star will take a few keyboard commands, so don’t release the mouse button until you are told. This section may take a few tries!
Press and hold on the Polygon tool (
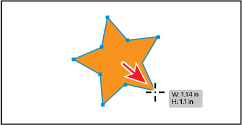
) in the toolbar, and select the Star tool ().To the right of the bird, press and drag to create a star shape. Drag until the measurement label shows a width of about 1.14 inches and then stop dragging. Don’t release the mouse button!
TIP
You can also click in the Document window with the Star tool (
 ) and edit the options in the Star dialog box instead of drawing it.
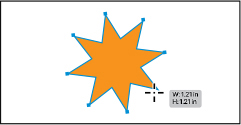
Press the Up Arrow key a few times to increase the number of points on the star to eight. Don’t release the mouse button!
Press Command (macOS) or Ctrl (Windows), and start dragging again, this time away from the center of the star a short distance, as you see in the figure, and then stop dragging without releasing the mouse button. Release Command or Ctrl but not the mouse button.
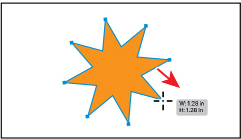
Pressing Command/Ctrl when drawing a star keeps the inner radius constant, making the arms longer or shorter, depending on how you drag.
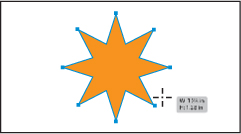
Press the Shift key. When the star straightens out, release the mouse button and then the key.
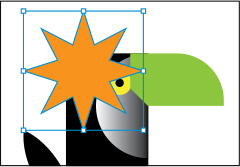
Select the Selection tool (
 ), and drag the star onto the head of the bird like you see in the first part of the following figure.
Click the Fill color box in the Properties panel on the right. In the panel that opens, make sure that the Swatches option (
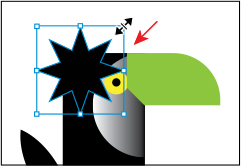
) is selected at the top. Select the black color to fill the shape.Press the Shift key and drag a corner to make it a bit smaller.
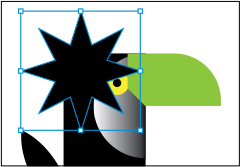
Click the Arrange button in the Properties panel and choose Send To Back to send the star behind the rest of the bird.
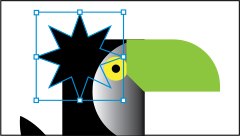
Drag it into position as you see in the figure.
Drawing lines
Lines created with the Line Segment tool are Live Lines, and similarly to Live Shapes, they have many editable attributes after they are drawn. Next, you’ll create a line, known as an open path, with the Line Segment tool. This line will be pretty short and will complete the foot of the bird.
Press and hold on the Star tool (
) in the toolbar, and select the Line Segment tool ( ).
).To the right of the orange triangle (the bird’s foot), press and drag in any direction to draw a line. Don’t release the mouse button yet.
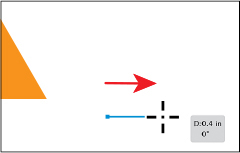
As you drag, press the Shift key to constrain the line to a multiple of 45 degrees. Notice the length and angle in the measurement label next to the pointer as you drag. Drag directly to the right until the line is around 0.4 inches in length. Release the mouse button and then the key.
With the line selected, change the stroke weight to 13 pt in the Properties panel to the right of the document.
Click the Stroke color box in the Properties panel, and make sure that the Swatches option (
) is selected in the panel that appears. Select a darker orange color.With the new line selected, move the pointer just off the right end. When the pointer changes to a rotate arrow (
 ), press and drag up until you see an angle of 90° in the measurement label next to the pointer. That will make the line vertical.
By default, lines rotate around their center.
Select the Selection tool (
) in the toolbar, and drag the line by the center point onto the orange triangle. Align it like you see in the figure.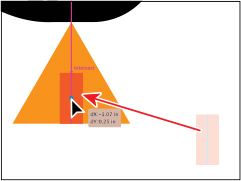
Drag across the line and orange triangle that make up the foot. Click the Group button in the Properties panel to keep the artwork together.
Next you’ll scale the foot. The darker orange line has a stroke, and by default, stroke weights do not scale. So if you make that line a lot smaller, the stroke weight will stay 13 pt. To scale the stroke as the line scales, you can turn on an option.
Click the More Options button (
) in the Transform section of the Properties panel. Select Scale Strokes & Effects in the panel that opens.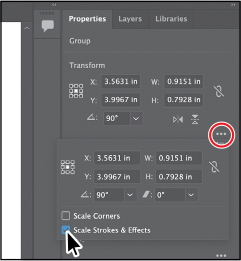
Back to the foot group, Shift-drag up from the bottom, center point on the bounding box to make it smaller. When it’s around 0.2 inches in width, release the mouse button and then the key. See the following figure.
Make a copy by Option- (macOS) or Alt- (Windows) dragging the group to the right. Release the mouse button and then the key.
You can move the feet so they look better. I dragged the feet a bit to the left.