- 7-1 Introduction
- 7-2 Terminology and Conventions-ANSI
- 7-3 Adding Dimensions to a Drawing
- 7-4 Drawing Scale
- 7-5 Units
- 7-6 Dimensioning Holes and Fillets
- 7-7 Dimensioning Counterbored and Countersunk Holes
- 7-8 Angular Dimensions
- 7-9 Ordinate Dimensions
- 7-10 Baseline Dimensions
- 7-11 Locating Dimensions
- 7-12 Fillets and Rounds
- 7-13 Rounded Shapes-Internal
- 7-14 Rounded Shapes-External
- 7-15 Irregular Surfaces
- 7-16 Polar Dimensions
- 7-17 Chamfers
- 7-18 Symbols and Abbreviations
- 7-19 Symmetrical and Centerline Symbols
- 7-20 Dimensioning to a Point
- 7-21 Dimensioning Section Views
- 7-22 Dimensioning Orthographic Views
- Chapter Projects
7-10 Baseline Dimensions
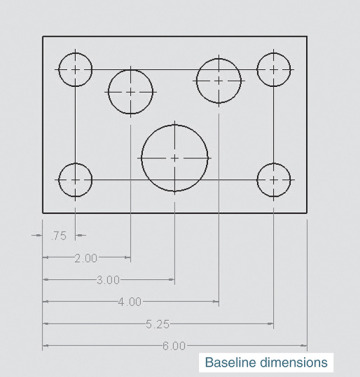
Baseline dimensions are a series of dimensions that originate from a common baseline or datum line. Baseline dimensions are very useful because they help eliminate the tolerance buildup that is associated with chain-type dimensions.
Creating Baseline Dimensions
See Figure 7-53.
1 Start a new Drawing document and create a top orthographic view of the part.
2 Use the Linear Center Mark tool and add connection centerlines between the four corner holes.
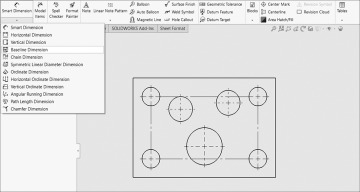
3 Click the arrowhead under the Smart Dimension tool and click the Baseline Dimension option.
4 Click the left vertical edge of the part and the lower portion of the first vertical centerline.
This will establish the baseline.
5 Click the lower portion of each vertical centerline and the right vertical edge line and locate the dimensions.
6 Click the arrowhead under the Smart Dimension tool and click the Baseline Dimension option.
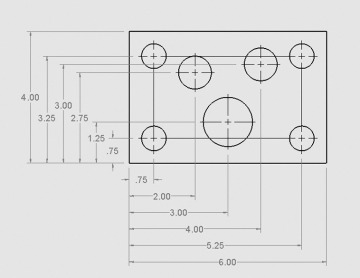
7 Click the lower horizontal edge of the part and the left end of the first horizontal centerline.
8 Click the left end of each horizontal centerline and the right top horizontal edge line.
The alignment of the vertical dimension lines can be changed by right-clicking the individual dimension and selecting the Break Alignment option.
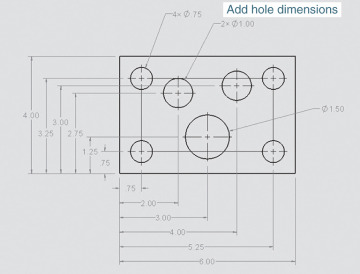
9 Add the hole dimensions.
Hole Tables
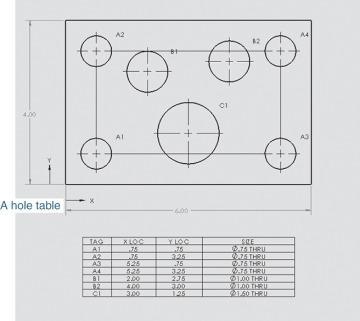
Hole tables are a method for dimensioning parts that have large numbers of holes where standard dimensioning may be cluttered and difficult to read. See Figure 7-54.
1 Start a new Drawing document and create a top orthographic view of the part.
2 Use the Linear Center Mark tool and add connection centerlines between the four corner holes.
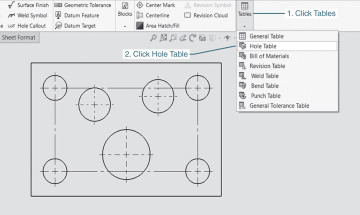
3 Click the Annotation tab, click Tables, and click Hole Table.
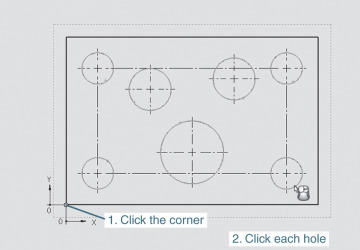
4 Click the lower-left corner of the part to establish an origin.
5 Click each hole.
As the holes are clicked they should be listed in the Holes box located in the Hole Table PropertyManager.
6 Click the green OK check mark and locate the hole table.
7 Add the overall dimensions.
8 Move the hole tags as needed to present a clear, easy-to-read drawing.
In this example all tags were located to the upper-right of the holes they define. Tables can be edited using the instructions presented in Section 5-11 for BOMs.
