- 7-1 Introduction
- 7-2 Terminology and Conventions-ANSI
- 7-3 Adding Dimensions to a Drawing
- 7-4 Drawing Scale
- 7-5 Units
- 7-6 Dimensioning Holes and Fillets
- 7-7 Dimensioning Counterbored and Countersunk Holes
- 7-8 Angular Dimensions
- 7-9 Ordinate Dimensions
- 7-10 Baseline Dimensions
- 7-11 Locating Dimensions
- 7-12 Fillets and Rounds
- 7-13 Rounded Shapes-Internal
- 7-14 Rounded Shapes-External
- 7-15 Irregular Surfaces
- 7-16 Polar Dimensions
- 7-17 Chamfers
- 7-18 Symbols and Abbreviations
- 7-19 Symmetrical and Centerline Symbols
- 7-20 Dimensioning to a Point
- 7-21 Dimensioning Section Views
- 7-22 Dimensioning Orthographic Views
- Chapter Projects
7-2 Terminology and Conventions—ANSI
Dimensions are added to drawings to define the part and guide manufacturing. General rules and conventions are used to dimension a drawing in a complete, orderly, and succinct manner.
Common Terms
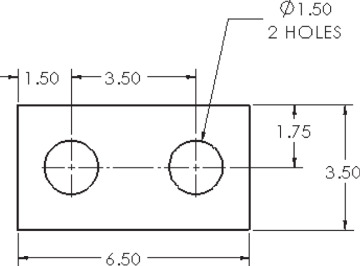
Figure 7-2 shows both ANSI- and ISO-style dimensions. The terms apply to both styles.
Dimension lines: In mechanical drawings, lines between extension lines that end with an arrowhead and include a numerical dimensional value located within the line.
Extension lines: Lines that extend away from an object and allow dimensions to be located off the surface of an object.
Leader lines: Lines drawn at an angle, not horizontal or vertical, that are used to dimension specific shapes such as holes. The start point of a leader line includes an arrowhead. Numerical values are drawn at the end opposite the arrowhead.
Linear dimensions: Dimensions that define the straight-line distance between two points.
Angular dimensions: Dimensions that define the angular value, measured in degrees, between two straight lines.
Dimensioning Conventions
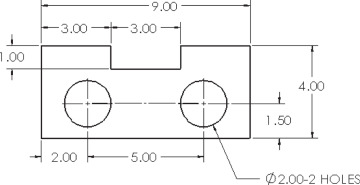
There are general guidelines you should follow when dimensioning drawings. Figure 7-3 shows some of the following guidelines applied to a dimensioned part.
Dimension lines should be drawn evenly spaced; that is, the distance between dimension lines should be uniform. A general rule of thumb is to locate dimension lines about 1/2in. or 15mm apart.
There should be a noticeable gap between the edge of a part and the beginning of an extension line. This serves as a visual break between the object and the extension line. The visual difference between the line types can be enhanced by using different colors for the two types of lines.
Leader lines are used to define the size of holes and should be positioned so that the arrowhead points toward the center of the hole.
Centerlines may be used as extension lines. No gap is used when a centerline is extended beyond the edge lines of an object.
Align dimension lines whenever possible to give the drawing a neat, organized appearance.
Common Errors to Avoid
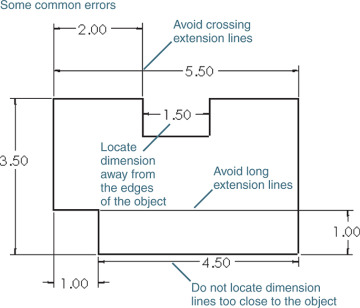
See Figure 7-4.
Avoid crossing extension lines. Place longer dimensions farther away from the object than shorter dimensions.
Do not locate dimensions within cutouts; always use extension lines.
Do not locate any dimension close to the object. Dimension lines should be at least 1/2in. or 15mm from the edge of the object.
Avoid long extension lines. Locate dimensions in the same general area as the feature being defined.


