- Setting Selection Preferences
- Selecting Lines with the Selection Tool
- Selecting Fills with the Selection Tool
- Using a Selection Rectangle
- Using the Lasso Tool
- Deselecting Elements
- Repositioning Elements Manually
- Repositioning Elements Numerically
- Basic Editing Tasks: Cut, Copy, Paste
- Editing Existing Elements with Assistance
- Moving End Points with the Selection Tool
- Moving Points with the Subselection Tool
- Reshaping Curves with the Selection Tool
- Reshaping Curves with the Subselection Tool
- Converting, Removing, and Adding Points
- Reshaping Fills
- Changing the Size of Graphic Elements
- Reorienting Graphic Elements
- Distorting Graphic Elements
- Changing the Envelope of Selected Elements
- Modifying Strokes
- Using the Eraser Tool in Normal Mode
- Using the Faucet Modifier
- Modifying Fill Colors
- Creating Solid Colors: Color Mixer Panel
- Creating New Gradients
- Creating Color Sets
- Putting Gradients to Work
- Modifying Applied Gradients
- Applying Attributes of One Graphic Element to Another
- Converting Lines to Fills
Modifying Fill Colors
Flash provides two methods for modifying the color of an existing fill. You can use the paint-bucket tool to apply the current fill settings to an unselected fill shape, or you can select the fill shape on the Stage and then choose a new fill color via the fill-color box in the Color Mixer panel, the Toolbar, or the Property Inspector.
To change fill color with the paint-bucket tool and Color Mixer panel:
In the Toolbar, select the paint-bucket tool, or press K.
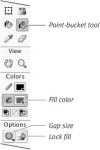
Modifiers for fills appear in the Options section of the Toolbar (Figure 3.75).

Figure 3.75 The paint-bucket tool lets you modify fills without first selecting them.
In the Color Mixer panel, set the following attributes:
- From the Fill Style menu, choose Solid.
- Click the fill-color box, and choose a new color from the swatch set.
The fill-color boxes in both the Color Mixer and the Toolbar display the selected color, and the paint bucket is ready to apply the new fill color.
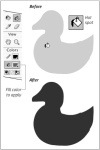
Click the paint bucket's hot spot (the tip of the drip of paint) somewhere inside the fill you want to change.
The shape fills with the new color (Figure 3.76).

Figure 3.76 Clicking a fill with the paint bucket applies whatever color is selected in the fill-color box. Use this technique to change existing unselected fills.
To modify selected fills with the Color Mixer panel:
- Using the selection tool, select one or more fills on the Stage.
In the Color Mixer panel, click the fill-color box, and choose a new color from the swatch set.
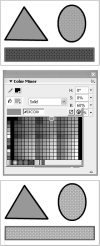
Flash changes all selected fills to whatever color you chose in the Color Mixer panel (Figure 3.77).

Figure 3.77 Select one or more fills for modification (top). Choose a new color from the Color Mixer panel's fill-color box (middle). Flash changes the color of all the fills in your selection (bottom).