- Setting Selection Preferences
- Selecting Lines with the Selection Tool
- Selecting Fills with the Selection Tool
- Using a Selection Rectangle
- Using the Lasso Tool
- Deselecting Elements
- Repositioning Elements Manually
- Repositioning Elements Numerically
- Basic Editing Tasks: Cut, Copy, Paste
- Editing Existing Elements with Assistance
- Moving End Points with the Selection Tool
- Moving Points with the Subselection Tool
- Reshaping Curves with the Selection Tool
- Reshaping Curves with the Subselection Tool
- Converting, Removing, and Adding Points
- Reshaping Fills
- Changing the Size of Graphic Elements
- Reorienting Graphic Elements
- Distorting Graphic Elements
- Changing the Envelope of Selected Elements
- Modifying Strokes
- Using the Eraser Tool in Normal Mode
- Using the Faucet Modifier
- Modifying Fill Colors
- Creating Solid Colors: Color Mixer Panel
- Creating New Gradients
- Creating Color Sets
- Putting Gradients to Work
- Modifying Applied Gradients
- Applying Attributes of One Graphic Element to Another
- Converting Lines to Fills
Converting Lines to Fills
Flash lets you convert lines and outlines (strokes) to fills, which you can then edit or fill with gradients. You can expand or contract a shape by a user-specified amount. And you can create soft-edged graphic elements. These conversions increase the number of curves that Flash creates and therefore may increase file size.
To convert a line to a fill:
- In the Toolbar, select the pencil tool.
- Draw a simple line on the Stage.
- Change to the selection tool, and click the line to select it.
- From the Modify menu, choose Shape > Convert Lines to Fills (Figure 3.107).
Flash converts the line to a fill shape that looks exactly like the line. You can now edit the "line's" outline (or apply a gradient) as though you were working with a fill created with the brush tool (Figure 3.108).

Figure 3.107 Choose Modify > Shape > Convert Lines to Fills to transform strokes into fills.

Figure 3.108 You can convert an outline, such as this line drawn with the pencil tool (top), to a fill. The fill then has its own editable outlines (middle and bottom).
To expand a fill:
- In the Toolbar, select the oval tool with no stroke.
- On the Stage, draw an oval shape.
- Change to the selection tool, and click the shape to select it.
From the Modify menu, choose Shape > Expand Fill.
The Expand Fill dialog appears (Figure 3.109).

Figure 3.109 The Expand Fill dialog presents options for resizing a selected fill.
- Enter a value in the Distance field.
Choose a Direction option.
Expand makes the shape larger. Inset makes the shape smaller.
Click OK.
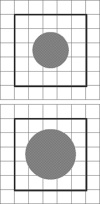
Flash blows the fill shape up like a balloon or shrinks it (Figure 3.110).

Figure 3.110 Using the Expand Fill command on the selected fill (top) causes its outlines to expand. The grid here is set to 36 pixels.
To soften the edges of a fill:
- In the Toolbar, select the oval tool with no stroke.
- On the Stage, draw an oval shape.
- Change to the selection tool, and click the shape to select it.
From the Modify menu, choose Shape > Soften Fill Edges.
The Soften Fill Edges dialog appears (Figure 3.111).

Figure 3.111 Enter values in the Soften Fill Edges dialog to create a softer-looking edge for a selected shape.
- Enter values for Distance and Number of Steps.
Choose a Direction option.
Expand makes the shape larger; Inset makes the shape smaller.
Click OK.
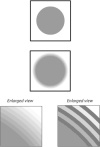
Flash divides the expansion or inset value by the number of steps you specified and creates a series of concentric shapes that outline your original shape. The new shapes get progressively lighter in color as they approach the outer edge of the softened shape (Figure 3.112).

Figure 3.112 The Soften Fill Edges command creates a purposeful banding effect to give fill shapes a soft edge. The selected circle (top) gets a soft edge in eight steps (middle). Enlarged views show the banding more clearly (bottom left); you can select individual steps of the softened edge (bottom right).