- Drawing apDiv Objects
- Editing the CSS Code
- More Layout Techniques
Editing the CSS Code
As we've seen, some elements of the apDiv can be changed interactively right on the page—you can grab the upper-left corner and move an apDiv, or you can use one of the eight corner handles to resize a selected apDiv. Other attributes, including background colors or images, can be assigned and edited in the Properties inspector.
An extensive set of additional layout and formatting attributes are available in the CSS Styles panel (choose Window > CSS Styles). Expand the set of styles for your page by clicking the expand triangle (down arrow) in the CSS Styles panel. A separate CSS style is displayed for each of your apDiv tags.
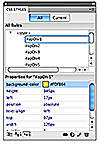
With an apDiv selected in the CSS Styles panel, Dreamweaver displays a list of attributes in the bottom part of the panel, as shown in Figure 9.

Figure 9 Examining CSS attributes for an apDiv tag.
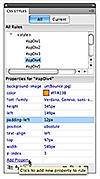
At the bottom of the properties list is a link to add a new property (see Figure 10). When you click the Add Property link in the CSS Styles panel, a new row appears in the panel, and a Click to Add New Property to Rule pop-up menu becomes active. When you open that pop-up, a long list of attributes appears. Most of these properties are named fairly intuitively: Background color changes the background color, Border changes border attributes, and so on. One feature you're likely to use is the Padding attribute, which defines space on the top, bottom, left, right, or all sides of an apDiv. In Figure 11, I'm adding 12 pixels of padding to create some space between my text and the edge of the apDiv.

Figure 10 Locating the link to add a new property.

Figure 11 Defining padding attributes for an apDiv.