- 1. iDVD Overview
- 2. iDVD Themes
- 3. Customizing iDVD Themes
- 4. Slideshows
- 5. Archiving, Encoding, and Burning
3. Customizing iDVD Themes
The benefit of iDVD's approach to creating DVD menus is that everything is already in place; the background imagery, animation, typefaces, and navigation structure are all prefab. Your job is to fill in the content.
While that may sound nicely organized to some people, others see it as a collection of limitations. Where's the fun if everything is spelled out for you already? This is where iDVD's theme customization comes into play. It may not be as open-ended as Apple's professional-caliber DVD Studio Pro, but there's enough flexibility built in to let you make your own personal stamp on the menu design.
Editing Text Formatting
A hallmark of the Macintosh has been the capability to change the appearance of text onscreen. Sure, every computer now offers dozens of fonts and styles, but in 1984 that capability was a big deal. So it's sensible that you can change the font, alignment, and color of your menu titles, buttons, and text blocks.
To edit text formatting:
- Click the text block you want to edit. If the Inspector window is not visible, a set of pop-up menus appears below the text (
Figure 3.1
). If the Inspector is visible, it becomes either the Text Info window or the Button Info window, depending on the text that's selected (
Figure 3.2
).
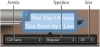
Figure 3.1 Change the formatting of the menu title or stand-alone text blocks in the Preview window.
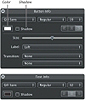
Figure 3.2 The Inspector window includes font formatting settings, but changes depending on what's selected: a button (top) or a text block, such as the menu's title (bottom).
- To change the text's font and size, use the following pop-up menus.
- Family. Choose a font family from this pop-up menu to change the font.
- Typeface. Choose the style of font from this pop-up menu.
- Size. Choose a font size from this pop-up menu.
- With the Inspector window visible, you can also edit the following attributes:
-
Color. Click the Color field to display the Colors palette and choose a new color (
Figure 3.3
).
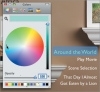
Figure 3.3 iDVD uses the Mac OS X Colors palette to choose from the full spectrum of colors.
- Shadow. Drop shadows are often overused in design, but in DVD menus they often make the text more readable. Click this checkbox to add a subtle drop shadow behind the text.
-
Color. Click the Color field to display the Colors palette and choose a new color (
Figure 3.3
).
)
)
)
To reset text to the theme's default formatting:
- Select the text block you want to change back to the theme's formatting.
- Choose Reset Object to Theme Settings from the Advanced menu. Or, Control-click the block and choose Reset to Theme from the contextual menu.
Tips
- If you want to change the appearance of a menu's title, you don't need to select anything first; the text controls in the Menu pane apply to the title by default.
- Hooray! In previous editions of this book, I've complained that you couldn't simply choose a standard font size (such as 12 point), but had to rely on an inaccurate slider. Now...you can.
- More good news! iDVD lets you apply formatting changes to each text block or button label independently (
Figure 3.4
). The old restrictions of applying one font for all button labels is gone, gone, gone. However, remember that just because you can use all sorts of crazy fonts on your menu doesn't mean you should.

Figure 3.4 and are two very different terms. is an even better word.
)
Editing Text Alignment and Position
iDVD uses two terms for aligning text: alignment and position. Alignment refers to how the text lines up within its allotted space, or how button labels appear in relation to each other. Position describes where a button's label appears in relation to the button's icon (if it's visible).
Title alignment
The title in each theme is bound to a specific area by default, but you can opt to place it anywhere within the menu. You can also make it disappear if a title isn't needed.
To set the title alignment:
- Select the menu title, or make sure nothing is selected (the settings apply to the title if nothing else is selected).
- In the Inspector window, click one of the Align options: Left, Center, or Right (
Figure 3.5
). The text is moved relative to the area designated for the title. For example, choosing Center in the Reflection White theme shifts the text to the right of the default position; it doesn't move it to the center of the screen as you might expect (
Figure 3.6
).

Figure 3.5 Choose an alignment button to specify text alignment.
To position the text anywhere you want, simply drag the title elsewhere on the screen; doing so unlocks the title from the theme's placement grid and enables you to drag the title anywhere onscreen ( Figure 3.7 ).
Figure 3.6 A title's position is relative to the area allotted by the theme, not by the overall screen.
Figure 3.7 You have the freedom to place the title anywhere.
)
)
)
To remove the menu title:
- Select the title and press the Delete key, or choose Delete from the Edit menu. Note that once a title has been deleted, you can't add it back to your page without using the Undo command.
Button label position
In themes where buttons include an icon, instead of just text, the Label pop-up menu determines where the text appears in relation to the icon.
To set the position of button text:
- Select a button in the menu.
- In the Button Info window, choose a button label location from the Label pop-up menu (
Figure 3.8
).
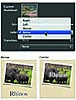
Figure 3.8 When a button includes an icon, the Position pop-up menu includes more options.
)
To remove button text:
- Click the button to select it, then click it again to select the label's text.
- Press the Delete key or choose Delete from the Edit menu.
Button text alignment
In themes that use only text for buttons, the Align controls specify the text alignment of the buttons relative to each other. (You can also switch normal buttons to text buttons on any theme; see "Editing Buttons" on the next page.)
To set the alignment of button text:
- Select a text button in the menu.
- In the Button Info window, click the Left, Center, or Right buttons to align the text of the labels to each other (
Figure 3.9
).
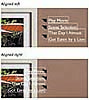
Figure 3.9 You can choose the alignment of text-only buttons.
)
Editing Buttons
Buttons are the mechanism by which your viewers interact with the DVD. In addition to changing the buttons' text, you can change their shape, location, and size, plus the highlight color.
To change the button style:
- Select one or more buttons in the menu.
- Click the Buttons button to view the Buttons pane. (By the way, now I can't stop saying "Buttons button!")
- Choose a button type from the pop-up menu (
Figure 3.10
).
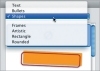
Figure 3.10 Change the appearance of button icons by choosing a new style in the Buttons pane.
- Click a button style to apply it to the selected button in the Preview window.
)
To reposition buttons:
- Drag a button onto another button to swap their locations on the grid. The others move out of your way as you drag.
- Drag the button to a new location within the menu (
Figure 3.11
). As you drag, iDVD displays alignment guides to help you line up objects.

Figure 3.11 You're free, to do what you want, any ol' time, by free positioning buttons.
)
Or
- Select two or more buttons.
- Control-click to bring up the contextual menu, and choose the options on the Align Objects and Distribute Objects submenus (
Figure 3.12
).
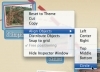
Figure 3.12 Easily align and distribute buttons from the contextual menu.
)
To re-align buttons:
- With nothing selected in the Preview window, click the Inspector button to bring up the Menu Info window.
- In the Buttons area, click Snap to grid (
Figure 3.13
). The menu's buttons return to the layout grid.
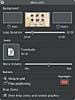
Figure 3.13 When it's time to crack down and restore order, click the Snap to grid button.
)
To change the button highlight color:
- In the Buttons area of the Menu Info window, click the Highlight field and choose a color from the Colors palette.
To resize buttons:
- Select one or more buttons in the menu.
- In the Button Info window, drag the Size slider. This feature becomes useful if you've added lots of buttons to your menu and you want to prevent overlap (
Figure 3.14
).
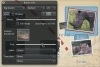
Figure 3.14 The Size slider makes button icons smaller or larger (but not the button text).
)
To change the appearance of a button icon:
- In themes with button icons, drag a photo or movie from the Media pane or the Finder onto the Button info window's Custom thumbnail field (
Figure 3.15
).
You can switch back to the generic sub-menu icon, if you want, by clicking the icon and moving the Thumbnail slider to the left. Or, drag the image out of the field to remove it. Only one photo or movie can be applied to a submenu icon—dragging others just replaces the previous image.
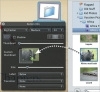
Figure 3.15 Drag a photo or movie from the Media pane to the Custom thumbnail field to change its icon (this works only in themes that use icons, naturally).
)
To reset a button to the theme default:
- Select the button you want to change back to the theme's formatting.
- Choose Reset Object to Theme Settings from the Advanced menu. Or, Control-click the block and choose Reset to Theme from the contextual menu.
Changing the Background
To alter a theme's appearance dramatically, swap the existing background image with your own photo or movie.
To use a photo or movie as the background:
- Click either the Inspector button to bring up the Menu Info window or the Edit Drop Zones button.
- Drag a photo or movie from the Media pane or the Finder and drop it onto the Menu icon in either location. The background image is replaced, but the drop zones remain (
Figure 3.16
).
Figure 3.16 Adding a photo or movie to the Menu icon in the Menu Info window (top) or the Drop Zones Editor (bottom) makes it the theme's background.
)
Or
- From the File menu, go to the Import submenu and choose Background Video.
- Locate a movie on your hard disk, and click Import.
Or
- Drag a photo or movie file from the Media pane or the Finder to the menu, but don't release the mouse button; be sure to avoid stopping on a drop zone.
- Press the Command or Option key to bring up a contextual menu with choices (
Figure 3.17
).

Figure 3.17 Press Command or Option before releasing the mouse button to choose an action.
- Choose Replace background to use your file as the background.
)
To use a photo or movie as the background with no drop zones:
- Follow the steps above to change the background image.
- In the Menu Info window, deselect Show drop zones and related graphics (
Figure 3.18
).
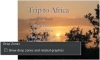
Figure 3.18 Turn off the option to show drop zones to use only your image or movie as the background.
)
To set the beginning and ending of a background video:
- With a video set as the background, make the Menu Info window visible.
- Click the small triangle above the Loop Duration slider to display the Background Movie Start/End control (
Figure 3.19
). The triangle appears only when a video is used as the background.
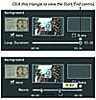
Figure 3.19 Use the almost-secret control in the Loop Duration slider to set the start and end of your background video.
- Drag the ends of the control to set the start and end of the video.
)
To remove your background photo or movie:
- Switch to the Menu pane.
- Drag the photo or movie out of the Background well (
Figure 3.20
). The theme's default background reappears.
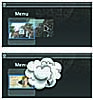
Figure 3.20 Drag a photo or movie file out of the Background well to revert to the theme's original background image. The image disappears in a poof of smoke. (I'm sure the more appropriate term is "puff" of smoke, but this seems more like a "poof.")
)
Setting Background Audio
Being a more visual person, I tend to forget about audio unless it's either (a) highly annoying, or (b) eerily nonexistent. Some themes include background audio, others don't, but you can add an audio file to any of them to customize your menu's sound.
To choose an audio file:
- Switch to the Media pane, and click the Audio button (if it's not already active). Your GarageBand songs and iTunes music appear (
Figure 3.21
).

Figure 3.21 The Audio list in the Media pane displays your iTunes and GarageBand songs.
- Locate the audio file you wish to use. To help narrow your search, click one of the playlists in the upper portion of the window, or type a name (song or artist) in the search box at the bottom.
- Click the Play button if you want to preview the file. Otherwise, click the file to select it.
)
To add background audio:
- Drag an audio file from the Media pane or the Finder to the Audio well in the Menu Info window (
Figure 3.22
).
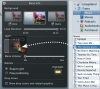
Figure 3.22 Drop a song file onto the Audio well to use that as your background sound.
- Drag an audio file from the Media pane or the Finder to the Menu icon in the Drop Zones Editor.
- Drag an audio file from the Media pane or the Finder to the menu.
)
Or
- From the File menu, choose Audio from the Import submenu.
- Locate an audio file on your hard disk, and click Import.
To change audio's volume:
- Drag the Menu Volume slider in the Menu Info window.
To remove background audio:
- Bring up the Menu Info window or the Drop Zones Editor.
- Drag the sound file out of the Audio well (or Menu well in the Drop Zones Editor). The well's icon changes to a generic speaker icon.
Tips
- To play more than one song in the background, select multiple audio files and drag them to the Audio well together.
- If you want the background audio turned down, not off, use the Volume slider at the bottom of the iDVD window. This setting only affects the volume while you work, not the volume of the audio when the project is burned to disc.
- Background audio doesn't need to be music. Spoken-word content or other sound effects work just as well.
- You can drag a QuickTime movie to the Audio well and use only its audio track.
- GarageBand songs need to be saved with an iTunes preview before you can add them to iDVD.
- Speaking of GarageBand, that type of audio is great for a DVD menu: you have control over the duration of the song, and it can loop in the background.
- If you add a background movie, then delete the movie from the Background well, the audio stays. You also need to delete the music from the Audio well.
- iDVD recognizes when it's using protected audio files, such as older songs you bought from the iTunes Music Store, and displays the file's icon (which includes a small lock image,
Figure 3.23
).
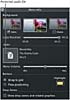
Figure 3.23 The icon in the Audio well can tell you if you're using protected audio content.
Looping Movie Playback
Normally, a movie or scene plays its frames and finishes, moving on to the next scene or returning to the menu. However, you can opt to loop a movie so that once started it will replay until you intervene.
To loop a movie:
- Click the Map button to switch to the Map view.
- Select a movie file.
- Choose Loop Movie from the Advanced menu. A loop icon appears on the movie clip (
Figure 3.24
).
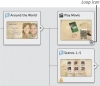
Figure 3.24 A loop icon in the Map view indicates that a movie will replay once it reaches its end.
)
Saving a Favorite Theme
You've added a new background, new music, and tweaked the buttons and text to your liking. If you want to keep this setting for future projects, save it as a favorite.
To save a favorite theme:
- Choose Save Theme as Favorite from the File menu (
Figure 3.25
).
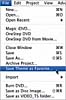
Figure 3.25 When you're ready to save your theme, choose the Save Theme as Favorite option.
- In the dialog that appears, type a name for the theme (
Figure 3.26
).
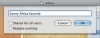
Figure 3.26 Type a name for your new favorite theme, and decide if all users of your Mac can use it.
- To make the theme available for all users on your computer, enable the Shared for all users option.
- If you're changing a favorite that you've already created and want to save over it, mark the Replace existing checkbox.
- After the theme is saved, it becomes available in the Themes pane. Choose Favorites or All from the pop-up menu to view your theme (
Figure 3.27
).
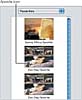
Figure 3.27 Saved themes appear in the Themes pane's Favorites list, and include a custom icon.
)
)
)
Deleting a Favorite Theme
Creating a favorite theme is a simple operation, but iDVD offers no similarly direct method of removing a favorite. However, you can do it with a little poking around in the Finder.
To delete a favorite theme:
- Quit iDVD if it is running.
- In the Finder, locate iDVD's Favorites folder. There are two; the location of the one you want to delete depends on whether the theme was made available to all users or not.
- If you enabled the Shared for all users option, go to [Computer] > Users > Shared > iDVD > Favorites (
Figure 3.28
).
Figure 3.28 A favorite theme shared by all users appears in Mac OS X's Users directory.
- If you did not enable Shared for all users, go to Home > Library > Application Support > iDVD > Favorites (
Figure 3.29
).
Figure 3.29 If the theme will be used only by you, it's stored within your user Library folder.
- If you enabled the Shared for all users option, go to [Computer] > Users > Shared > iDVD > Favorites (
Figure 3.28
).
- Select the file corresponding to the theme you wish to delete, and drag it to the Trash.
- Re-launch iDVD to see that the favorite theme is now no longer available.
)
)
)