Publishers of technology books, eBooks, and videos for creative people

Home > Articles > Design > Adobe Creative Suite

From the book Buttons

Buttons

If someone asks you to list InDesign’s basic building blocks, you might respond frames (which can include text or graphics or nothing at all) and lines. But there’s a third type of object, too: a button. Buttons are only useful in interactive PDF or SWF files, but they can do all kinds of things—jump to another page, play a movie or sound, or hide or show another button.

You can make any selected frame or line into a button (except for frames that contain movies or sounds)—just choose Convert to Button from the Interactive submenu, under the Object menu or in the Context menu. Or, click the Convert Object to a Button button in the Buttons panel (which you can find in the Interactive submenu, under the Window menu). You can also turn a button back into an object by selecting Convert from Button.

An object turned into a button acts like any other object—you can even print it. But the object comes to life when you turn on the Interactive Elements check box in the Export PDF dialog box, or the Include Buttons checkbox in the Export SWF dialog box.

The Way of Buttons

It’s important to remember that buttons are containers, like a special kind of frame. When you turn an object into a button, InDesign actually puts that object inside a button “frame.” This means you can select that nested frame (with the Direct Selection tool or by clicking the Select Content button in the Control panel), move it around, delete it, replace it with something else, and so on.

Behavioral Modification

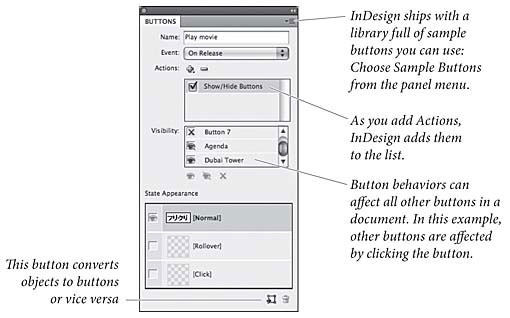
To make a button actually do something—react when the user clicks it—you have to change the button’s behavior in the Buttons panel (see Figure 13-4).

Figure 13.4 Adding Behaviors to a Button

  1. Give the button a descriptive name at the top of the panel.
  2. Buttons are a kind of “field” (in PDF parlance), and you have four options for a field’s visibility: Visible, Hidden, Visible but Doesn’t Print, or Hidden but Printable. The default is Visible; you can change the option in the Buttons panel menu.
  3. Why have an invisible button? Don’t think of buttons as just something you click; if you want a picture to appear when you click a button, you make two buttons: a visible one that you click and one that has a picture in it (set to Hidden).

    Most of your buttons will either be Visible or Hidden. Occasionally, Visible but Doesn’t Print can be useful—you could use it for something like a “Submit” button that you want to have appear on the screen, but not on the printed page. The Hidden but Printable option is really odd—it means that the object is invisible on screen, but shows up when you print. You might use this for special information that is only relevant for a hardcopy version of a page.

  4. Choose a trigger from the Event pop-up menu: On Release (that’s when the user lets go of the mouse button), On Click (when the mouse button is down), On Roll Over (when the cursor is above the button), On Roll Off (when the cursor leaves the button), On Focus (when the button is selected—either by a click or by a press of the Tab key), or On Blur (when a click or press of the Tab key moves the focus to another field).
  5. Select one of the actions you want to associate with the Event from the Actions pop-up menu.
    • Close. This closes the current PDF file.
    • Exit. This quits the viewer (Acrobat).
    • Go to Anchor. If you have used the Hyperlinks panel to make a text anchor in this or any other document, you can jump to that point with this action. If the InDesign document that contains the anchor isn’t open, you can click Browse to select it.
    • Go to page. The first four “Go to” actions work in PDF and SWF files: First page, Last page (the final page of the PDF document), Previous page (the page before the current one), and Next page (the page following this one). For example, you might assign these as navigation buttons, and put them on a master page of a document. Buttons work well on master pages because they appear on every document page tagged with that master. The fifth option, Go to Page (which jumps directly the page number you specify), only works when exported in a SWF file. If you want to jump to a particular page in a PDF file, you need to use Go to Anchor.
    • Go to Previous View. This action returns to the last page the viewer displayed. If you jump from page 5 to page 20, Go to Previous View would jump back to page 5.
    • Go to Next View. This action only works if someone has already invoked a “Previous page” action; it’s like the Forward feature in a Web browser.
    • Go to URL. Like a URL hyperlink, the Go to URL action hands off the URL you specify to the default Web browser. This can be any URL, including http://, file://, or mailto:.
    • Movie. If you have placed a movie or animation file (see “Audio and Video,” later), you can control it using the Movie action. After selecting Movie, select a movie, and then specify what you want to do to it: Play, Pause, Stop, or Resume.
    • Open File. Use this action to open another file. You need to specify the file using an absolute file path; it’s much simpler to click the Browse button to let InDesign figure out the path for you.
    • Show/Hide Buttons. While Acrobat has several different kinds of fields (such as text entry fields, check box fields, and so on), InDesign currently supports only button fields. Whenever you want objects to appear or disappear on your page, make them into buttons. Even if those buttons have no behavior of their own, they can still be controlled (made visible or hidden) using the Show/Hide Buttons action. When you select Show/Hide Buttons, the panel lists all the fields (buttons) in your document (not just the fields on the current page). You can click once in the box to the left of the field name to make the button visible (you’ll see a little eyeball), or click again to make the button hidden (InDesign draws a red line through the eyeball). Click a third time to make it neutral (this action won’t affect the button at all).
    • Sound. After you import a sound file into your document, you can Play, Pause, Stop, or Resume it with this action.
    • View Zoom. A button can control the current view settings in Acrobat. After selecting the View Zoom behavior, choose from among the many options in the Zoom pop-up menu, including Zoom In, Zoom Out, Fit in Window, Rotate Clockwise, and Single Page.

After creating an action, you can select another Event/Action combination and add it to the button. This means one button click can do a bunch of things at once: go to another page, show a hidden object on that page, and immediately start playing a movie. To remove an action, select it and click the Delete Action button.

Tab Order

When you open a PDF in Acrobat and press the Tab key, the focus jumps to the first field on the page; press Tab again, and it skips to the next field. If the field is a button, you can press Return/Enter to “click” the button. But who specifies the order of the buttons? You do. As long as you have more than one button on a page, you can choose Set Tab Order from the Interactive submenu (under the Object menu). To reorder a field in the list, select it and click the Move Up or Move Down buttons—or better, just drag it into the correct position.

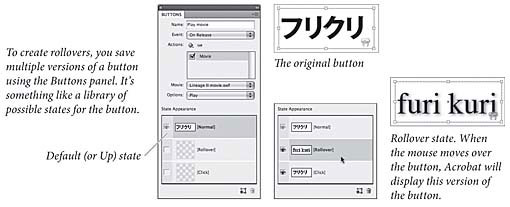
Rollovers and States

Multimedia designers love rollovers. A rollover is an image on an interactive page (like a PDF or a SWF) that changes in some way when the user moves the cursor over it. The rollover may appear to change color or shape; or maybe it lights up to indicate that it’s a hotspot. When you move the cursor away, the image returns to its original form. InDesign supports both normal rollovers and two-state buttons (buttons that change when you click on them). It also lets you make “two position” rollovers—where you roll over a button and an image changes somewhere else on the page.

We use the term “image,” but rollovers can involve text or lines as easily as images; it’s up to you. However, if you are using images, you need to create the graphics for each state of the rollover: the original image on the page (the “off” state), and the image you see when the cursor is over the image (the “on” state).

Remember that buttons are just containers, typically with objects nested in them—a text frame, a graphic frame, a line, or even a group of objects. The Buttons panel gives you a way to change the content of a button container depending on two events: the user moving the cursor over the button or clicking on it.

It’s easy to add and change states (see Figure 13-5):

  1. Select the button and the Buttons panel. (You can open this panel if it’s not visible by double-clicking the button).
  2. To add a Rollover state, click the [Rollover] tile in the State Appearance section of the Buttons panel. If you want to add a Down state, click the [Click] tile. If you later decide you don’t want a state, select it and click the Delete button at the bottom of the panel.
  3. Click the state you want to alter, and then, on the document page, make a change to the content of the button. Let’s say you have a button with a picture in it. You can click on the Rollover state, and replace the picture with a different one (just the way you normally would; with the File > Place command). Or, you could make the current picture rotate ten degrees when you roll over it by selecting the graphic frame (the one nested inside the button) and rotating it.
  4. Basically, each state actually contains a different object and the Buttons panel gives you a way to make each one visible—one at a time—almost like the Conditional Text panel. So you can add a drop shadow to the object inside the Rollover state and when you switch back to the Normal state, the drop shadow disappears.

  5. You can test the states by exporting a PDF or SWF and viewing it in Acrobat, your Web browser, or Flash Player, or—the cheesy quick version—by clicking back and forth among the states in the panel. If the little thumbnails in the panel aren’t big enough, you can make them larger or smaller by choosing Panel Options from the panel menu.

Figure 3.5 Creating Rollovers

Two-Position Rollovers

Making a rollover that affects objects elsewhere on the page involves creating a set of actions: Convert all of the relevant objects to buttons and then use the On Roll Over and On Roll Off events to make those objects Visible or Hidden at the appropriate time(s). You could, for example, have one button that, when rolled over, makes two other buttons visble.

Peachpit Promotional Mailings & Special Offers

I would like to receive exclusive offers and hear about products from Peachpit and its family of brands. I can unsubscribe at any time.

Overview


Pearson Education, Inc., 221 River Street, Hoboken, New Jersey 07030, (Pearson) presents this site to provide information about Peachpit products and services that can be purchased through this site.

This privacy notice provides an overview of our commitment to privacy and describes how we collect, protect, use and share personal information collected through this site. Please note that other Pearson websites and online products and services have their own separate privacy policies.

Collection and Use of Information


To conduct business and deliver products and services, Pearson collects and uses personal information in several ways in connection with this site, including:

Questions and Inquiries

For inquiries and questions, we collect the inquiry or question, together with name, contact details (email address, phone number and mailing address) and any other additional information voluntarily submitted to us through a Contact Us form or an email. We use this information to address the inquiry and respond to the question.

Online Store

For orders and purchases placed through our online store on this site, we collect order details, name, institution name and address (if applicable), email address, phone number, shipping and billing addresses, credit/debit card information, shipping options and any instructions. We use this information to complete transactions, fulfill orders, communicate with individuals placing orders or visiting the online store, and for related purposes.

Surveys

Pearson may offer opportunities to provide feedback or participate in surveys, including surveys evaluating Pearson products, services or sites. Participation is voluntary. Pearson collects information requested in the survey questions and uses the information to evaluate, support, maintain and improve products, services or sites; develop new products and services; conduct educational research; and for other purposes specified in the survey.

Contests and Drawings

Occasionally, we may sponsor a contest or drawing. Participation is optional. Pearson collects name, contact information and other information specified on the entry form for the contest or drawing to conduct the contest or drawing. Pearson may collect additional personal information from the winners of a contest or drawing in order to award the prize and for tax reporting purposes, as required by law.

Newsletters

If you have elected to receive email newsletters or promotional mailings and special offers but want to unsubscribe, simply email ask@peachpit.com.

Service Announcements

On rare occasions it is necessary to send out a strictly service related announcement. For instance, if our service is temporarily suspended for maintenance we might send users an email. Generally, users may not opt-out of these communications, though they can deactivate their account information. However, these communications are not promotional in nature.

Customer Service

We communicate with users on a regular basis to provide requested services and in regard to issues relating to their account we reply via email or phone in accordance with the users' wishes when a user submits their information through our Contact Us form.

Other Collection and Use of Information


Application and System Logs

Pearson automatically collects log data to help ensure the delivery, availability and security of this site. Log data may include technical information about how a user or visitor connected to this site, such as browser type, type of computer/device, operating system, internet service provider and IP address. We use this information for support purposes and to monitor the health of the site, identify problems, improve service, detect unauthorized access and fraudulent activity, prevent and respond to security incidents and appropriately scale computing resources.

Web Analytics

Pearson may use third party web trend analytical services, including Google Analytics, to collect visitor information, such as IP addresses, browser types, referring pages, pages visited and time spent on a particular site. While these analytical services collect and report information on an anonymous basis, they may use cookies to gather web trend information. The information gathered may enable Pearson (but not the third party web trend services) to link information with application and system log data. Pearson uses this information for system administration and to identify problems, improve service, detect unauthorized access and fraudulent activity, prevent and respond to security incidents, appropriately scale computing resources and otherwise support and deliver this site and its services.

Cookies and Related Technologies

This site uses cookies and similar technologies to personalize content, measure traffic patterns, control security, track use and access of information on this site, and provide interest-based messages and advertising. Users can manage and block the use of cookies through their browser. Disabling or blocking certain cookies may limit the functionality of this site.

Do Not Track

This site currently does not respond to Do Not Track signals.

Security


Pearson uses appropriate physical, administrative and technical security measures to protect personal information from unauthorized access, use and disclosure.

Children


This site is not directed to children under the age of 13.

Marketing


Pearson may send or direct marketing communications to users, provided that

  • Pearson will not use personal information collected or processed as a K-12 school service provider for the purpose of directed or targeted advertising.
  • Such marketing is consistent with applicable law and Pearson's legal obligations.
  • Pearson will not knowingly direct or send marketing communications to an individual who has expressed a preference not to receive marketing.
  • Where required by applicable law, express or implied consent to marketing exists and has not been withdrawn.

Pearson may provide personal information to a third party service provider on a restricted basis to provide marketing solely on behalf of Pearson or an affiliate or customer for whom Pearson is a service provider. Marketing preferences may be changed at any time.

Correcting/Updating Personal Information


If a user's personally identifiable information changes (such as your postal address or email address), we provide a way to correct or update that user's personal data provided to us. This can be done on the Account page. If a user no longer desires our service and desires to delete his or her account, please contact us at customer-service@informit.com and we will process the deletion of a user's account.

Choice/Opt-out


Users can always make an informed choice as to whether they should proceed with certain services offered by Adobe Press. If you choose to remove yourself from our mailing list(s) simply visit the following page and uncheck any communication you no longer want to receive: www.peachpit.com/u.aspx.

Sale of Personal Information


Pearson does not rent or sell personal information in exchange for any payment of money.

While Pearson does not sell personal information, as defined in Nevada law, Nevada residents may email a request for no sale of their personal information to NevadaDesignatedRequest@pearson.com.

Supplemental Privacy Statement for California Residents


California residents should read our Supplemental privacy statement for California residents in conjunction with this Privacy Notice. The Supplemental privacy statement for California residents explains Pearson's commitment to comply with California law and applies to personal information of California residents collected in connection with this site and the Services.

Sharing and Disclosure


Pearson may disclose personal information, as follows:

  • As required by law.
  • With the consent of the individual (or their parent, if the individual is a minor)
  • In response to a subpoena, court order or legal process, to the extent permitted or required by law
  • To protect the security and safety of individuals, data, assets and systems, consistent with applicable law
  • In connection the sale, joint venture or other transfer of some or all of its company or assets, subject to the provisions of this Privacy Notice
  • To investigate or address actual or suspected fraud or other illegal activities
  • To exercise its legal rights, including enforcement of the Terms of Use for this site or another contract
  • To affiliated Pearson companies and other companies and organizations who perform work for Pearson and are obligated to protect the privacy of personal information consistent with this Privacy Notice
  • To a school, organization, company or government agency, where Pearson collects or processes the personal information in a school setting or on behalf of such organization, company or government agency.

Links


This web site contains links to other sites. Please be aware that we are not responsible for the privacy practices of such other sites. We encourage our users to be aware when they leave our site and to read the privacy statements of each and every web site that collects Personal Information. This privacy statement applies solely to information collected by this web site.

Requests and Contact


Please contact us about this Privacy Notice or if you have any requests or questions relating to the privacy of your personal information.

Changes to this Privacy Notice


We may revise this Privacy Notice through an updated posting. We will identify the effective date of the revision in the posting. Often, updates are made to provide greater clarity or to comply with changes in regulatory requirements. If the updates involve material changes to the collection, protection, use or disclosure of Personal Information, Pearson will provide notice of the change through a conspicuous notice on this site or other appropriate way. Continued use of the site after the effective date of a posted revision evidences acceptance. Please contact us if you have questions or concerns about the Privacy Notice or any objection to any revisions.

Last Update: November 17, 2020