- #25 Understanding the Perspective Grid
- #26 Drawing in Perspective
- #27 Creating Variable-width Strokes
- #28 Creating Better Dashed Strokes
- #29 Adding Arrowheads to Strokes
- #30 Drawing with the Shape Builder Tool
- #31 Drawing Behind and Drawing Inside
- #32 Creating Bristle Brushes
- #33 Using Multiple Artboards
- #34 The Power of Appearances
- #35 Creating Crisp Artwork for the Web
- #36 Preparing Scalable Web and Print Graphics
#27 Creating Variable-width Strokes
The problem with Illustrator artwork is that it looks like Illustrator artwork. It tends to be a little too perfect and uniform unless you go to a lot of trouble, and sacrifice a lot of editability, to make it look otherwise. The fireplace illustration in Figure 27a should have a loose, casual feel, but that's undermined by the perfectly consistent line weight of every stroke.

Figure 27a A typical Illustrator line art drawing using normal strokes. The enlarged detail shows the uniformity of all strokes in the artwork.
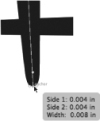
The new Width tool  (Shift-W) lets you create variable-width strokes on a single path without adding anchor points or expanding the path. The Width tool adds a new kind of point—a width point—visible only when you hover over the path with the tool (Figure 27b).

Figure 27b A width point selected with the Width tool and displaying Smart Guide data about the width of the stroke at that point.
To add a width point to any path, simply click somewhere on that path with the Width tool and drag either away from the path to widen the stroke, or toward the path to narrow it. To widen the stroke only on one side of the path, select the point, hold down the Option (Alt) key, and drag one of the width point's handles to the desired width on that side of the path (Figure 27c).

Figure 27c Widening a stroke equally on both sides of a path (left), and on only one side (right), with the Option (Alt) key.
To relocate a width point, select it with the Width tool and drag it to the desired position along the path. To "pull along" any other width points on that path and redistribute the changes in weight, hold down the Shift key while moving the selected width point. To delete a path, select it with the Width tool and press Delete.
Once you've modified a stroke's width, you can save the stroke as a Width Profile in either the Control panel or the Stroke panel (Figure 27d). That saved profile can be applied to any other stroke in your artwork, or used in any other Illustrator file.

Figure 27d The Width Profile pull-down in the Control panel, with icon options for saving, deleting, or resetting profiles.
To make the most of your saved width profiles, you can flip them along the path using the Flip Along or Flip Across icons in the Stroke panel (Figure 27e). Flip Along flips the width profile from the start of the path to its end. Flip Across is only active for strokes with different weights on either side of the path, and flips them across that path.

Figure 27e Both paths are identical, and use the same width profile, but the right path was flipped across the path length using the Stroke panel.
In the final fireplace illustration in Figure 27f, a single width profile was used for all elements of the fireplace frame, but made to look more varied by flipping the profile on select paths and subtly adjusting stroke weights. A second width profile was applied to the bricks and two others to the flames.

Figure 27f The finished illustration uses four custom width profiles.