- #25 Understanding the Perspective Grid
- #26 Drawing in Perspective
- #27 Creating Variable-width Strokes
- #28 Creating Better Dashed Strokes
- #29 Adding Arrowheads to Strokes
- #30 Drawing with the Shape Builder Tool
- #31 Drawing Behind and Drawing Inside
- #32 Creating Bristle Brushes
- #33 Using Multiple Artboards
- #34 The Power of Appearances
- #35 Creating Crisp Artwork for the Web
- #36 Preparing Scalable Web and Print Graphics
#30 Drawing with the Shape Builder Tool
Illustrator CS5's new Shape Builder tool  is like a dynamic version of the Pathfinder's Unite and Minus Front options, combined with Live Paint's shape-sensing, click-and-color functionality. Figure 30a shows an illustration at its very early stages, using only primitive shapes as the basis for a drawing of a car. No fill or stroke has been applied. Using only the Shape Builder tool, we can quickly and easily refine this collection of shapes to form the car and simultaneously fill it with appropriate colors.

Figure 30a An arrangement of drawn shapes created as the foundation for an illustration of a car. The single horizontal line defines areas where the shapes it intersects can be divided.
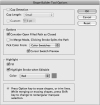
The Shape Builder shares a few behaviors with Illustrator's Live Paint feature, including Gap Detection and a Cursor Swatch Preview option that applies color as shapes are combined. Double-clicking the Shape Builder tool icon in the Tools panel accesses all of these options (Figure 30b).

Figure 30b The Shape Builder Tool Options share several features with Illustrator's Live Paint.
To form a car from the collection of shapes in Figure 30a, we start by removing parts of any shape that won't be included in the final illustration. With all the shapes selected and the Shape Tool (Shift-M) active, you need only drag over selected shapes while holding down the Option (Alt) key to remove any portion of an object up to the point where it intersects with another shape (Figure 30c). Portions of the shapes "sensed" by the Shape Builder tool are highlighted as you move over them.

Figure 30c Three ways to remove portions of shapes with the Shape Builder tool: Option-click (Alt-click) and drag through continuous areas (left), Option-click (Alt-click) a single area (center), or Shift-Option-click (Shift-Alt-click) and draw a marquee over multiple areas (right).
Once the unwanted areas are removed, we can start combining those parts we want to keep. With the Cursor Swatch Preview active (Figure 30d), you can cycle through document swatches and choose a color to fill the remaining shapes with as the Shape Builder combines them (Figures 30e and 30f). As with deleting shapes, holding down Shift creates a marquee selection, and simply clicking and dragging creates a linear selection of continuous shapes.

Figure 30d The Shape Builder tool with Cursor Swatch Preview active.

Figure 30e Combining shape areas by Shift-dragging to create a marquee selection.

Figure 30f Adding colors to different areas of the artwork as they're combined with the Shape Builder tool.
While much of what the Shape Builder tool does is inherited from the Pathfinder and Live Paint features, it works more quickly and more intuitively than either of those tools, producing finished illustrations (Figure 30g) from basic forms in very little time.

Figure 30g The finished illustration completed entirely with the Shape Builder tool.