Tweaking Colors with HSL
Having access to the Hue, Saturation, and Luminance (HSL) panel in ACR is arguably the most valuable improvement in Photoshop CC’s HDR workflow, because color manipulation happens to be one area of weakness with virtually every HDR plugin, and every previous Photoshop workflow.
For this part of the workflow, it’s better to zoom back out, usually to 25% or 33% depending on the size of your image, your monitor dimensions, and other factors. Generally you should be able to see all or most of your photograph at this stage of the process, partly to ensure all the colors are accurate, and partly to ensure you don’t introduce any color-bands or artifacts. Keep in mind that any pronounced changes to color saturation, may also increase noise or undo the improvements made when applying the noise reduction settings.
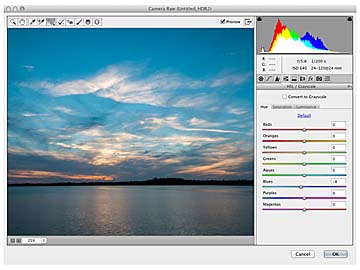
To start, click the HSL button (fourth from the left under the Histogram) to access the color controls. Click the Hue tab to start. For this shot, I wanted to make the blue skies slightly more aqua (i.e., not quite as dark, and less purple). But what’s the best Hue control to use when an area is made of more than one hue? In this case, Blues or Aquas, or both? The short answer is you don’t have to guess: use the Targeted Adjustment tool (fifth icon from the left in the main toolbar, top-left portion of the window).
When you select this tool with the HSL panel open, it automatically knows which HSL tab is active, and will switch to the appropriate mode. When you’re ready, click and drag on the region of the photo where you intend to shift the hues. The results for this shot are shown in Figure 12. It turns out a small change to the Blues was all that was necessary, but doing that without guesswork is useful.

Figure 12 The HSL panel provides a huge improvement to HDR workflows by allowing you to precisely control specific hues, as well as how saturated and bright those hues are.
From this point, because the saturation of my colors looked good, I did not need further changes to the HSL settings. If you want to change the Saturation or Luminance of a given area of color, you can just switch to the appropriate tab, then continue to use the Targeted Adjustment tool to get the results you want, tweaking the settings manually where necessary.