This chapter is from the book
This chapter is from the book
This chapter is from the book
Developing photographs
Lightroom, as a raw converter, does its best to interpret the raw data captured by your camera to render an image that you can view and work with onscreen. However, that rendering is only an initial interpretation of the raw data. The controls in the Develop module give you the opportunity to fine-tune that interpretation. If you’re not satisfied with the initial appearance of a raw image in Lightroom, don’t be too quick to reject the photograph. You’ll be surprised at the latitude you have to correct color, recover highlight detail, and otherwise enhance the appearance of images rendered from raw files.
NOTE

As you work through this lesson and the book, you do not have to use the exact value for each adjustment that you see in the illustrations. Choose values that look good to you on your monitor. The values in the illustrations indicate the general direction of adjustments and approximate values only.
In this section, you’ll apply Develop module controls to raw photographs. You can work with RGB images in the Develop module too.
Adjusting color and tone in the Basic panel
The Develop module’s Basic panel contains controls for making fundamental global corrections to color and tone. Global corrections are those that affect the entire photograph, as opposed to local corrections, which affect just part of an image. You’ll apply Basic panel adjustments to most photographs you process in the Develop module, so it’s important to have a thorough understanding of the Basic panel controls.
Working with the sliders
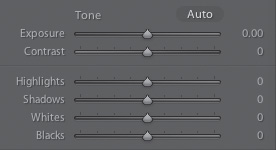
The Basic panel contains sliders divided into three main sections:
The WB (White Balance) section controls color balance.
The Tone section controls exposure, contrast, and specific tonal values.
The Presence section controls intensity of tone and color.
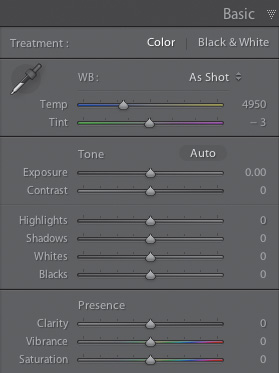
There’s also a narrow Treatment section at the top of the Basic panel where you can click between Color and Black & White labels (or press V on the keyboard) to quickly see how a color photograph will look converted to black and white.
Before digging in to apply Basic panel sliders, here are some tips that will help you use the sliders efficiently.
With DSC0419.dng still open in the Develop module, click the header of the Basic panel in the right panel column to open the Basic panel.
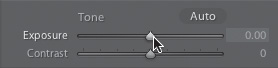
Drag the Exposure slider in the Basic panel to the right to lighten the photograph. (The value you choose doesn’t matter for this step.) Then double-click the slider control (or double-click the slider label) to return the slider to its default value of 0.
TIP

To compare Before and After views of a single slider adjustment, double-click the slider control (or the slider label) to return the slider to its default value (the Before view); then press Ctrl-Z/Command-Z to undo, which returns the slider to its last adjusted value (the After view).
To return any slider in the Basic panel to its default value, double-click the slider control or the slider label.
The Exposure slider and the other sliders in the Tone and Presence sections of the Basic panel default to 0, in the middle of each slider. The sliders in the White Balance section default to the white balance settings captured by the camera.
An alternative to dragging a slider is to move it in increments for more control. Click the Exposure slider’s label to activate that slider; then use the Plus (+) and Minus (–) keys on the keyboard to move the slider by preset increments. Double-click the slider control or label to reset the slider.
TIP
To set a slider to a particular value, click in the field to the right of the slider, type a value, and press Enter/Return. For example, if you know you want to increase exposure the equivalent of one stop, type 1 in the Exposure field to change the Exposure value to +1.00.
Holding the Shift key during this process moves a slider in larger increments. Holding the Alt/Option key moves it in smaller increments.
Another way to move a slider in increments is to hover over the slider and press the Up Arrow or Down Arrow key on your keyboard to move that slider in increments. The same modifier keys apply to this method: Shift for larger increments, and Alt/Option for smaller increments.
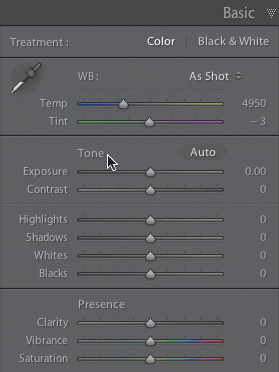
Adjust a few sliders in the Tone section of the Basic panel. (The values you choose don’t matter for this step.) To return all the sliders in this section to their default values of 0, double-click (or Alt-click/Option-click) the Tone label at the top of the section.
To return all sliders in the Presence section to their defaults, double-click (or Alt-click/Option-click) the Presence label at the top of that section. To return all sliders in the White Balance section of the Basic panel to their defaults, double-click the WB label in that section.
NOTE
To compare Before and After views of all adjustments made in the Basic panel, in the History panel click the state just beneath the first Basic panel adjustment (the Before view). Then press Ctrl-Z/Command-Z (the After view). Each of the other panels in the right panel column has a panel switch
 in its header for toggling Before and After views of all adjustments made in that panel. The Basic panel has no such panel switch.
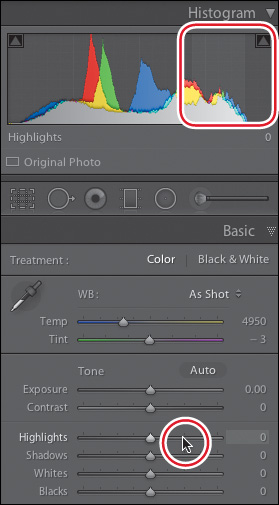
If the Histogram panel at the top of the Develop module’s right panel column is not open, click its header to open it.
Hover over the Highlights slider in the Basic panel and notice the light gray overlay that appears in the histogram. Repeat this with each of the other sliders in the Tone section.
The overlay in the histogram indicates the part of the tonal range that will be most affected by adjusting a particular slider. Each slider in the Tone section has its primary effect on a different area of the histogram (although other areas are tangentially affected too).
The significance of process version
The instructions in this book, particularly instructions that concern the Basic panel, are for the current Lightroom process version—PV 2012, which was introduced in Lightroom 4. Process version means Lightroom’s underlying image processing technology, which changed significantly with PV 2012. Some of the Basic panel sliders look and behave differently in PV 2012 than they do in previous process versions.
How does the current process version affect photographs that you adjusted in a previous process version? If you like the way a photograph looks with its older processing, it’s fine to leave that photograph as is. If you want to re-adjust the photograph to take advantage of improvements in PV 2012, open it in the Develop module. At first, the Basic panel sliders will look different than the current PV 2012 sliders. Click the lightning icon at the bottom right of the Histogram panel  . Then click Update in the Update Process Version dialog. This replaces the older Basic panel controls with the PV 2012 sliders, and you can use them to re-adjust the photograph.
)
Updating a photograph you adjusted in an earlier process version can affect the appearance of the photograph, as the dialog warns. So although this dialog gives you the option to Update All Filmstrip Photos, it’s usually preferable to update one photograph at a time.
Evaluating the photograph
Take the time to evaluate a photograph before making adjustments. Ask yourself whether the photograph is too bright or dark. Is it overly contrasty or flat? Is there detail missing from highlight or shadow areas? Is the color off?
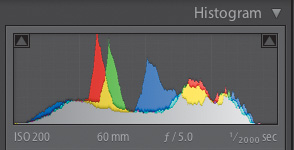
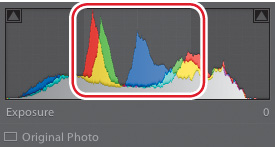
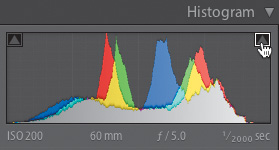
The Histogram panel in the Develop module can help with this evaluation. The histogram displays the location of a photograph’s tones across a range, from black on the far left to white on the far right. For example, with DSC0149.dng open in the Develop module, the histogram looks like the following illustration. The lack of bars on the right and left sides of the histogram indicates that there are no completely white tones and very few rich black tones in this photograph. This suggests that the photograph could be improved by setting a white point with the Whites slider and a black point with the Blacks slider.
Leave the Histogram panel open. As you make adjustments to the photograph, check this live histogram to confirm the effects that your adjustments are having on tonal values.
Order of adjustments
There is no hard and fast technical requirement to make develop adjustments in a particular order. A common approach is to begin with the Basic panel, work your way down through the panels in the right panel column, and make most global adjustments before local adjustments.
There are a few workflow exceptions to this approach. If you decide to jump to the Camera Calibration panel to change the camera profile that Lightroom uses to render raw files, it’s logical to do that at the beginning of your Develop workflow, even though the Camera Calibration panel is at the bottom of the right panel column. And although most local adjustments are made after global adjustments, try to do local retouching with the Spot Removal tool before Lens Correction panel adjustments to enhance accuracy and rendering performance.
When you’re working in the Basic panel, a top-down approach is common; but don’t be afraid to stray from that order as necessary. For example, if a photograph is so dark that you can’t evaluate its color balance, increase the Exposure slider before tackling the White Balance controls at the top of the Basic panel. Or if you need to re-adjust a Basic slider that you’ve already set, feel free to go back and do that.
White balancing
The overall color of a photograph reflects the color of the light illuminating the scene, which is measured as color temperature. Strictly speaking, the purpose of Lightroom’s white balance controls is to neutralize the color of light in order to remove unwanted color casts. However, there is no requirement to remove a color cast. In your subjective judgment you might elect to retain or even emphasize a color cast, like the warm gold in a sunset scene. In that sense, Lightroom’s white balance controls are color correction tools that you can use to convey a mood that meets your subjective photographic vision.
There are three kinds of controls in the WB (White Balance) section of the Basic panel:
The Temperature and Tint sliders give you control over two axes of color. The Temperature slider ranges from cool blue to warm gold; the Tint slider ranges from green to magenta. You can use the sliders on their own or to fine-tune results from the other white balance controls.
The white balance presets menu offers preset combinations of Temperature and Tint slider values.
The White Balance Selector tool is useful for neutralizing color.
You’ll apply all three white balance controls in this exercise.
With DSC0149.dng (the photograph of the Paris rooftops) still open in the Develop module, click the Reset button at the bottom right of the module to reset any adjustments you’ve made so far.
TIP
Another way to set both the Temperature and Tint sliders to their Auto values is to Shift-double-click the WB label in the White Balance section. If you want to set just the Temperature slider or just the Tint slider to its default value, Shift-double-click the control or label on that slider. To undo an auto adjustment, press Ctrl-Z/Command-Z.
In the Basic panel, click the drop-down menu of white balance presets on the right side of the White Balance section and choose Daylight. This option shifts the Temperature slider to the right toward gold and the Tint slider to the right toward magenta on this photograph, warming the overall color.
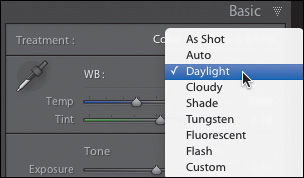
The options in this drop-down menu are preset values for the Temperature and Tint sliders. The As Shot option reflects the white balance captured by the camera. (As Shot may not be available, depending on the camera settings.) The Auto option is Lightroom’s best guess from the image data about how to set the Temperature and Tint sliders. Each of the other presets is a different combination of these sliders.
Use the Temperature and Tint sliders to tweak the preset color balance to your taste. In the following illustration, the Tint slider was decreased slightly.
Press the Y key on the keyboard to compare Before and After views.
The After view, on the right side of this illustration, is warmer in color than the Before version, on the left.
Press the Y key again (or the D key) to toggle back to Loupe view.
Click the Plus icon (+) on the right side of the Snapshots panel. In the New Snapshot dialog, name this snapshot White Balance, and click Create.
You’ll come back to this photograph in this state to make further adjustments later in this lesson. In the meantime, you’ll switch files for the next example, in which you’ll neutralize color using the White Balance Selector tool.
Open the Filmstrip by pressing F6 (or fn-F6) on the keyboard. In the Filmstrip, select 7073846.dng (a photograph of a Paris subway station), which has a strong, warm color cast.
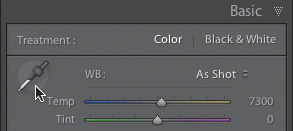
Click the White Balance Selector tool (the eyedropper icon) in the White Balance section of the Basic panel.
This tool is most useful when there is an area in the photograph that you think should be neutral in color—like the tiles on the right side of the subway platform floor, which were light gray in the actual scene.
If the toolbar isn’t showing, press the T key on your keyboard. The toolbar now displays options specific to the White Balance Selector tool. In the toolbar, make sure the Auto Dismiss check box is unchecked and the Show Loupe check box is checked.
Unchecking Auto Dismiss will allow you to apply the White Balance Selector tool multiple times to get the result you want, without having to reselect the tool in the Basic panel each time. Checking Show Loupe will display a magnified view of the area under your cursor to help you pick a color to neutralize.

Hover the White Balance Selector tool over something that should be neutral in this photograph, like the floor tiles on the right side of the subway platform.
The Loupe confirms that the color under the cursor is not neutral. If it were, the three RGB values at the bottom of the Loupe would be more similar.
The Navigation panel on the left offers a live preview of the effect of the White Balance Selector tool. As you move the cursor in the image, you can see how the color would change if you were to click that spot with the White Balance Selector tool.
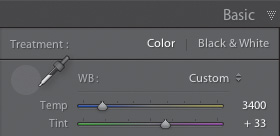
Click the floor tiles on the subway platform with the White Balance Selector tool to shift them from gold to neutral gray.
The rest of the colors in the image shift relative to that neutralized color, significantly reducing the warm color cast in this photograph.
If you don’t like the result, you can continue to click with the White Balance Selector tool on other objects that were gray or white in the actual scene. Depending on where you click, you’ll get very different results, potentially introducing another unwanted color cast elsewhere in the image. This makes the White Balance Selector tool relatively unpredictable as compared to the other white balance controls.
To deactivate the White Balance Selector tool, click the empty circle on the left side of the White Balance section of the Basic Panel.
)
)
)
)
White balancing JPEGs
If you shoot JPEGs, you have less flexibility to set white balance in Lightroom than you do with raw files. That’s because white balance is already baked into JPEGs by your camera at the time of capture, which is not the case with raw files.
Lightroom’s white balance controls are different for JPEGs than for raw files. When you’re working with a JPEG, you’ll see different values on the Temperature and Tint sliders and fewer options in the white balance presets menu.
)
Trying out Auto adjust
The six sliders in the Tone section of the Basic panel control the tonal values in a photograph. The default for all these sliders is 0. The Auto button at the top right of the Tone section sets all the sliders in the Tone section to automatically calculated values. Some photographers shy away from the Auto button, but you might give it a try if you’re short on time or want a quick read of how a photograph will look with tone adjustments. To return all the sliders in the Tone section back to their defaults, double-click the Tone label at the top left of the Tone section.
TIP
To set an individual tone slider to its Auto value, Shift-double-click the control or label on that slider. Double-click the control or label on that slider again to return it to its default value.
Adjusting exposure and contrast
The first sliders at the top of the Tone section in the Basic panel are Exposure and Contrast. The Exposure slider controls the overall brightness of a photograph. The Contrast slider affects the overall contrast.
If the Filmstrip is not open at the bottom of the Develop module, press F6 (or fn-F6) on the keyboard. In the Filmstrip, select DSC0149.dng (the photograph of the Paris rooftops you last worked with in the section “White balancing”).
Make sure the white balance controls are as you set them for this photograph in the “White balancing” section. If you created a snapshot to record your white balance settings, as suggested in that section, click that snapshot in your Snapshots panel now.
NOTE
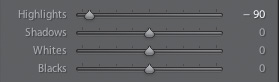
The Exposure, Highlights, Shadows, Whites, and Blacks sliders in the Basic panel each have a primary effect on a different area of the tonal range, with secondary effects on other parts of the tonal range.
Hover over the Exposure slider in the Basic panel.
A light gray overlay appears in the center of the histogram in the Histogram panel. This represents the tonal range on which the Exposure slider has its primary effect—the midtones.
Drag the Exposure slider to the right from its default of 0.
NOTE
Exposure slider values simulate stops on a camera. Setting Exposure to +1.00 is like exposing one stop over the metered exposure in camera.
Dragging the Exposure slider to the right increases the overall brightness of a photograph. The tones—particularly the midtones—move to the right on the histogram. Dragging the Exposure slider to the left would decrease overall brightness.
Click the label on the Contrast slider to activate that slider. Then press the Plus (+) key on your keyboard to increase contrast in this photograph slightly.
When you’re making small moves to a slider, this and the other incremental methods of setting a slider, covered earlier in “Working with the sliders,” offer finer control than dragging.
NOTE
Increasing contrast may also increase color saturation. In that case, you can use global or local saturation controls, addressed later in this lesson, to tame the increased saturation.
Contrast refers to the range of tones in an image. When you increase the Contrast slider, tones are pushed apart across the tonal range, with light tones getting lighter and dark tones darker except at the extreme light and dark ends of the tonal range. This is similar to the effect of an s-shaped tone curve, which has a steep slope in the middle, where contrast is high, and a relatively flat top and bottom, where contrast is lower.
You don’t have to apply the Contrast slider to every image, but increasing contrast with this slider can benefit photographs that are lacking in contrast to varying degrees. On the other hand, if a photograph is too contrasty, moving the Contrast slider to the left will compress tones along the tonal range and reduce contrast.
Toggle the Backslash key (\) on the keyboard to compare Before and After views of your adjustments to this point.
Leave the photograph open for the next section.
)
)
Adjusting highlights and shadows
The Highlights and Shadows sliders fine-tune contrast in light and dark areas of a photograph, respectively. The Highlights slider is very useful for recovering highlight detail. The Shadows slider is useful for revealing detail in dark areas.
With DSC0149.dng (the photograph of the Paris rooftops) still open in the Develop module, hover over the Highlights slider in the Basic panel. A light gray overlay appears over the 1/4-tone highlights in the Histogram panel, representing the tonal range on which the Highlights slider has its primary effect. Notice that this is not the brightest area of the histogram, which is on the far right.
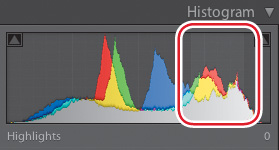
Drag the Highlights slider to the left of its default of 0.
Dragging the Highlights slider to the left darkens and separates the lighter tones in a photograph, with minimal impact on darker tones. The effect is to emphasize detail and edge definition in highlight areas, like the clouds in this photograph. The Highlights slider is most often used for this purpose, although it can also be dragged to the right to brighten highlights without clipping them.
Hover over the Shadows slider in the Basic panel. A light gray overlay appears over the 3/4-tone shadows in the Histogram panel, representing the tonal range on which the Shadows slider has its primary effect. These tones are dark, but they are not the very darkest part of the tonal range.
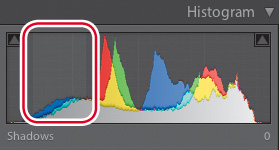
Drag the Shadows slider to the right of its default of 0.
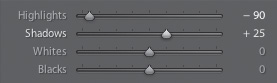
Dragging the Shadows slider to the right lightens and separates relatively dark tones in the photograph. The effect is to reveal detail in darker areas, like the shadows under the balconies in this photograph. The Shadows slider is most often used for this purpose, although it can also be dragged to the left to darken shadows without clipping them.
Dragging the Shadows slider to the right flattens contrast. To compensate, when you drag the Shadows slider to the right it’s often a good idea to drag the Blacks slider to the left, as you’ll do in the next section. This re-introduces contrast in dark areas.
Leave the photograph open for the next section.
)
)
Setting white and black points
The Whites and Blacks sliders set the white and black points, respectively, at each end of the tonal range. Setting these points appropriately maximizes contrast while avoiding excessive clipping of image detail, which is particularly important in the highlights.
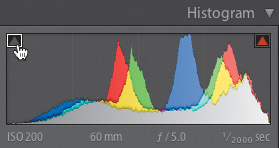
With DSC0149.dng (the photograph of the Paris rooftops) still open in the Develop module, hover over the Whites slider in the Basic panel. In the Histogram panel, a light gray overlay appears on the far right of the histogram, representing the tonal range on which the Whites slider has its primary effect.

Click the highlight clipping indicator (the triangle at the top right of the Histogram panel) to activate it.
This indicator will add a red overlay to the image to show you the highlights that will be clipped as you drag the Whites slider to the right.
Highlight clipping turns the brightest parts of a photograph to pure white with no image detail. Highlight clipping is usually best to avoid, except in specular highlights (like highlights in shiny chrome).
NOTE
Another way to see which highlights will be clipped is to hold the Alt/Option key as you drag the Whites slider to the right. Areas clipped in all channels are white, areas clipped in one or two channels are in color, and unclipped areas are black.
Drag the Whites slider to the right until there is a red overlay over the brightest areas of the photograph.
The red overlay is the highlight clipping indicator’s way of telling you which highlights will be clipped.
Drag the Whites slider back to the left until there are just a few specks of red overlay in the photograph.
The red overlay indicates where highlight clipping will occur. The brightest tones in the image are clipped by pushing them off the right side of the histogram.
Click the highlight clipping indicator in the Histogram panel again to deactivate it.
Hover over the Blacks slider in the Basic panel. In the Histogram panel, a light gray overlay appears on the far left side of the histogram, representing the tonal range on which the Blacks slider has its primary effect.
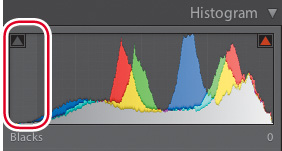
Click the shadow clipping indicator (the triangle at the top left of the Histogram panel) to activate it.
This indicator will add a blue overlay to the image to show you the shadows that will be clipped as you drag the Blacks slider to the left.
Drag the Blacks slider to the left until there is a blue overlay over the darkest parts of the photograph in which you don’t mind losing detail.
The blue overlay indicates where shadow clipping will occur.
NOTE
Another way to see which dark areas will be clipped is to hold the Alt/Option key as you drag the Blacks slider to the left. Areas that are clipped in all channels are black, areas clipped in one or two channels are in color, and unclipped areas are white.
Shadow clipping pushes the darkest tones off the left side of the histogram, introducing rich blacks into the image. Some shadow clipping is often desirable, particularly after you’ve dragged the Shadows slider to the right to open up 3/4-tone shadow areas. You usually don’t have to be as careful about clipping blacks as you do about clipping whites, because in many photographs dark areas do not contain important details.
Click the shadow clipping indicator in the Histogram panel again to deactivate it.
Toggle the Backslash key (\) on the keyboard to compare Before and After views of your adjustments to this point.
Leave the photograph open for the next section.
)
)
)
Adding positive or negative clarity
The Clarity slider in the Presence section of the Basic panel can have a big impact on a photograph. Dragging Clarity to the right adds punch to a photograph. Dragging Clarity to the left adds a soft glow.
Drag the Clarity slider to the left of its default of 0 to add negative clarity.
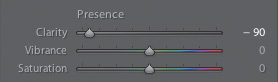
Negative Clarity adds a diffused glow that is a great way to soften a portrait or give a scene a dreamlike quality.
Drag the Clarity slider to the right of 0 to add positive clarity.
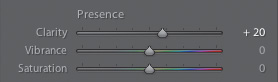
Positive clarity adds a special combination of midtone contrast and edge definition that brings out detail and adds punch to an image. In this photograph, for example, it emphasizes detail in the buildings and the edges of the clouds. To avoid the risk of visible halos at image edges, don’t be too aggressive with positive clarity.
Leave the photograph open for the next section.
)
)
Controlling color saturation
The last two sliders in the Basic panel—Vibrance and Saturation—control color intensity. These sliders work in slightly different ways, so try them both on a photograph before deciding which to apply.
Drag the Vibrance slider to the right of its default of 0 to increase the intensity of colors.
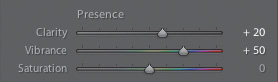
Dragging the Vibrance slider to the right increases color saturation in an intelligent way, by adding the most saturation to colors that need it most. Dragging this slider to the left would decrease saturation.
The Vibrance slider is almost always a good choice for adding saturation to photographs of people, because it protects skin tone colors (including yellow and orange) from oversaturation. But in this case, dragging the Vibrance slider far enough to the right to saturate the yellows and oranges in the buildings causes the blue sky to become oversaturated.
Double-click the label or control on the Vibrance slider to return it to its default of 0.
Drag the Saturation slider to the right of its default of 0.
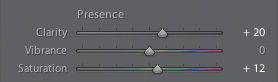
Increasing the Saturation slider saturates all colors in a photograph equally. This sometimes causes too strong an effect, but in this case increasing the Saturation slider adds intensity to the warm colors of the buildings without making the sky exceedingly oversaturated. You’ll use controls in the HSL panel to fine-tune the color of the sky in the section “Fine-tuning color in the HSL panel.”
Press the Y key on the keyboard to compare the Before view on the left, which has no adjustments, with the After view on the right, which has all the adjustments you added in the Basic panel.
Press Y again to return to Loupe view.
Click the Plus icon (+) on the right side of the Snapshots panel to capture a snapshot of the photograph with all the Basic panel adjustments you made. Name the snapshot Basics and click Create.
Leave the photograph open for the next section.
)
)
)
Fine-tuning contrast in the Tone Curve panel
After you’ve made global adjustments in the Basic panel, if you need to make more targeted adjustments to contrast and brightness, you can do so in the Tone Curve panel.
DSC0149.dng (the photograph of the rooftops in Paris) should be open in the Develop module with all the Basic panel adjustments you added to it in preceding sections. If you made a snapshot you named Basics, as suggested at the end of the last section, click that snapshot in the Snapshots panel.
Click the header on the Tone Curve panel to open that panel to its default parametric tone curve view.
The parametric Tone Curve panel offers four sliders that you can use to adjust the four regions of the curve: Highlights, Lights, Darks, and Shadows. If your Tone Curve panel doesn’t look like this, click the Point Curve icon
 at the bottom right of the Tone Curve panel.
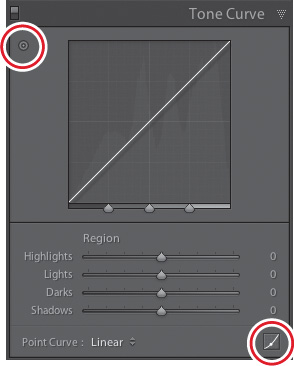
Click the Targeted Adjustment tool (the TAT)
 at the top left of the tone curve panel to activate the TAT
  .
.The TAT allows you to make adjustments to targeted tones by dragging directly on the photograph.
With the TAT activated, go to the photograph in the work area and drag a dark part of the building down slightly.
Dragging down with the TAT moves the corresponding part of the curve down, darkening those tones throughout the image.
The light gray overlay on either side of the curve indicates the tonal region that is most affected by this move.
With the TAT, drag a bright part of the building up slightly.
Dragging up with the TAT moves the corresponding region of the curve up, lightening those tones throughout the image.
Double-click the Region label above the sliders to return all the sliders in the parametric Tone Curve panel to their defaults of 0.
To return an individual region slider to its default, double-click the label or control on that slider.
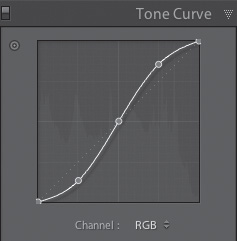
Drag the Shadows slider in the Tone Curve panel to the left to make the darkest tones in the photograph darker. The effect is similar to that of dragging the Blacks slider in the Basic panel to the left.
Dragging any of the four region sliders is another way to make a targeted adjustment in the parametric Tone Curve panel.
Hovering over a slider displays a gray overlay on the curve that tells you which part of the curve is most affected by that slider.

NOTE
All the curves you create in either view of the Tone Curve panel are cumulative.
Click the Point Curve icon at the bottom right of the parametric Tone Curve panel to switch to another view of this panel—the point curve view.
In point curve view, you can zero in more closely on particular tones by clicking directly on the curve to add and drag points. This makes point curve view more focused, but also more complex to use.
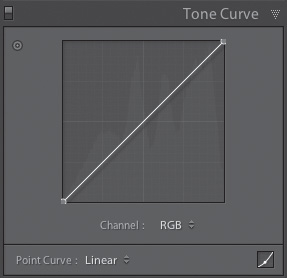
Click the Channel menu beneath the point curve and choose Blue to access the Blue channel.
In the Blue channel, click the center of the curve and drag up to make the photograph more blue overall, or drag down to make the photograph more gold.
One advantage of point curve view is that it gives you access to curves for individual Red, Green, and Blue color channels. You can use these color curves as color correction tools, as you did here. The color channels are also handy for making custom split-tones, by dragging the shadow area of a color curve in one direction and the highlight area in the opposite direction.
Choose RGB in the Channel menu to return that menu to its default.
Double-click the Point Curve label at the bottom left of the panel to return all curves you made in point curve view to their defaults.
Click the Point Curve icon at the bottom right of the panel to return the Tone Curve panel to parametric view.
Toggle the panel switch
 on the left side of the Tone Curve panel header to compare the Before view (with no Tone Curve panel adjustments) with the After view (with your current Tone Curve panel adjustment).
If there were multiple parametric curves and point curves still in effect, the panel switch would toggle all of them together.
Click the Plus icon (+) on the right side of the Snapshots panel to capture a snapshot of the photograph with your Basic panel adjustments and your tone curve adjustment. Name the snapshot Tone Curve and click Create.
Leave the photograph open for the next section.
)
)
)
Fine-tuning color in the HSL panel
The Develop module panel labeled HSL/Color/B&W (the HSL panel) offers controls for adjusting ranges of colors wherever those colors occur in an image. You can use these controls to adjust the hue, saturation, and lightness of particular color ranges.
NOTE
The HSL panel is useful for converting photographs from color to black and white too. Click the B&W label in the panel header. Then use the color range sliders to fine-tune the conversion of individual colors to black and white brightness values.
DSC0149.dng (the photograph of the rooftops in Paris) should be open with all the adjustments you’ve made to it to this point. If you made a snapshot you named Tone Curve, as suggested at the end of the last section, click that snapshot in the Snapshots panel now.
Click the HSL label (not the Color or B&W label) on the header of the HSL panel. Then click the Saturation tab at the top of the panel.
Click the Targeted Adjustment tool (the TAT)
 at the top left of the HSL panel to activate the tool
  .
.The TAT allows you to make adjustments to targeted colors by dragging directly on the image.
With the TAT, drag down in a saturated blue area of the sky in the photograph.
Dragging down with the TAT decreases saturation in the range of colors that corresponds to the color under your cursor. Dragging up would increase saturation in those colors.
The Blue slider in the Saturation tab of the HSL panel moves to the left and the blues across the photograph become less saturated.
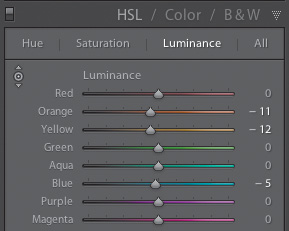
Click the Luminance tab, which offers the same color range sliders as the Saturation tab, except that these sliders affect the brightness of colors.
With the TAT still active, drag down slightly in the blue sky in the photograph to darken the blues.
Dragging up would lighten the blues.
Drag down in a light orange area of the buildings in the photograph to darken the corresponding colors across the photograph.
Notice that the Orange and Yellow sliders moved to the left in the illustration. That indicates that there was more than one color under the TAT cursor when this move was made. One advantage of using the TAT to make adjustments directly on the image, rather than dragging sliders in the HSL panel, is that the TAT knows exactly which color ranges are involved and can drag more than one slider to correspond to the colors under your cursor.
TIP
Using the TAT and dragging sliders are not the only ways to set controls in the HSL panel. You can type a value into the field to the right of a slider. Or you can click a slider label and use the Plus (+) and Minus (–) keys on your keyboard (along with modifier keys described earlier in “Working with the sliders”) to change a slider value in increments.
Click the Hue tab in the HSL panel, which you can use to change the hue of colors in a photograph.
Drag the Orange slider to the left, toward red. This makes orange hues across the photograph (including those in the buildings, the chimneys, and the smokestacks) more red-orange as opposed to yellow-orange.
The Hue tab of the HSL panel has a TAT too. You might use this TAT to make a blue sky more purple or aqua in hue.
Toggle the panel switch on the left side of the HSL/Color/B&W panel header to compare the Before view (without HSL adjustments) with the After view (with all the current HSL adjustments).
To compare the photograph with all adjustments you’ve made to this point to the original uncorrected photograph, press the Backslash (\) key on your keyboard, or toggle the Y key to see Before and After views. Some of the adjustments applied so far have been subtle, but their cumulative effect is significant.
Click the Plus icon (+) on the right side of the Snapshots panel to capture a snapshot of the photograph with your Basic, Tone Curve, and HSL panel adjustments. Name the snapshot HSL and click Create.
)
)
)
You’ll come back to this photograph in this state to make further adjustments later in this lesson. In the meantime, you’ll switch files for the next example, in which you’ll reduce digital noise and perform initial sharpening on a photograph.
Reducing noise in the Detail panel
The Develop module has powerful controls for reducing the noise that is inherent in a digital capture. Digital noise is most apparent in photographs shot with a high ISO and in shadow areas of a photograph.
If the Filmstrip is not open in the Develop module, press F6 (or fn-F6) on the keyboard. In the Filmstrip, select P1050905.dng (a photograph of garden rakes), which was shot at ISO 400.
NOTE
If you do not zoom to 1:1 view before opening the Detail panel, when you do open that panel, it will display a warning icon (!) to the left of the Sharpening label cautioning you to zoom to 100% or larger. Clicking that warning icon will zoom the photograph to 1:1 view.
Click the photograph to zoom in to 1:1 view. Then drag to pan to an area of the photograph that displays some grainy digital noise.
The 1:1 view is the only zoom level at which you can accurately evaluate digital noise and sharpening. However, some of the illustrations in this lesson are zoomed to 2:1 view to ensure that the effects of noise and sharpening are visible in this book.
Click the header of the Detail panel in the Develop module to open that panel.
If your Detail panel does not display a preview area, click the triangle to the right of the Sharpening label at the top of the Detail panel to reveal a small 1:1 preview.
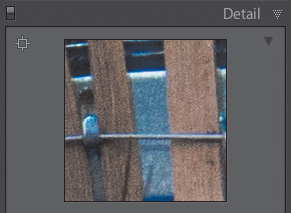
In the Detail panel’s 1:1 preview, drag to an area of the photograph that displays some grainy noise.
Alternatively, click the square icon to the left of the 1:1 preview in the Detail panel; then click a grainy area in the photograph to direct the 1:1 preview to that spot.
In the Noise Reduction section of the Detail panel, drag the Color slider to the left to 0.
This disables color noise reduction, revealing a significant amount of color noise in the photograph.
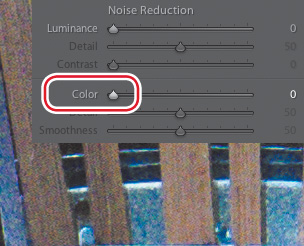
Double-click the Color label to return the Color slider to its default of 25.
This hides the color noise in the image, although there is still some grayscale luminance noise.
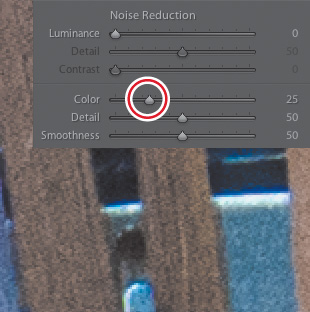
Three of the sliders in the Noise Reduction section address color noise. Dragging the Color slider to the right increases the amount of color noise reduction, but also can cause a loss of edge detail. In some images, dragging the color Detail slider to the right preserves some of that detail, but the effect of this slider may not be noticeable unless there is a lot of color noise in the photograph. If you have larger areas of mottled color too, dragging the Smoothness slider to the right sometimes reduces those artifacts. For this exercise, leave the color Detail and Smoothness sliders at their default values of 50.
In the Noise Reduction section, drag the Luminance slider to the right to reduce luminance noise, the grainy grayscale noise that is visible in shadow areas of this photograph.
Increasing the Luminance slider reduces noise by blurring the image slightly. Too much luminance noise reduction can give a photograph an artificially smooth look. Your goal when setting the Luminance slider is to reduce noise to an acceptable level without blurring the image so much that it looks artificial.

The purpose of the Detail and Contrast sliders under the Luminance slider is to compensate for the softening effects of reducing luminance noise. The luminance Detail slider acts as a threshold. The lower the value for this slider, the more details are softened. In some images, increasing the Detail slider can bring back some detail, and increasing the Contrast slider can bring back some edge contrast lost by reducing luminance noise. Leave these sliders at their defaults of 50 and 0, respectively, for this exercise.
Still at 1:1 view, toggle the panel switch on the left side of the Detail panel header to compare the Before view (with default noise reduction) with the After view (with your noise reduction adjustments).
Leave the photograph open for the next section.
)
)
Capture sharpening in the Detail panel
The purpose of sharpening in the Develop module’s Detail panel is to compensate for the softness that is inherent in digital capture. This initial sharpening is sometimes called capture sharpening. You’ll probably sharpen again to prepare a photograph for output—either in Lightroom’s Export dialog, Lightroom’s output modules, or Photoshop. And you may do some creative sharpening along the way too. So be careful not to oversharpen now in the Detail panel.
P1050905.dng (the photograph of garden rakes) should still be open with the noise reduction adjustments you applied in the previous section, and the image should still be zoomed to 1:1 view, which is critical when sharpening.
Pan to an area of the image that displays detail.
Drag the Amount slider to the right of its default of 25 to increase the amount of sharpening.

The Amount slider determines the strength of the sharpening effect. Sharpening is accomplished by increasing contrast at image edges. The higher the amount, the more edge contrast is introduced.
TIP
The Amount and Radius sliders affect one another. So it’s common to move back and forth between these sliders as you set their values, evaluating the results in the 1:1 previews in the work area and in the Detail panel.
Drag the Radius slider to the left of its default of 1.0 to decrease the size of the sharpening halos.
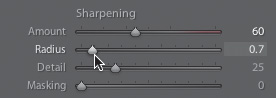
Radius determines the width of the sharpening effect at image edges (the halos). If a photograph has lots of detail, the ideal setting for the Radius slider is usually lower than it would be for a portrait or other photograph that has less detail you want to sharpen.
Leave the Detail slider at its default of 25 to control detail sharpening.
Alt/Option-click the control on the Detail slider to display a grayscale version of the image that shows you which image edges are being sharpened (the light gray edges). Dragging the Detail slider further to the right would sharpen digital noise in this image, which is usually something to avoid.
Hold the Alt/Option key as you drag the Masking slider to the right to protect parts of the photograph from sharpening.
This displays a mask in which the areas protected from sharpening appear in black as you drag the Masking slider. The Masking function is useful to protect non-edges from sharpening—like a model’s skin in a portrait, a clear sky in a landscape, or digital noise.
For Before and After views of your sharpening settings, double-click the Sharpening label in the Detail panel to see the Before view, with default sharpening settings; then press Ctrl-Z/Command-Z to undo and see the After view, with the sharpening settings you chose.
This comparison leaves your noise reduction settings in place in both the before and after states.
Next, you’ll apply what you’ve learned about noise reduction and sharpening to the photograph of the Paris rooftops you last worked with in the section “Fine-tuning color in the HSL panel.”
If the Filmstrip is not open at the bottom of the Develop module, press F6 (or fn-F6) on the keyboard. In the Filmstrip, select DSC0149.dng (the photograph of the Paris rooftops).
Make sure the adjustments for DSC0149.dng are as they were at the end of the section “Fine-tuning color in the HSL panel.” If you created an HSL snapshot to record your last adjustments to this image, as suggested at the end of that HSL section, click that snapshot in your Snapshots panel now.
Try setting the controls in the Detail panel on your own for this photograph, using what you learned in this lesson about sharpening and noise reduction. The following illustration suggests some sharpening and noise reduction settings to try.
TIP
Lightroom comes with some sharpening presets that you can use as a starting place for capture sharpening. When you’re sharpening an image that has lots of detail, in the Presets panel choose Lightroom General Presets > Sharpen – Scenic. When you’re sharpening a portrait or some other low-frequency image, choose Lightroom General Presets > Sharpen – Faces. Then fine-tune the resulting sharpening values in the Detail panel.
Click the Plus icon (+) on the right side of the Snapshots panel to capture a snapshot of DSC0149.dng with your Basic, Tone Curve, HSL, and Detail panel adjustments. Name the snapshot Detail and click Create.
Leave this photograph open for the next section.
)
)
)
)
Retouching with the Spot Removal tool
The Spot Removal tool is useful for hiding circular spots, like dust spots or blemishes, and also for removing some non-circular content from a scene.
DSC0149.dng (the photograph of the rooftops in Paris) should be open with all the adjustments you’ve made to it to this point. In the Snapshots panel, click the Detail snapshot you made at the end of the previous section.
Select the Spot Removal tool in the tool strip, which is beneath the Histogram panel in the column on the right side of the Develop module.
A panel of Spot Removal controls (the Spot Removal tool panel) drops down beneath the tool strip.
If the Develop module toolbar isn’t showing at the bottom of your screen, press T on your keyboard.
In the toolbar at the bottom of the Develop module, check the Visualize Spots check box. This displays a mask on the photograph in which spots appear as white or gray dots.
The Visualize Spots feature is useful for revealing spots caused by dust on a lens, sensor, or scanner that you might not have noticed in the photograph.
You can control the sensitivity of the Visualize Spots feature by dragging the Visualize Spots slider in the toolbar to the right or left.
To zoom in to the photograph, hold the spacebar on the keyboard and click the photograph. Release the spacebar and drag to move to a spot you want to remove.
NOTE
Zooming in or out when you’re working with a local adjustment tool requires that you hold the spacebar as you click the photograph. When a local adjustment tool is not selected, simply clicking the photograph zooms in and out.
TIP
If you have lots of spots to remove that are close together, you may find it more efficient to accomplish that in Photoshop, using Photoshop’s Spot Healing Brush tool or Healing Brush tool.
TIP
To page through a photograph to inspect it for spots, press the Home key on your keyboard to start at the upper-left corner of the photograph. Press the Page Down button on the keyboard to page through the photograph from top to bottom in a column-like pattern.
Move the cursor over a dust spot in the photograph. Size the cursor so that it is slightly bigger than the dust spot by pressing the Left Bracket key ([) to decrease cursor size or the Right Bracket key (]) to increase cursor size.
Click the dust spot to remove it from view.
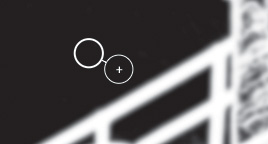
The Spot Removal tool samples content from a nearby source area in the photograph to create a patch to hide the dust spot. Two circles appear in the image. The circle with the Plus icon (the destination circle) represents the patch that is hiding the spot; the empty circle (the source circle) represents the area from which the patch was sampled.
Uncheck the Visualize Spots check box in the toolbar to return to regular view, where you’ll no longer see this dust spot.
You can remove spots in either the regular view or the Visualize Spots view. One approach is to switch back and forth between views as you work, by checking and unchecking the Visualize Spots check box.
In either view, when you move your cursor off the photograph in the center work area, the circles disappear from view, because by default the Tool Overlay menu in the toolbar is set to Auto. You can change that behavior to Always, Never, or Selected (to view just a selected patch).
If you don’t like the appearance of a patch, click its destination circle to select that patch. Then try one or more of these options:
To sample from a different location, hover over the source circle to change the cursor to a Hand tool, and drag the source circle to a different location.
To resize the patch, hover over either circle to change the cursor to a double-pointed arrow, and drag out to increase or drag in to decrease the size of the circles. Or drag the Size slider in the Spot Removal panel.
To blend the patch with the surroundings, make sure the Heal option, rather than the Clone option, is selected in the Spot Removal tool panel.
To soften the edge of the patch, drag the Feather slider in the Spot Removal tool panel to the right. You can reset this slider and any of the sliders in the Spot Removal tool panel to its default value by double-clicking the slider label or control.
To make the patch less opaque, drag the Opacity slider in the Spot Removal tool panel to the left.
To remove the selected patch, press the Delete/Backspace key on the keyboard. (If you want to remove all Spot Removal tool patches, click the Reset label at the bottom right of the Spot Removal tool panel.)
Lightroom’s Spot Removal tool can also hide non-circular content. Zoom and pan to locate content you want to hide—like one of the railings at the top right of this photograph.
TIP
If you have more complex content to remove, remember that you can hand off a photograph from Lightroom to Photoshop to take advantage of Photoshop’s full-featured retouching tools.
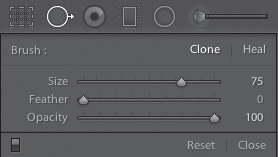
Size the cursor so it is just a bit larger than the height of the railing, select the Clone option in the Spot Removal panel (to avoid the risk that the blending behavior of the Heal option will smudge the ends of the patch), and drag across the railing in the photograph.
Toggle the panel switch for the Spot Removal tool, which is at the bottom left of the Spot Removal panel.
Toggling the panel switch gives you Before and After views of all the circular and non-circular corrections you made with the Spot Removal tool.
To close the Spot Removal panel, click the Close label at the bottom right of that panel.
Click the Plus icon (+) on the right side of the Snapshots panel to capture a snapshot of DSC0149.dng with all your global adjustments and your Spot Removal corrections. Name the snapshot Spot Removal and click Create.
Leave this photograph open for the next section.
)
)
)
Making lens corrections
In the Develop module’s Lens Corrections panel you can adjust for a variety of issues related to your camera lens, including lens distortion, lens vignetting, chromatic aberration, and perspective problems.
Applying a lens profile
Lightroom uses profiles of camera lenses to correct for lens-related geometric distortions and vignetting.
DSC0149.dng (the photograph of the rooftops in Paris) should be open with all the adjustments you’ve made to it to this point. In the Snapshots panel, click the Spot Removal snapshot you made at the end of the previous section.
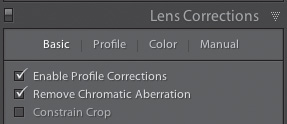
Click the header on the Lens Corrections panel to open that panel, and click the Basic tab in the Lens Corrections panel, if that tab is not already open.
Check the Enable Profile Corrections check box. In many cases, this automatically applies a lens profile for the lens with which the photograph was shot and automatically corrects geometric distortion (pincushioning or barrel distortion) and vignetting (dark corners) in the photograph.
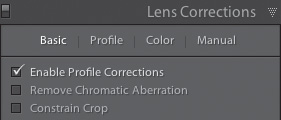
If checking Enable Profile Corrections does not alter the photograph, it could be that Lightroom did not find the lens profile automatically. In that case, click the Profile tab in the Lens Corrections panel and use the Lens Profile menus there to choose the make, model, and profile manually for the lens with which the photograph was captured.
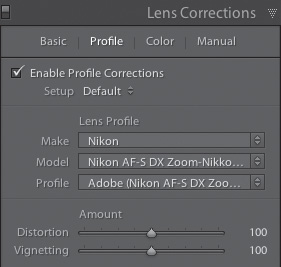
Adobe has created lens profiles for many popular lenses, but if you have a new or unusual lens it’s possible Adobe has not yet profiled that lens. In that case, you could look into making a lens profile yourself, but the simpler approach is to use the sliders in the Manual tab of the Lens Corrections panel to fix geometric distortion and vignetting manually.
If you shoot with a mirrorless camera (sometimes called a Micro Four Thirds camera), the camera may have compensated for lens issues by embedding lens correction instructions into the metadata of your raw files. Those corrections may be applied when Lightroom initially converts the raw files, rather than through a lens profile invoked in the Lens Corrections panel.
Leave this photograph open for the next section.
Removing chromatic aberration
Chromatic aberration is a lens-related anomaly that can cause unwanted color to appear along image edges. Lightroom can remove some chromatic aberration automatically.
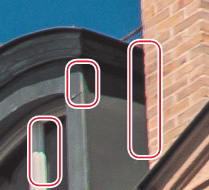
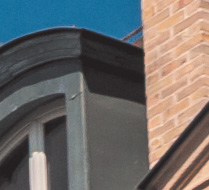
With DSC0149.dng open, zoom to 1:1 view and pan to an edge with visible color fringing. Notice the magenta color along the edge of the chimney and the green color along the shadows on the window structure.
Click the Basic tab in the Lens Corrections panel if the Basic tab is not already open.
NOTE
If you see purple or green fringing at high-contrast edges after checking the Remove Chromatic Aberration check box, try using the Defringe controls in the Color tab of the Lens Corrections panel to remove the fringing.
In the Basic tab, check the Remove Chromatic Aberration check box.
The magenta and green lines in the preceding illustration are now barely visible in the photograph.
Leave this photograph open for the next section.
Correcting perspective with Upright
The Upright feature in the Lens Corrections panel offers automatic corrections for some perspective problems related to the angle at which a photograph was shot, including leveling a crooked image and reducing keystoning (vertical distortion) in shots of buildings. The Upright feature was introduced in Lightroom 5.
With DSC0149.dng open, click the Basic tab in the Lens Corrections panel if it is not already open.
With the Enable Profile Corrections check box checked in the Basic tab, click each of the four Upright buttons—Level, Vertical, Full, and Auto—in turn to try them out on the photograph. This is usually the best way to approach applying Upright, because results can vary from image to image.
The Level option tries to straighten or level a photograph that is crooked on the horizontal or vertical axis.
The Vertical option not only levels a photograph but also tries to correct for converging vertical lines—like those that make buildings shot from street level appear to be leaning back (keystoning).
In this case, the Vertical option makes such an extreme correction that white areas of the canvas are left showing on two sides of the adjusted image.
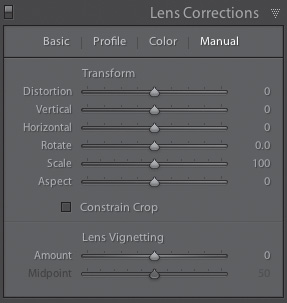
When an Upright correction reveals canvas around an image, you have several options: You can try checking the Constrain Crop check box in the Basic tab, although this option may eliminate more content than you would like in some photographs. If applying the Upright correction pushed some of the photograph off the canvas, you can use the Scale slider in the Manual tab of the Lens Corrections panel to reduce scale until all the photograph is back in view; then crop the image manually using Lightroom’s Crop Overlay tool with the lock icon unlocked for maximum flexibility. Or hand the image off to Photoshop, where you can crop the image with Photoshop’s Crop tool or try to fill the white edges using Photoshop’s Content-Aware Fill feature.
The Full option tries to fix leveling, vertical perspective, and horizontal perspective. This option often delivers the most extreme results, as is the case with this photograph.
The Auto option is often the best choice, as it is in this case. This option attempts to level an image and fix perspective problems, while maintaining a natural look. Leave this photograph with the Auto option applied.
TIP
After you make an Upright correction, you can fine-tune the results using the sliders in the Manual tab of the Lens Corrections panel.
Toggle the panel switch on the left side of the Lens Corrections panel header to compare the Before view (with no lens correction adjustments) with the After view (with the current lens correction adjustments).
Click the Plus icon (+) on the right side of the Snapshots panel to capture a snapshot of DSC0149.dng with all your global adjustments, your Spot Removal corrections, and your lens corrections. Name the snapshot Lens and click Create.
Leave this photograph open for the next section.
)
)
)
)
Making local adjustments
Most of the adjustments you’ve made so far are global adjustments—adjustments that affect the entire photograph. Often you’ll want to make local adjustments too—adjustments that affect just part of a photograph. Photoshop has lots of features for making local adjustments, like dodge and burn tools, selections, and masks. Lightroom has only a few local adjustment tools, but they are often quite useful. Before you hand a file off to Photoshop for local adjustments, consider what you can accomplish in Lightroom with the Graduated Filter tool, the Radial Filter tool, and the Adjustment Brush tool.
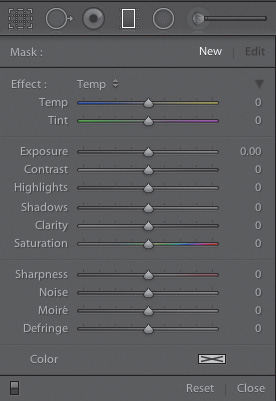
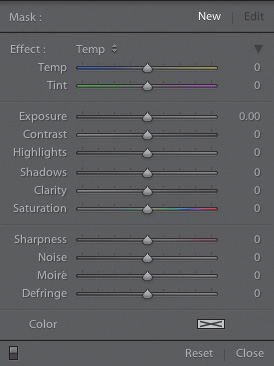
These three Lightroom local adjustment tools have a lot in common. They all work by creating a mask that limits the area affected by adjustments. They all offer the same list of adjustments, which you can apply individually or in combination. That list of adjustments includes adjustments that are also in the Basic panel—Temperature, Tint, Exposure, Contrast, Highlights, Shadows, Clarity, Saturation—plus Sharpness, Noise, Moire, Defringe, and Color tint.
Working with the Graduated Filter tool
With the Graduated Filter tool you can apply adjustments to part of a photograph in a gradient pattern. In this exercise you’ll apply two gradient filters with different combinations of adjustments to get different effects on the sky and the buildings.
With DSC0149.dng still open in the Develop module, select the Graduated Filter tool in the tool strip beneath the Histogram panel.
The Graduated Filter panel drops down from the tool strip.
In the Graduated Filter panel, double-click the Effect label at the top left of the sliders to set all the sliders to their defaults of 0.
The sliders for all the local adjustment tools are sticky, so it’s important to reset them. Doing that all at once is most efficient. To reset an individual slider to its default, double-click the slider label or control.
Drag the Exposure slider all the way to the left.
Setting one or more sliders before you create a graduated filter loads the Graduated Filter tool with those settings so that they will be applied as you create the next graduated filter. This negative exposure setting is just a way to help you see the gradient you’ll create in the next step.
Click the upper-left corner of the photograph and drag toward the lower-right corner, stopping near center of the photograph so that this graduated filter covers just the sky.
This creates a mask in a gradient pattern over the sky. The gradient mask defines where the Exposure value and any additional parameters you set in the future will be applied.
You can create multiple graduated filters. Each filter will be represented by a separate pin in the photograph. To select a graduated filter, click its pin. When a particular graduated filter is selected, its pin turns black. All the pins will disappear from view when you move your cursor off the photograph in the center work area, because by default the Show Edit Pins menu in the toolbar is set to Auto.
To reposition this graduated filter, drag its black pin. To rotate the graduated filter, drag its center line clockwise or counterclockwise slightly.
The three white lines on a graduated filter represent the strength of the parameters it applies: 100%, fading through 50%, and then down to 0%. You can contract or extend the filter’s gradient by dragging either of the outside white lines toward or away from the center line.
With the filter’s pin selected in the photograph, change the settings for this filter in the Graduated Filter panel. Drag the Exposure slider so it is slightly to the left of its default of 0, drag the Temperature slider to the left of its default of 0, and drag the Saturation slider slightly to the left of its default of 0.
These changes are applied to the selected graduated filter, making the sky slightly darker and more blue.
TIP
You can save this combination of local adjustment settings as a preset to apply to other photographs. Click the Effect menu at the top of the drop-down panel, and choose Save Current Settings as New Preset. Name the preset and click Create. When you want to access these settings for future use with the Graduated Filter tool, the Radial Filter tool, or the Adjustment Brush tool, select this preset from the Effect menu in the drop-down panel for that tool.
To add another graduated filter, click the New label at the top right of the Graduated Filter panel.
This deselects the first pin, which changes to white.
Double-click the Effect label in the panel to reset all the sliders in the Graduated Filter panel to their defaults of 0.
Drag a new graduated filter from the lower-right corner up toward the upper-left corner, stopping near the top of the buildings, so that this filter covers most of the buildings. The two graduated filters can overlap.
This time the graduated filter was not preloaded with settings, to demonstrate that you have the option to wait to set parameters until after you create a graduated filter. The same is true of the other local adjustment tools—the Radial Filter tool and the Adjustment Brush tool.
With the pin for the second graduated filter selected in the photograph, go to the Graduated Filter panel and drag the Temperature slider to the right to warm up the color of the building, drag the Shadows slider to the right to open up shadow areas in the building, and drag the Clarity slider to the right to emphasize the details on the building facade.
TIP
To remove an individual graduated filter, select its pin and press the Delete/Backspace key on the keyboard. To remove all graduated filters, click the Reset label at the bottom of the Graduated Filter panel.
Toggle the panel switch for the Graduated Filter tool, which is at the bottom left of the Graduated Filter panel.
Toggling the panel switch gives you Before and After views of all the graduated filters you added. To see Before and After views of just one graduated filter, select its pin in the photograph and double-click the Effect label in the Graduated Filter panel (the Before view). Then press Ctrl-Z/Command-Z to undo (the After view).
To close the Graduated Filter panel, click the Close label at the bottom right of the Graduated Filter panel or click the Graduated Filter icon in the tool strip.
Click the Plus icon (+) on the right side of the Snapshots panel to capture a snapshot of DSC0149.dng with all your global adjustments, your Spot Removal corrections, your lens corrections, and your graduated filters. Name the snapshot Graduated and click Create.
Leave this photograph open for the next section.
)
)
)
Using the Adjustment Brush tool
The Adjustment Brush tool works much like the Graduated Filter tool. The two tools apply the same adjustments, individually or in combination, to local areas of a photograph that are defined by masks behind the scene. The difference is that with the Adjustment Brush tool you paint the adjustments where you want them. Many of the mechanics of working with the Graduated Filter tool apply to the Adjustment Brush tool also, so refer to the preceding section “Working with the Graduated Filter tool” for more details.
With DSC0149.dng (the photograph of Paris rooftops) still open in the Develop module, select the Adjustment Brush tool in the tool strip beneath the Histogram panel.
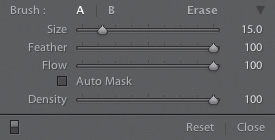
The Adjustment Brush panel drops down from the tool strip. The Effect section of the panel offers the same adjustments as the Graduated Filter panel. The Brush section contains brush options for the Adjustment Brush tool.
Double-click the Effect label near the top left of the Adjustment Brush panel to reset all the Effect sliders to their defaults of 0.
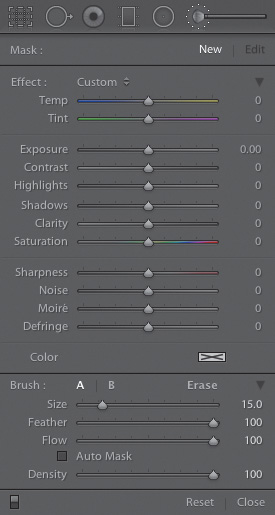
Choose brush options in the Brush section of the Adjustment Brush panel:
Use the Size slider to set the size of the brush.
Alternatively, after you’ve created an adjustment brush, size the selected brush by pressing the Right Bracket (]) and Left Bracket ([) keys on the keyboard.
Use the Feather slider to set the softness of the brush.
Alternatively, after you’ve created an adjustment brush, set the feather value of the selected brush by pressing the Shift-Left Bracket ([) to decrease feathering or Shift-Right Bracket (]) to increase feathering.
The default value of the Feather slider is 100 (maximum softness). To reset this slider to its default, double-click the slider label or control.
Use the Flow slider to set the rate at which adjustments are applied.
When the Flow slider is decreased, the brush acts like an airbrush, building up the opacity of adjustments over multiple strokes.
Use the Density slider to set the maximum opacity of adjustments.
If you’re not getting the full effect you expect from a brush stroke, it may be because the value of the Density slider, the Flow slider, or both is less than 100. To reset each of those sliders to its default of 100, double-click the slider label or control.
If you want to adjust a defined area (like an object against a solid background), check the Auto Mask check box. With this box checked, Lightroom will do its best to confine the adjustment brush mask to areas that match the tone and color under your cursor. It does this by continuously sampling as you paint with the adjustment brush.
If the toolbar is not showing at the bottom of the screen, press T on your keyboard. In the toolbar, check the Show Selected Mask Overlay check box.
Paint over part of the cloud in the photograph.
The red overlay is the mask that defines where the adjustments associated with this brush will be applied.
If you paint too far and want to erase part of the mask, hold the Alt/Option key as you paint.
Uncheck the Selected Mask Overlay check box in the toolbar to turn off the red overlay in the image.
TIP
There are many practical uses for local adjustment brush corrections, like burning and dodging (selective darkening and lightening), creative sharpening, removing noise from shadows, balancing color, and removing color fringe.
With the pin that represents this adjustment brush selected in the image, go to the Adjustment Brush panel to set the values of the adjustments for this brush. Drag the Clarity slider to the right of its default of 0 and the Highlights slider to the left of its default of 0 until you like the result in the image.
These adjustments are applied to the area affected by this adjustment brush, emphasizing cloud detail.
To extend the area affected by these adjustments, with the pin for this adjustment brush selected, paint over another part of the clouds.
To see where you’ve painted, check and then uncheck the Show Selected Mask Overlay check box in the toolbar.
NOTE
You can add multiple adjustment brushes to an image, each with its own settings and pin. To add a new brush, click the New label at the top of the Adjustment Brush panel and click the image.
To make a change to the adjustments applied by this brush, with the pin for this brush selected, go to the Adjustment Brush panel and drag the Exposure slider slightly to the left.
You can change or add a setting to an adjustment brush at any time by selecting its pin in the image and setting controls in the Adjustment Brush panel.
Toggle the panel switch for the Adjustment Brush tool, which is at the bottom left of the Adjustment Brush panel.
If you’ve created multiple adjustment brushes, this gives you Before and After views of all of them. To see Before and After views of just one adjustment brush, select its pin in the photograph and double-click the Effect label in the Adjustment Brush panel (the Before view). Then press Ctrl-Z/Command-Z to undo (the After view).
To close the Adjustment Brush panel, click the Close label at the bottom right of the Adjustment Brush panel or click the Adjustment Brush icon in the tool strip.
Click the Plus icon (+) on the right side of the Snapshots panel to capture a snapshot of DSC0149.dng with all your adjustments to this point, including adjustment brushes. Name the snapshot Brush and click Create.
Leave this photograph open for the next section.
)
)
)
)
)
Applying the Radial Filter tool
The Radial Filter tool applies the same adjustments as the Gradient Filter tool and Adjustment Brush tool, but in a circular pattern. The Radial Filter tool is useful for spotlighting elements in a photograph and for vignetting to draw attention to an off-center element.
With DSC0149.dng still open, select the Radial Filter tool in the tool strip beneath the Histogram panel.
The Radial Filter panel drops down from the tool strip.
Double-click the Effect label near the top left of the Radial Filter panel to reset all the Effect sliders to their defaults of 0.
Drag the Feather slider in the Radial filter panel to 100, if it is not already there.
This ensures a gradual, soft transition at the outside edge of a radial filter. After you create a radial filter with a particular Feather value, you can still adjust the amount of feather on that filter using the Feather slider.
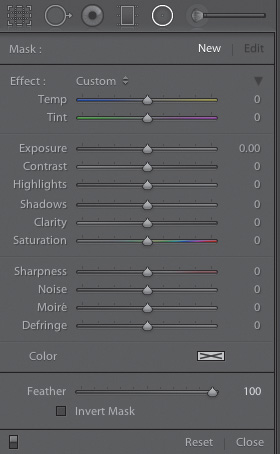
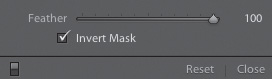
Make sure the Invert Mask check box is not checked, which is the default.
This ensures that adjustments assigned to a radial filter affect the area outside, not inside, the radial filter.
Drag the Exposure slider to the left in the Radial Filter panel.
TIP
To add a radial filter that fills the image and is centered, Ctrl-Alt-double-click/Command-Option-double-click in the photograph.
In the photograph, position your cursor slightly off-center (over the clouds) and drag to the right to create a large radial filter.
The decrease in exposure affects the area outside the radial filter by default, creating a subtle vignette effect.
The purpose of a vignette is to direct the viewer’s attention away from the edges of the photograph and toward important content. The advantages of creating a vignette with the Radial Filter tool are that a radial filter vignette can be off-center and it can incorporate any of the adjustments in the Radial Filter panel. For example, you could adjust the color temperature or the saturation of the vignette instead of just the exposure. (The Post-Crop Vignette feature in the Develop module’s Effects panel doesn’t offer these advantages.)
With the pin that represents this radial filter selected in the photograph, go to the Radial Filter panel and tweak the value of the Exposure slider to your taste, making the vignetted corners darker or lighter than they were initially.
Reposition and resize the filter to your liking using these techniques:
Drag from inside the radial filter to move it to a different location on the image.
Hover over a square anchor point on the border of the radial filter. When the cursor changes to a double-pointed arrow, drag toward or away from the center of the filter to resize the filter.
Hover outside the border of the radial filter. When the cursor changes to a curved arrow, drag to rotate the filter.
Click the New button at the top right of the Radial Filter panel to start creating another radial filter.
Position your cursor over the bird in the photograph and drag outward to create another, smaller radial filter around the bird. Reposition and resize this filter to your liking.
With the pin that represents the radial filter around the bird selected in the photograph, check the Invert Mask check box near the bottom of the Radial Filter panel.
This ensures that the adjustments you assign to this radial filter will affect that area inside the filter rather than outside the filter. This allows you to use the Radial Filter tool as a spotlighting tool, rather than just another vignetting tool.
In the Radial Filter panel, drag the Exposure and Contrast sliders to the right of their defaults of 0.
This increases exposure and contrast inside this radial filter to draw attention to the bird.
Create one more radial filter using the same techniques. With Invert Mask still checked, create another radial filter over a part of the building to which you’d like to add some light. For this radial filter, move the Temperature and Tint sliders to the right to warm up the color, set Exposure to the right of its default of 0 for brightness, and set Highlights to the left of its default of 0 to retain detail in the highlights.
This filter gives the impression of sunlight shining like a subtle spotlight on part of the building.
Right-click/Control-click the pin of the sunlight radial filter and choose Duplicate from the pop-up menu.
The duplicate filter is directly on top of the original filter, so at first the adjustments appear at double strength.
Drag the selected pin (which is the pin for the duplicate filter) to another part of the building to add a spot of sunlight there.
Reshape the duplicate filter in its new location to fit the content there, using the techniques covered earlier in this section. With the duplicate filter selected, you can also tweak its settings in the Radial Filter panel separately from the original filter.
Toggle the panel switch for the Radial Filter tool, which is at the bottom left of the Radial Filter panel.
If you’ve created multiple radial filters, this gives you Before and After views of all of them. To see Before and After views of just one radial filter, select its pin in the photograph and double-click the Effect label in the Radial Filter panel (the Before view). Then press Ctrl-Z/Command-Z to undo (the After view).
To close the Radial Filter panel, click the Close label at the bottom right of the Radial Filter panel or click the Radial Filter icon in the tool strip.
Toggle the Backslash key (\) to compare the current version of the photograph (with all the global and local adjustments you made in Lightroom’s Develop module) to the original (with no adjustments).
Click the Plus icon (+) on the right side of the Snapshots panel to capture a snapshot of DSC0149.dng with all your global and local adjustments, including radial filters. Name the snapshot Radial and click Create.
Leave this photograph open for the next section.
)
)
)
)
)
)
)
Saving metadata to files
One way to save metadata to files is to do so manually.
With DSC0149.dng still open in the Develop module with all the adjustments you added to it during this lesson, choose Photo > Save Metadata to File (or press Ctrl-S/Command-S).
When you save metadata to a DNG file, the metadata is stored in a special area inside the DNG without affecting the image pixels. The same is true when you save metadata to a JPEG, TIFF, PSD, or PNG. However, when you save metadata to a camera manufacturer’s proprietary raw file, the metadata is stored in a separate XMP sidecar file that you must keep with the corresponding raw file.
When you’re working with a DNG file you have an alternative to the Save Metadata to File command. You can choose to select the file in the Library module and choose Metadata > Update DNG Previews & Metadata. This saves the metadata to the file just like the Save Metadata to File command and also ensures that the JPEG preview in the DNG file is updated so other applications can see your changes.
Another way to save metadata to files is to do so automatically to all your photographs.
To enable the automatic option, choose Lightroom/Edit > Catalog Settings, click the Metadata tab, and check the Automatically Write Changes into XMP check box. Close the Catalog Settings dialog.
The upside of the automatic option is that whenever you make an adjustment it is saved automatically to the photograph, without you having to do anything else to make that happen. The major downside is that continuous, automatic saving could possibly interfere with Lightroom’s performance.
Working with virtual copies
When you want to experiment with different adjustments, or when you need different versions of a photograph (like a color version and a black and white), virtual copies come in handy.
If the Filmstrip is not showing in the Develop module, press F6 (or fn-F6) on your keyboard. Select DSC0149.dng in the Filmstrip if it is not already selected there.
TIP
You can also make virtual copies of one or more photographs in the Library module.
Choose Photo > Create Virtual Copy, or press the keyboard shortcut Ctrl-’ (apostrophe)/Command-’ (apostrophe).
This creates a virtual copy of the photograph that appears in the Filmstrip along with the original. The virtual copy is identified by the turned-up page icon at its bottom left corner.
A virtual copy is not an actual pixel-based copy that takes up valuable space on your computer drive. It is just an alternative set of processing instructions stored in the Lightroom catalog. This means you can create and experiment with multiple virtual copies of a photograph, each with different adjustments, without a lot of overhead.
In the Filmstrip, select the virtual copy you just made.
Press V on the keyboard to quickly convert the virtual copy to black and white.
Notice that this adjustment does not affect the original of the photograph. You are free to make additional virtual copies and try out different adjustments on each of them without affecting the original or filling up your drive.
)
)