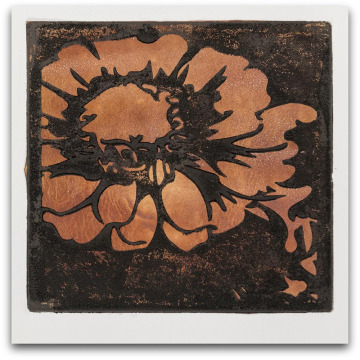
I nearly lost my mind when I first opened Adobe Shape in December 2014 and realized how much time and energy it could save me. I might even be able to take up new hobbies or home projects!
It's important to understand that the Adobe Shape mobile app's process is not automated. You're not simply applying a filter or running an image through an ActionScript; you actually create the imagery with the app. The greatest benefit for me is that Adobe Shape saves the final artwork into a vector graphic that I can use immediately with my desktop software (Adobe Photoshop and Adobe Illustrator CC 2015) as well as other mobile apps such as the new Adobe Draw, via the syncing capabilities of the Adobe Creative Cloud (Adobe CC) Libraries.
If you're thinking, "Vector graphics? Big deal," the extreme level of detail in these vector shapes might change your tune. My colleague and mentor, Bonny Pierce Lhotka (author of Hacking the Digital Print: Alternative Image Capture and Printmaking Processes), lets me use her Universal Laser Systems cutting machine for creating art pieces. My immediate excitement about the vector graphics I can create with Adobe Shape is using those shapes for cutting materials with the laser.
Initially, I was skeptical, as you probably are. How could an iPad app—especially a free app—integrate into my desktop illustration or design workflows? But after experimenting with the app and coordinating it with my other software, I came to realize that the possibilities are ever-expanding.
In this two-part series, Bonny Lhotka and I will demonstrate one potential artistic process that utilizes the shapes created with Adobe Shape. This article is Part 1 of the series, focusing on creating the shapes for the project. In Part 2: Modern Mixed-Media Photo Transfer, Bonny shows how to use those shapes in block printing.
Photo Manipulation Without Adobe Shape
Not too long ago, if I wanted to reference or re-create an object as a graphic element for my work, I would carry out the following steps:
Take a series of photos of the object. Figure 1 shows the photo I'm using for this project. My daughter Emma (then 13) took this picture in 2014.
- Get the photos to my computer via email, text, Dropbox, or by physically connecting the device to my desktop.
- Save the photos to the desktop.
- Open a photo in Adobe Photoshop and hand trace it, or open the photo in Adobe Illustrator and run the Image Trace tool; then fiddle with those settings to get the result I wanted.
Alternatively, I could hand-draw my subject with pencil or ink and scan it in or take photos, eventually getting back to steps 2–4.
Today we can make all kinds of images and shapes quickly, precisely, and easily by using Adobe Shape or many other new Adobe mobile apps. These handy and powerful apps allow us to take a finished product to a higher level, raising our art capabilities with it. Figure 2 shows the ultimate result I achieved by manipulating Emma's original photo.

Figure 1 Starting photograph (©2014 Emma Weien).
We'll go through the step-by-step procedure I used to transform Emma's original photo into this tangible piece of artwork, relying on Adobe Shape, Adobe CC, the Universal Laser Systems equipment, and Bonny's expertise.
What You Need for This Project
Make sure that you have all of the correct equipment to follow along and create your first shape. For this project, you will need the following:
- An iPad or iPhone with iOS 7.0 or later. (According to Adobe, the iPod touch can also be used, but I have no experience using that device.) Depending on your equipment, some steps or features may appear differently than those shown here.
- Adobe Shape mobile app. Download the app from the iTunes Store and install it. This free app is compatible with the iPhone, iPad, and iPod touch and is optimized for iPhone 5, iPhone 6, and iPhone 6 Plus.
- Adobe Creative Cloud account. If you're already an Adobe Creative Cloud subscriber, your account's email and password will work for this project. If you don't have an Adobe Creative Cloud account, you can sign up free with a working email address.
- Wireless Internet or cellular data connection. Shapes cannot be saved without a connection to the Adobe Creative Cloud.
- Image for manipulation. A photo with a strong contrasting foreground or background will work best. Pen or pencil drawings on white paper work extremely well. You may need to edit or enhance the image in a photo editor for more contrast or to crop out unwanted areas before you begin this procedure. I usually use the editing features found in the Photo app on all iPhones or iPads.
Step 1: Log into Adobe Shape and Select the Starting Image
Start by opening your downloaded Adobe Shape mobile app. If this is your first time using the app, you will need to log in using your Adobe Creative Cloud account and password or create an account to get started. Occasionally you might need to log into the app again, so be sure to note your login information.
The opening screen is your Adobe Shapes Library gallery page. If this is your first time opening the app, the gallery page will be empty. Select the plus (+) symbol on the center-left side to choose your image source (see Figure 3). You can use a picture from your iPad or iPhone Photo library (Camera Roll) or an image stored in your Creative Cloud Assets. If you prefer, capture an image with the camera on your device within Adobe Shape.
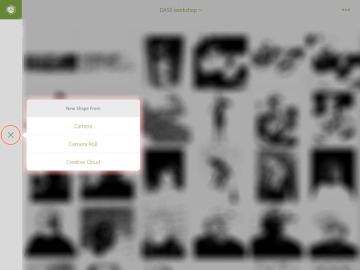
Figure 3 What image will you use? Choose between using the camera "live," working with an image in your Camera Roll, or selecting a previously saved image in your Adobe Creative Cloud account.
Step 2: Set the Contrast Level
When the photo is imported or captured with the camera, the screen will show a monotone, black-and-white image. Using the vertical slider at right, adjust the level of contrast within the image. The selected area is highlighted with neon green, as shown in Figure 4. In the upper-right corner is a rounded square icon with a circle inside. This toggles the selection option from dark to lighter selection areas. The dark areas are selected in Figure 5. I'll use the lighter areas selected in Figure 4 for this example.

Figure 4 Neon green indicates the highlighted and selected area. The slider to the right controls the selection amount.
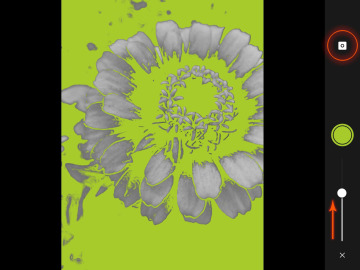
Figure 5 Selecting the dark areas will give you a very different result.
When the selected area is to your liking, tap the main circle button that resembles the camera shutter button at center right (see Figure 6). This action will advance the procedure to the fine-tuning (refinement) step. Only the captured selection area will appear in neon green.
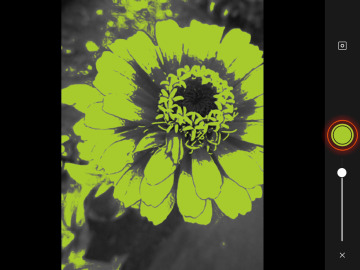
Figure 6 Tap on the circle button at right when the selection is to your liking.
Step 3: Refine the Image
Most of the time photos will include artifact shapes that you don't want in the finished shape (see Figure 7). Using your finger or stylus, select the areas you don't want. Unselected areas are depicted in white, as shown in Figure 8. You may need to zoom into the shape to get smaller shapes. (Pinch the screen to zoom in or out.)
If an area is unselected that you actually want, toggle the -/+ switch at lower right (see Figure 9) to switch between subtracting from the shape (-) and adding to it (+). Then reselect the wanted area. It will return to the neon green when selected.
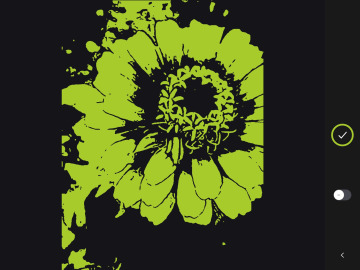
Figure 7 Neon green highlights the selected area. For the result I want, I need to clean up around the main part of the flower.
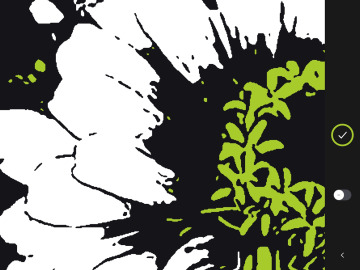
Figure 8 White areas are unselected. Pinch the screen to zoom in and out of the image to select more detailed areas.
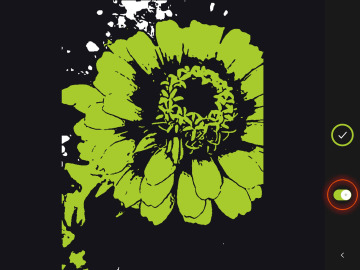
Figure 9 Deselect or select areas using the -/+ toggle switch.
Step 4: Finish the Shape, Ready for Sharing
When the shape is to your liking, select the checkmark button at center right to begin the shape creation step. This process can take a few minutes, depending on the device and the complexity of the shape. A progress bar will advance at the top of the screen and completed areas will fill in as black (uncompleted areas remain light gray). Figure 10 shows my new shape during the creation process.
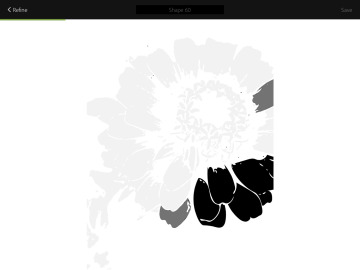
Figure 10 Black indicates shapes completed, while light gray shows what remains.
The keyboard will appear upon the completion of the Refine step, allowing you to name the shape and save it to the Adobe Shape library (see Figure 11). Name your shape and select Save in the upper-right corner. An Internet connection is required in order to save the shape.
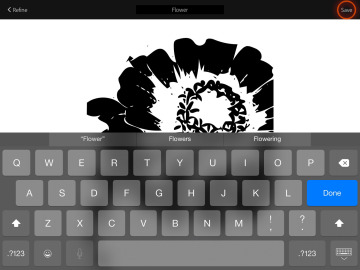
Figure 11 Name your shape to save it to the library.
Once saving is complete, the app will present the Shape Library with your new shape included (see Figure 12). Now you can use the shape in Adobe Photoshop or Adobe Illustrator on your desktop computer (you will need a paid Adobe CC subscription) or in Adobe Draw (another free mobile app from Adobe). You also can place the image in Adobe InDesign CC 2015.

Figure 12 Shape Library with completed shapes.
Selecting the shape in the Adobe Shape library opens it in the app. From here you can edit the shape, duplicate it, delete it, or share it as a flat JPG image via Message, Mail, or other third-party apps installed on your device, such as Facebook (see Figure 13). You can also save the shape as an image in the device's Camera Roll.
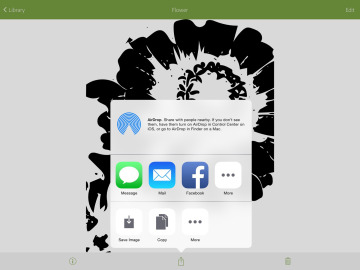
Figure 13 Share a rasterized version of the shape with others using Mail, Message, or third-party apps.
Step 5: Use Your New Shape in the Cloud
As soon as you save your new shape in Adobe Shape, it will be synced to your Creative Cloud Library (CC Libraries). Access the shape through Adobe Photoshop and Illustrator as live vector graphics. The window panel in both can be opened from the menu bar (Window > Libraries). The CC Libraries panel will appear, or open if it's already available. My flower shape is already synced and available for use, as shown in Figure 14. (This is where you exclaim, "WOW!")
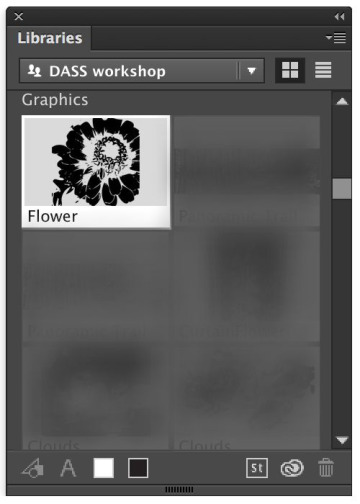
Figure 14 Open the CC Libraries panel in Adobe Illustrator or Adobe Photoshop to view shapes.
Simply grab the shape from the panel and drag-and-drop it onto the artboard or canvas. From here, you can manipulate the shape in a multitude of ways.
I wanted Bonny to use my new vector image with her Universal Laser Systems cutter, about 90 minutes away from my office. Instead of dragging-and-dropping the image, saving the file to my hard drive, and then emailing it or using Dropbox to get the file to her, I can simply make her a collaborator for this library.
To make someone a collaborator, select the three-line menu icon in the upper-right corner of the CC Libraries panel. A drop-down menu appears. Choose Collaborate to open your default Internet browser and go to your Adobe Creative Cloud account online. A small form appears, stating that you want to invite a collaborator to your library: "Collaborators can view, edit, move, or delete contents of this shared library." All you have to do at this point is provide an email address and invite your collaborator. You can create a brief custom message. In this case, I asked Bonny to use my new shape on her laser cutter.
After Bonny accepted my email invitation to collaborate, I received a message through Adobe CC that my invitation to Bonny was accepted, giving her access to my library.
In Part 2 of this series, Bonny will explain how she made a woodblock print using the shape I created with Adobe Shape.
Final Thoughts
On many occasions, I've made shapes and quickly sent them to Bonny for immediate cutting on her Universal Laser Systems cutter. I've also created several versions of one image, using varying levels of contrast in each; then I compiled them with different colors and opacities in Adobe Draw to make intriguing artwork that almost looked silk-screened. Sending the shape compositions to Adobe Illustrator or Adobe Photoshop gives me an enormous jumpstart on many designs and illustrative projects. It can really help with getting those in-the-moment "napkin sketch" ideas more directly and professionally into the machine, one step closer to a speedy completion.

