- Getting started
- Editing paths and shapes
- Using the Width tool
- Finishing up the illustration
- Review questions
- Review answers
This chapter is from the book
This chapter is from the book
This chapter is from the book
Editing paths and shapes
In Illustrator, you can edit and combine paths and shapes in a variety of ways to achieve the artwork you want. Sometimes, to get the artwork you desire, you start simpler and utilize different methods for achieving more complex paths. This includes working with the Scissors tool ( ), the Knife tool (
 ), the Width tool (
 ), the Shape Builder tool (
 ), Pathfinder effects, the Eraser tool (
 ), outlining strokes, joining paths, and more.
Cutting with the Scissors tool
There are several tools that allow you to cut and divide shapes. You’ll start with the Scissors tool (), which splits a path at an anchor point or on a line segment and makes an open path. Next, you’ll cut a shape with the Scissors tool to reshape it.
- Choose View > Smart Guides to ensure that they are on.
- Choose “2 Bird 1” from the Artboard Navigation menu in the lower-left corner of the Document window.
- Choose View > Fit Artboard In Window.
- Select the Zoom tool (
 ) in the Tools panel, and click twice on the red shape in the upper-right corner of the artboard to zoom in.
 - Select the Selection tool (
 ) in the Tools panel, and click the red shape to select it.
 With the shape selected, in the Tools panel, click and hold down the Eraser tool (
), and select the Scissors tool (). Position the pointer over the blue anchor point on the path on the left side (see the figure), and when you see the word “anchor,” click to cut the path at that point.If you don’t click directly on a point or path, you will see a warning dialog box. You can simply click OK and try again. Cuts made with the Scissors tool must be on a line or a curve rather than on an end point of an open path. When you click with the Scissors tool, a new anchor point is created and is selected.
- Choose View > Smart Guides to turn them off.
Select the Direct Selection tool (
 ), and drag the anchor point you just clicked to the left.
Drag the other anchor point, from where you originally cut the path with the scissors, up and to the left (see the figure).
Notice how the stroke (the black border) doesn’t go all the way around the red shape. That’s because cutting with the Scissors tool makes an open path. A circle or rectangle are examples of closed paths, and a line or “S” shape are examples of open paths (the end points are not connected). If you only want to fill the shape with a color, it is not necessary to join the path to make a closed path. An open path can have a color fill. It is, however, necessary to join a path if you want a stroke to appear around the entire fill area.
)
)
)
Joining paths
Suppose you draw a “U” shape and later decide you want to close the shape, essentially joining the ends of the “U” with a straight path. If you select the path, you can use the Join command to create a line segment between the end points, closing the path. When more than one open path is selected, you can join them together to create a closed path. You can also join the end points of two separate paths.
Next, you will join the ends of the red path to create a single closed shape.
Select the Selection tool (
) in the Tools panel. Click away from the red path to deselect it, and then click in the red fill to reselect it.This step is important because only one anchor point was left selected from the previous section. If you were to choose the join command, an error message would appear. By selecting the whole path, when you apply the join command, Illustrator simply finds the two ends of the path and connects them with a straight line.
Choose Object > Path > Join.
Notice that the two anchor points on the left side of the paths are now joined with a straight path and the stroke (black border) goes all the way around now.
Choose Select > Deselect to see the closed path.
When you apply the Join command to two or more open paths, Illustrator first looks for and joins the paths that have end points stationed closest to each other. This process is repeated every time you apply the Join command until all paths are joined.
TIP
In Lesson 6, “Creating an Illustration with the Drawing Tools,” you’ll learn about the Join tool (
 ), which allows you to join two paths at a corner, keeping the original curve intact.
- Click the red path to select it again.
Select the Eyedropper tool (
 ) in the Tools panel, and click the blue circle in the center of the artboard.
The Eyedropper tool samples the appearance attributes like stroke and fill from what you click and applies those same appearance attributes to the selected artwork, if it can.
- Select the Selection tool, and drag the formerly red shape into position like you see in the figure.
Choose Select > Deselect.
)
)
)
Cutting with the Knife tool
Another way to cut a shape is by using the Knife tool (). To cut with the Knife tool, you drag across a shape, and the result is two closed paths.
- Choose “3 Bird 2” from the Artboard Navigation menu in the lower-left corner of the Document window.
- Click and hold down the mouse on the Scissors tool (), and select the Knife tool ().
Position the Knife pointer (
 ) above the green shape toward the top of the artboard. Starting above the shape (see the red X in the figure), drag down all the way across the shape to cut the shape into two.
Dragging across a shape with the Knife tool makes a very free-form cut that is not straight at all.
TIP
Pressing the Caps Lock key will turn the Knife tool pointer into a more precise cursor (
 ). This can make it easier to see where the cut will happen.
Position the pointer above the green shape, to the right of where you just cut. Press and hold Option+Shift (Mac OS) or Alt+Shift (Windows) and drag down all the way across the shape to cut it into two, in a completely straight line. Release the mouse button and then the keys.
Pressing the Option key (Mac OS) or Alt key (Windows) allows you to cut in a straight line. Pressing the Shift key as well constrains the cut to 45 degrees.
While pressing the keys in the previous step, try making two more cuts to the right of the cut you just made.
Don’t worry about making the resulting shapes exactly the same width. See the figure for roughly where to cut.
- Choose Select > Deselect.
Select the Selection tool (
), and click the first green shape from the left to select it. Choose the CMYK Cyan color from the Fill color in the Control panel.When you hover the pointer over a color in the panel that appears, you can see a yellow tooltip with the color name appear.
- Click the green shape farthest to the right to select it. Choose a red color from the Fill color in the Control panel. I chose a color with the name “C=15 M=100 Y=90 K=10.” See the following figure.
With three green shapes left, click the middle green shape to select it. Choose an orange color with the name “C=0 M=80 Y=95 K=0” from the Fill color in the Control panel.
- Drag across all of the shapes you cut to select them. Change the Stroke weight to 0 in the Control panel.
- Choose Select > All On Active Artboard, and then choose Object > Group.
Choose Select > Deselect, and then choose File > Save.
)
)
)
)
)
)
Using the Eraser tool
The Eraser tool () lets you erase any area of your vector artwork, regardless of the structure. You can use the Eraser tool on paths, compound paths, paths inside Live Paint groups, and clipping content.
Next, you’ll use the Eraser tool to modify several shapes.
- Choose 2 Bird 1 from the Artboard Navigation menu in the lower-left corner of the Document window.
With the Selection tool (
), select the smaller white circle toward the upper-left corner of the artboard.By selecting the white shape, you’ll erase only that shape and nothing else. If you leave all objects deselected, you can erase any object that the tool touches, across all layers.
- Click and hold down the mouse on the Knife tool (), and select the Eraser tool () in the Tools panel.
Double-click the Eraser tool (
) to edit the tool properties. In the Eraser Tool Options dialog box, change the Size to 20 pt. Click OK.Position the pointer off the upper-left corner of the white circle (where you see the red X in the figure). Click and drag across the circle in a “U” shape to erase the top half of the circle.
When you release the mouse button, the top half of the circle is erased, and the circle is still a closed path.
Change the Stroke weight to 0 in the Control panel, and choose a blue from the Fill color. I chose a blue with the color name of “C=85 M=50 Y=0 K=0” that appears in the yellow tooltip when you hover over each color swatch.
You can also erase in a straight line, which is what you’ll do next.
- Select the Selection tool, and click the white circle in the lower-right corner of the artboard.
Select the Eraser tool (
) in the Tools panel. Press the Shift key and starting off the left side of the white circle, drag across the top half of the circle. Release the mouse button and then the Shift key.The white circle is now two separate shapes, both closed paths.
Drag across the remaining shape at the top to erase it completely. You may need to drag across is a few times to erase it all.
It may look like you erase part of the blue shape, but since it isn’t selected, it isn’t erased.
With the last part of the circle still selected, select the Eyedropper tool (
) in the Tools panel, and click the small blue circle you erased part of earlier (in the upper-left corner of the artboard).This copies the appearance attributes like fill and stroke from the small shape to the larger shape.
With the larger blue shape selected, choose Object > Transform > Rotate. In the Rotate dialog box, change the Angle to -20, and select Preview to see the change. Click OK.
- Select the Selection tool in the Tools panel. Drag each shape from its center onto the large blue circle in the center to create a bird (see the figure for guidance).
- Choose Select > All On Active Artboard, and then choose Object > Group.
Choose File > Save.
)
)
)
)
)
)
)
)
)
Combining shapes
In Illustrator, you can combine vector objects in a variety of ways. A lot of the time, creating more complex shapes from simpler shapes can be easier than trying to create them with drawing tools like the Pen tool. The resulting paths or shapes differ depending on the method you use to combine the paths. In this section, you’ll explore a few of the more widely used methods for combining shapes.
Working with the Shape Builder tool
The first method you will learn for combining shapes involves working with the Shape Builder tool (). This tool allows you to visually and intuitively merge, delete, fill, and edit overlapping shapes and paths directly in the artwork. Using the Shape Builder tool, you’ll start out by creating a more complex bird shape from a series of simpler shapes like circles and squares.
- Choose 4 Butterfly from the Artboard Navigation menu in the lower-left corner of the Document window.
- Choose View > Fit Artboard In Window to ensure it fits in the Document window.
- Select the Zoom tool () in the Tools panel, and click a few times on the red and green shape on the left side of the artboard to zoom in.
Select the Selection tool (
), and drag a marquee selection across the red/orange rectangle, white circles, and green rectangle to select the shapes on the artboard.In order to edit shapes with the Shape Builder tool (
), they need to be selected. Using the Shape Builder tool, you will now combine, delete, and paint these simple shapes to create the rest of a butterfly’s wings.Select the Shape Builder tool (
) in the Tools panel. Position the pointer off the upper-left corner of the shapes, and drag from the red X in the figure down and to the right into the red/orange rectangle. Release the mouse button to combine the shapes.TIP
You can also press the Shift key and drag a marquee across a series of shapes to combine them. Pressing Shift+Option (Mac OS) or Shift+Alt (Windows) and dragging a marquee across selected shapes with the Shape Builder tool (
) selected allows you to delete a series of shapes within the marquee.When you select the Shape Builder tool, the overlapping shapes are divided into separate objects temporarily. As you drag from one part to another, a red outline appears, showing you what the final shape outline will look like when it merges the shapes together after releasing the mouse button. Notice that the new combined shape is now the same blue as the bird shape you created previously.
Position the pointer off the upper-right corner of the shapes, and drag from the red X in the figure down and to the left into the red/orange rectangle. Release the mouse button to combine the shapes.
Next, you’ll delete a few shapes.
With the shapes still selected, hold down the Option (Mac OS) or Alt (Windows) key. Notice that, with the modifier key held down, the pointer shows a minus sign (
 ). Click each red shape to delete them.
Double-click the Shape Builder tool in the Tools panel. In the Shape Builder Tool Options dialog box, select Straight Line from the Selection options. Click OK to close the dialog box.
By default, the Shape Builder tool lets you drag across shapes in a freeform way.
With the shapes still selected, hold down the Option (Mac OS) or Alt (Windows) key and drag through the green shape in the center from top to bottom to remove it.
- Select the Selection tool. With the blue shapes still selected, change the Fill color to an orange/red color with the tooltip name that shows as “C=0 M=90 Y=85 K=0.”
- Choose Object > Group to group the now orange shapes together.
- Choose View > Fit Artboard In Window.
- Select the Selection tool and drag one of the orange shapes in the group to the right side of the artboard, above the yellow shapes. See the following figure for how to position them.
- Drag the orange/yellow shape (an arrow is pointing to it in the figure) into the center of the wing shapes.
Choose Select > Deselect, and then choose File > Save.
)
)
)
)
)
)
)
Working with the Pathfinder panel
The Pathfinder panel is another place to combine shapes in different ways. When a shape mode such as Unite is applied, the original objects selected are permanently transformed, but you can hold down a modifier key, and the original underlying objects are preserved.
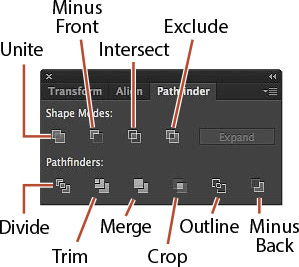
When a Pathfinder effect such as Merge is applied, the original objects selected are permanently transformed. If the effect results in more than one shape, they are grouped automatically.
- Choose 5 Bird 3 from the Artboard Navigation menu in the lower-left corner of the Document window.
- Choose Window > Pathfinder to open the Pathfinder panel group.
With the Selection tool (
), hold down the Shift key, and click the red oval and blue rectangle beneath it to select both objects.You need to create a shape that looks like a bird wing. You will use the Pathfinder panel and those shapes to create the final artwork.
With the shapes selected, in the Pathfinder panel, click the Minus Front button (
 ) in the Shape Modes section of the Pathfinder panel to permanently subtract the top shape from the bottom shape.
With the new shape selected, notice the word “Path” on the left side of the Control panel.
- Choose Edit > Undo Subtract to bring both shapes back. Leave them selected.
)
)
Shape modes in the Pathfinder panel
The buttons in the top row of the Pathfinder panel, called shape modes, create paths just like the Pathfinder effects, but they can also be used to create compound shapes. When several shapes are selected, clicking a shape mode while pressing the Option (Mac OS) or Alt (Windows) key creates a compound shape rather than a path. The original underlying objects of compound shapes are preserved. As a result, you can still select each original object within a compound shape. Using a shape mode to create a compound shape can be useful if you think that you may want to retrieve the original shapes at a later time.
With the shapes still selected, hold down the Option (Mac OS) or Alt (Windows) key, and click the Minus Front button (
) in the Shape Modes section of the Pathfinder panel.This creates a compound shape that traces the outline of what’s left after the top red shape is subtracted from the bottom blue shape. You will still be able to edit both shapes separately.
- Choose Select > Deselect to see the final shape.
With the Selection tool, double-click the blue shape to enter Isolation mode.
TIP
To edit the original shapes in a compound shape like this one, you can also select them individually with the Direct Selection tool (
).You could also double-click the (now) white oval, but that one is harder to see.
Choose View > Outline so that you can see the outlines of the two shapes, and click the edge of the oval shape or drag across the path to select it.
- Choose View > GPU Preview or View > Preview On CPU if not available.
Drag the white oval from the middle a little to the left.
Press the Escape key to exit Isolation mode.
You will now expand the wing shape. Expanding a compound shape maintains the shape of the compound object, but you can no longer select or edit the original objects. You will typically expand an object when you want to modify the appearance attributes and other properties of specific elements within it.
- Click away from the shape to deselect it, and then click to select it again.
Click the Expand button in the Pathfinder panel. Close the Pathfinder panel group.
- Drag the blue wing shape on top of the bird like you see in the figure.
Choose Select > All On Active Artboard, and then choose Object > Group.
)
)
)
)
)
Creating a compound path
Compound paths let you use a vector object to cut a hole in another vector object. Whenever I think of a compound path, I think of a doughnut shape, which can be created from two circles. Holes appear where paths overlap. A compound path is treated like a group, and the individual objects in the compound path can still be edited or released (if you don’t want them to be a compound path anymore). Next, you’ll create a compound to create some art for the butterfly.
- Choose 4 Butterfly from the Artboard menu in the lower-left corner of the Document window.
- Choose View > Fit Artboard In Window.
With the Selection tool (
) selected, select the white circle with the black stroke. Drag it onto the larger orange circle above it, a little off-center.- Drag across both shapes to select them.
Drag the shapes onto the larger orange wing of the butterfly. Notice that the white circle is on top and you can’t see through it.
Choose Object > Compound Path > Make, and leave the artwork selected.
TIP
You can still edit the original shapes in a compound path like this one. To edit them, select each shape individually with the Direct Selection tool (
) or double-click the compound path with the Selection tool to enter Isolation mode and select the individual shapes.You can now see that the white circle has seemingly disappeared, and you can now see through the shape to the reddish-orange color of the butterfly wing. The white circle was used to “punch” a hole in the orange shape. With the shape still selected, you should see “Compound Path” on the left end of the Control panel above the Document window.
Option-drag (Mac OS) or Alt-drag (Windows) the new compound path to the right side of the orange wing shape. Release the mouse button and then the key.
- Select all of the shapes for the butterfly by choosing Select > All On Active Artboard.
- Choose Object > Group.
Choose Object > Transform > Rotate. In the Rotate dialog box, change Angle to -45, select Preview, and then click OK.
- Choose File > Save.
)
)
)
)
Combining paths using the Shaper tool
In Lesson 3, “Using Shapes to Create Artwork for a Postcard,” you learned about the Shaper tool. The Shaper tool can be used to not only create paths and shapes but also combine paths and shapes.
After combining artwork with the Shaper tool, the result is a “shaper group.” The original paths are still accessible and treated like a merged group, but appearance attributes are applied to the shaper group as a whole.
)
To learn more about combining paths using the Shaper tool, search for “Shaper tool” in Illustrator Help (Help > Illustrator Help).