This chapter is from the book
This chapter is from the book
This chapter is from the book
Working with Scenes
Scenes provide an easy way to break your movie's timeline into sections of frames. You can also think of scenes as animated "pages," each of which can be unique, though they all belong to the same timeline (Figure 10.11). A single movie can consist of any number of scenes, played in the order you place them. Each movie automatically starts with one scene; you manually add (or delete) the rest. Although individual scenes are all part of a single timeline (the main timeline), each new scene is made up of an independent frame number sequence, beginning with Frame 1.
) Figure 10.11 Scenes allow you to break up a single timeline into
manageable sections.
Figure 10.11 Scenes allow you to break up a single timeline into
manageable sections.
Let's say you have a movie that consists of three scenes: Intro, Body, and Conclusion. Your movie will first play the Intro scene from beginning to end, then the Body, and finally the Conclusion (at which point the movie will stop). Keep in mind, however, that you can also reorder these scenes to change their flow.
The only function of scenes is to help you organize content. A timeline that spans multiple scenes is still considered a single unit: This is especially important to remember if you're working with and updating variables in a timeline (for more on this, see Chapter 12, "Understanding ActionScript"). Scenes cannot be used inside the timeline of a symbol.
Scene Management
Scene management can encompass (among other things) adding and deleting scenes, renaming scenes, and changing the order in which scenes appear in the movie—most of which you can accomplish via the Scene panel.
To display the Scene panel:
From the Window menu, choose Scene. The Scene panel will appear (Figure 10.12), and the movie's scenes will be listed.
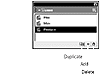 Figure 10.12 The Scene panel.
) Figure 10.12
Figure 10.12To add a scene, do one of the following:
On the Scene panel, click the Add Scene button.
Or
From the Insert menu, choose Scene. Either of these actions will generate a new scene, with the default name Scene appended by a number. The authoring environment will also automatically jump to your newly created scene.
To delete a scene:
On the Scene panel, select the scene you wish to delete from the scene list.
Click the Delete Scene button on the Scene panel. An alert box will ask you to confirm the deletion.
Click OK.
Or
Go to the scene you wish to delete.
From the Insert menu, choose Remove Scene. An alert box will ask you to confirm the deletion.
Click OK.
To rename a scene:
From the scene list in the Scene panel, double-click the scene whose name you wish to change.
Enter a new name for the scene, then press Return/Enter.
To reorder scenes:
From the scene list in the Scene panel, click and hold the name of the scene you'd like to reposition.
Drag the scene to a new position in the list, and release (Figure 10.13).
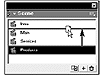 Figure 10.13 Repositioning a scene in the Scene panel changes its play order in the overall movie sequence.
The scenes will now play sequentially in the order they appear in the list.
) Figure 10.13
Figure 10.13To navigate between scenes, do one of the following:
From the scene list in the Scene panel, click the name of the scene you wish to navigate to.
Or
From the View menu, choose Go To and then specify one of the available scenes from the list.
The timeline will automatically jump to that scene.
Duplicating scenes
Duplicating a scene allows you to make an exact copy of it—including all frames, layers, animations, and sounds. This enables you to use an existing scene as the starting point for a new one.
To duplicate a scene:
From the scene list in the Scene panel, click the name of the scene you wish to duplicate.
Press the Duplicate Scene button on the Scene panel.
The new scene is given a default name and appears on the scene list.