- Getting started
- Creative Cloud Desktop
- Managing desktop applications
- Accessing mobile applications
- Creative Cloud services
- Next steps with Creative Cloud
This chapter is from the book
This chapter is from the book
This chapter is from the book
Managing desktop applications
The primary use of Creative Cloud Desktop is to access and manage the various software applications that are part of your subscription.
Installing software applications
Before you can use any of the Adobe desktop applications like Photoshop, Illustrator, Premiere Pro, and the rest, you must first install them to your computer.
On the Apps tab, click All Apps in the upper left of the interface.
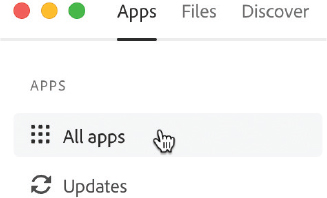
A grid of applications appears.
Locate the application you want to install and click Install.
NOTE
If you see a warning icon
 when attempting to install an app, clicking the icon will provide detailed information as to why the software cannot be installed. Normally, this is because you must update your operating system for compatibility.
Creative Cloud will download the application and the installation process will begin.
You can monitor the installation progress directly or proceed to install additional applications while this is happening.
Installing multiple applications will not affect the installation procedures at all.
Once the application is installed, click Open to launch it.
TIP
If you can’t find a specific piece of software, you can click the search icon
 at the top right of the interface to locate and install it.
)
)
)
Software applications to install
When working through this book, you’ll want to install the following desktop applications:
Adobe Lightroom: Photography management and editing
Adobe Photoshop: Raster image design
Adobe Illustrator: Vector graphic design
Adobe InDesign: Multipage layout for digital and print
Adobe XD: Screen layout and prototyping
Adobe Dimension: Scene-based 3D layout design
Adobe Audition: Audio recording, editing, and mixing
Adobe Premiere Pro: Video sequencing
Adobe After Effects: Motion graphics, video compositing, and effects
Adobe Character Animator: Live, performance-based character animation
Adobe Animate: Multiplatform animation, motion graphics, and interaction design
Adobe Media Encoder: File transcoding and conversion
If you don’t have room on your computer to install everything at once, you can always install only what you are using at a given time, removing software that you no longer currently need. As you’ll see soon, the Creative Cloud Desktop application makes these actions relatively painless.
Updating software applications
One of the major benefits to Adobe’s cloud-based distribution model is that it makes updates available on a regular basis. Some provide important new features and UI improvements, and others are more akin to stability and security updates. In either case, it is a good idea to keep your software updated at all times.
Updates may be installed automatically depending on any preferences you have set. You can also check for updates manually.
In the left-hand column of the Apps tab view, choose Updates.
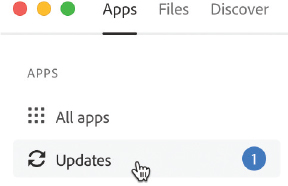
Creative Cloud displays the number of updates currently available in a badge to the right.
On the Updates screen, click Check For Updates.
Creative Cloud Desktop will check for any available updates to your installed software applications.
If updates are available, they will be listed below, and they often include information detailing what the update contains.
Click the Update button to download the update and install it to your system. You can also choose Update All
 to update everything with a single click.
Monitor the update process. Sometimes you will receive a prompt that asks you whether you’d like to import settings to the updated version, depending on your chosen preferences.
Once the update completes, you can launch the application and make use of the updated version.
)
)
)
Uninstalling software applications
From time to time, you may need to completely uninstall an application if you no longer use it regularly, or perhaps if you want to free up space on your computer.
While you can do this on the operating system level, it is best to uninstall through the Creative Cloud Desktop application.
On the Apps tab, your installed applications are listed in the All Apps sidebar. Click the More Actions
 option at the right of any installed application to access an overlay menu and select Uninstall.
This menu will show more or fewer actions reflecting the chosen application and what is available.
Depending on the application being uninstalled, you may get an overlay asking whether you would like to keep or remove preferences during the uninstall process. If you think you might reinstall the application in the future, click Keep to retain your preferences.
Creative Cloud removes the application from your computer, but you can reinstall it whenever you like.
)
)
Installing other versions
By default, installing a software application will install the latest version. If you want to install a specific version of most applications, you have to access them through the More Actions menu.
On the Apps tab, under All Apps, click the More Actions
option at the right of any installed application to access an overlay menu and choose Other Versions.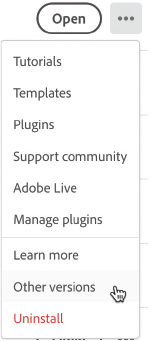
An additional overlay appears. Here you can choose specific versions of the software to install.
In the overlay, you can see the latest version highlighted at the top and older versions listed below. Locate the version you want to install and click the Install button associated with that version of the software.
The version you selected is downloaded and installed.
Click Done to exit the overlay.
)
Desktop software not covered in this book
While this book does cover the major desktop applications available in Creative Cloud, it doesn’t include everything that’s available.
Here are some applications we will not be detailing in this book:
Adobe Lightroom Classic: Manage and edit photographs in a desktop application.
Adobe Bridge: Preview, organize, edit, and publish your creative assets.
Adobe Acrobat: View, create, manipulate, print, and manage PDF files.
Adobe Dreamweaver: Design web pages using HTML, CSS, and JavaScript workflows.
Adobe InCopy: Provide feedback and edits to InDesign documents.
Adobe Substance 3D Collection: Create 3D art and augmented reality (AR) experiences using an entirely separate suite of software that isn’t included in a Creative Cloud subscription but that is available separately.
We will touch upon this collection in more detail in Lesson 7.
Even though we will not be addressing these applications, that doesn’t mean they are not important. Of course, you are free to install and use any application that is available as part of your subscription.