- Flash Guide 2006
- Welcome to the New Flash Reference Guide
- Flash Design Guide
- Introduction To Flash
- Working with the Authoring Tool
- Working with Templates
- FreeHand for the Power User
- Creating Animation with Fireworks
- Creating Animation in Flash
- Animating Text
- Working With Layers and Keyframes
- Working With Tweens
- Quickly Add Keyframes to Tweens
- Using Animation Paths
- Using Flash's Onion Skinning Tools
- Publishing Your Animation
- Preloading for Non-Programmers
- Drawing in Flash
- Using the Library
- Organizing Animations With Storyboards
- Working With Masks
- Making 2D Look 3D
- Working With Text
- Working With Input Text Fields
- Working With Dynamic Text
- Working with Text: Advanced Text Treatment With CSS
- Working With Text: Embedding Fonts
- Flash Interactive Developer Guide
- What is an Interactive Developer?
- Creating Flash Projects
- Using Form Applications
- Working with Form Components
- Setting up a Movie for Design and Animation
- Setting up a Movie for Programming
- Working with Components
- ActionScript Fundamentals
- Intro to Working With Arrays
- Understanding The Three Types of Arrays
- Control Data Stored in Arrays
- The Eolas Solution
- Intro to Flash Player 9
- Working with Strings
- Creating ActionScript Transitions
- Working with Boolean Objects in ActionScript
- Optimizing Delivery
- Working with Numbers in ActionScript
- Working with the Number Class
- Flash Professional 9 Preview
- Adobe Takes ActionScript Open Source
- Flash Rich Media Guide
- Pros and Cons of Flash 8 Video
- Using SMIL in Flash Video 8
- Stream an MP3 Audio File to Your Flash Movie
- Flash 8
- Introduction to Flash 8
- Advanced Text Rendering
- Using BitmapData Class in Your ActionScript
- The CacheAsBitmap Property
- Bitmap Rendering Improvements and Blend Modes
- Using The ExternalInterface Class
- Using Filters
- Downloading and Uploading Files with ActionScript
- Runtime Support for GIF and PNG Files
- Garbage Collection in Flash 8
- Using Enhanced Gradients
- Using Scale 9
- Stroke Enhancements in Flash 8
- Video Support in Flash 8
- How to Create a Slideshow
- Creating Dynamic Text in Flash
- Flash 3-D–Taking Flash to the Third Dimension!
- Object Collision Detection with Flash
- Create a Quiz With The Flash Quiz Template
- Working with Flash
- Uses for Flash
- Beyond Flash
- Flash Reference Guide
- Informit Articles and Sample Chapters
- Books
- Online Resources
- Blogs and Discussion
- Tools and Downloads
- Summary
- Flash MX Interface
- Welcome to Flash: the Designers' and Developers' Tool
- Using the Stage
- Panels, Panels Everywhere
- Using the Tools Pane
- Using the Property Inspector
- Using the Timeline Panel
- Using the Library
- Adding Interaction through the Actions Panel
- Integrating with Studio MX
- Saving and Publishing Flash Movies
- Informit Articles and Sample Chapters
- Books
- Online Resources
- Summary
- Drawing in Flash
- Shape Tools
- Applying Color
- Informit Articles and Sample Chapters
- Tools and Downloads
- Summary
- Flash Bitmaps
- Importing Bitmaps
- Exporting Bitmap Images
- Converting Bitmap Images to Vector Illustrations
- Informit Articles and Sample Chapters
- Online Resources
- Tools and Downloads
- Summary
- Flash Text and Text Fields
- Text Types
- Input Text
- Online Resources
- Tools and Downloads
- Summary
- Using the Library
- Library Organization
- Creating Instances
- Informit Articles and Sample Chapters
- Books
- Online Resources
- Summary
- Flash Animation
- Controlling Time
- Keyframe Animation
- Tweening
- Text Animation with Flash
- Informit Articles and Sample Chapters
- Books
- Online Resources
- Summary
- Flash Audio
- Using Audio in Flash
- Importing
- Linking to MP3
- Publishing Audio
- Streaming MP3 from the Flash Communication Server
- Informit Articles and Sample Chapters
- Online Resources
- Summary
- Video in Flash
- Video
- Flash Video
- Spark Codec
- Exporting Video
- Informit Articles and Sample Chapters
- Blog and Discussion
- Summary
- Flash Components
- Attaching Components to Movies
- Creating a Component
- Informit Articles and Sample Chapters
- Tools and Downloads
- Summary
- Exporting and Optimization
- Connecting Flash to the Internet
- Loading SWF Movies
- Sharing Fonts Between Movies
- Reusing Your ActionScripts
- Using Third-Party Tools
- Informit Articles and Sample Chapters
- Online Resources
- Tools and Downloads
- Summary
- Introduction to Design in Flash
- Introduction to Design
- Fundamental Design Concepts
- Breaking Up the Screen
- Branding
- Adding Forms to Movies
- Developing with ActionScript
- Introduction to Programming within Flash MX 2004
- Using ActionScript to Extend the Functionality of Flash
- ActionScript Fundamentals
- Using the Actions Panel
- Using the Reference Panel
- Rapidly Adding ActionScript with the Behaviors Panel
- Event Handling within ActionScript
- Timeline Events
- Triggering Events through User Interaction
- Flash MX 2004 Pro
- Summary
- Creating Interactive Movies
- Giving Users a Choice
- What it All Comes Down to
- Summary
- Testing your Flash Movies
- Naming Conventions
- Syntax Checker
- Testing your movies
- Summary
- Debugging
- Using the "Debugger"
- Reviewing ActionScript Error Codes
- Summary
- Using ActionScript to Control Your Movies
- Setting Up Your Movies for Interaction
- Making Movie Clips Behave Like Buttons
- Controlling Multiple Movie Clips
- Applying Different Types of Events to a Movie Clip
- Summary
- Using ActionScript to Control Text
- How ActionScript Can Control Text
- Using Cascading Style Sheets within Flash MX 2004 Dynamic Text Boxes
- Applying CSS formatting with ActionScript
- Where Do You Go Now?
- The Differences Between ActionScript 1 and ActionScript 2
- Working with Classes
- Which Version of the Flash Player should you use?
- What’s Next?
- Using Pre-Built Classes In Flash MX 2004
- Using a Class in ActionScript
- The List of Core Classes
- Flash Player-Specific Classes
- Summary
- Creating Your Own Classes
- Creating a Custom Class
- Working with External Data in Flash
- Why Use XML in Flash?
- Integrating Flash and XML
- Visual Elements
- Adding the ActionScript
- Future Shock
- Using Components
- Begin Using Components
- Building an Application with Components
- Gluing Components Together with ActionScript
- Summary
- Informit Articles and Sample Chapters
- Books and e-Books
- Online Resources
- Rich Internet Applications
- Introduction to Rich Internet Applications
- Why Use Flash for Building Application Solutions?
- Building Applications with Flash
- Getting Started
- Using Flash Variables
- Working with Parameters in the Object and Embed HTML Tags
- Linking data with Flashvars
- Getting Data Into Flash: Loading External SWF and JPG Files
- Why You Should Separate Your Files
- Loading Movies into Levels and Target Movie Clips
- Summary
- Loading SWF and JPG Images
- Working With XML: What is XML, and How Does it Relate to Flash?
- A Brief History of XML
- Why Structuring Your Data is Always a Good Thing
- How XML Came to Flash
- Summary
- Working with XML: Good XML vs. Bad XML
- Good Places to Start
- Writing Good XML
- XML Tools
- The Next Step - Using XML in your Flash Applications
- Working with XML: Loading XML into Flash
- Integrating Flash and XML
- Visual Elements
- ActionScript
- Future Shock
- Working with XML — Dynamically Building XML with .NET, ColdFusion, Java, and PHP
- ColdFusion
- .NET
- Java
- PHP
- Summary
- Working with XML — Web Services
- SOAP Support in Flash MX 2004
- Using Components to Bind Web Services into your Applications
- Summary
- Working with Data — Working with XML
- XML In Flash
- Writing XML In Flash
- Building Trees of Data with XML
- Working with Data: Pushing Data back to the Server with Load Vars
- Setting up the Database
- Writing the VB.NET Code
- Creating the Flash Movie
- Working with Data: Leveraging Persistent Connections
- Using XMLSocket Connections
- XMLSocket Server
- XMLSocket Security
- XMLSocket Class in Flash
- Creating a Pong Game with an XMLSocket Server
- Summary
- Flash Remoting
- What is Flash Remoting?
- Using Flash Remoting
- The Future of Flash Remoting
- Flash Remoting Links
- Working with Data: Macromedia Flex Presentation Server
- What Problem Does Flex Presentation Server Address?
- How does Flex work?
- Coding and Building Flex Applications
- Building Rich Internet Applications: Connecting Flash to a Database
- Using FlashVars
- Using LoadVars
- Loading XML
- Consuming a Web Service
- Live data connections with XMLSocket Connections
- Building Rich Internet Applications: Planning, Planning, Planning
- A Simple Plan
- Tools You Can Use
- Applying a Discipline
- Building Rich Internet Applications: Design Counts
- Do Not Be Afraid to Ask For Help
- What if You Do Not Have a Ben To Call
- Building Rich Internet Applications: Beyond the Movie Clip
- UI Components
- Data Components
- Media Components
- Manager Components
- Screen Components
- Building Rich Internet Applications: Using Macromedia Central
- What Central is All About
- Who is Using Central?
- Developing for Macromedia Central
- Next Steps You Need to Take
- Building Rich Internet Applications: Using Macromedia Flex
- Authoring with Flex
- Publishing with Flex
- Presenting the Solution: Delivering Flash Applications to the Web
- Flash's own Publishing Tools
- Using Dreamweaver
- Writing your Own HTML
- Presenting the Solution: Delivering Flash Over Non-PC Devices
- Using Macromedia's Flash Lite
- Programming for Flash Lite
- FlashCast
- Informit Articles and Sample Chapters
- Books and e-Books
- Flash for Designers: Rich Media Production
- Graphic Control in Flash
- Drawing in Flash
- Importing Vector Art
- Importing Raster
- Scripting Images
- Introduction to the Rich Media Production
- Using Video, Audio and Images in your Flash Movies
- Using SWF Flash Movies
- Using JPEG Images
- MP3 Sound Files
- Flash Video
- Using Components to Build Rich Media Solutions
- Using the Loader Component
- Using the Media Components
- Controlling Components with ActionScript
- Controlling the Loader Component
- Media Components
- Using Audio in Flash
- Linking to MP3
- ActionScript-Controlled Audio
- Volume Control
- Publishing Audio
- Summary
- Video in Flash
- Working with Video
- Controlling Video with Components
- Exporting Video
- Summary
- Choosing Which Version of Flash Communication Server to Use
- Server Requirements
- Installation
- Running Communication Server on Different OS Platforms
- Pitfalls to Watch for
- Summary
- Streaming Video
- Live Video
- Broadcast Video on Demand
- Flash Video Components
- The Communication Server MX Server Code for the VideoPlayBack Component
- Record Video with VideoRecord Communication Component
- Create A Video Conference
- Examining the VideoConferencing Component
- The Communication Server MX Server Code for the VideoConferencing Component
- Summary
- Using the Microphone and Camera Core Classes
- Microphone
- Camera
- Constructing Large Applications That Leverage Video and Audio
- Configuring the Server
- Creating the Movie
- Broadcasting
- Summary
- Informit Articles and Sample Chapters
- Books and e-Books
- Matthew's Predictions for 2006
- Matthew's Favorite Flash Books
- Matthew's Favorite Flash Web Resources
- Macromedia as Part of Adobe
- First Look: Flash Player 8
- First, the Facts
- What Macromedia Brings to the Table
- What Adobe Brings to the Table
- What the Two Companies Can Do for Each Other
- A Brief History of Flash
Working with Video
To begin with I am going to focus on standard video. By standard I mean video that is not streamed form a server as you would have with a live broadcast of conference system.
Later in the you will set up Flash MX Communication Server and broadcast video from the server.
As you saw earlier, audio can be imported directly into Flash or you can link to an external MP3 file. Currently Flash MX does not allow you to link to an external MP3 file, however you can import many types of video into Flash MX.
Flash MX allows you to import MPEG, AVI and Flash Movies natively. These file formats do not, however constitute a complete range of video formats available to you as a designer.
You will no doubt want to import files formatted in Apple's QuickTime movie CODEC or Microsoft's ASF format. There is an easy way to support these additional file types: download and install Apple's QuickTime and Microsoft's Windows Media Player. It is best to install the latest and greatest versions of these products.
For Microsoft Windows users you will find that installing the Player software allows you to import additional file types. For Macintosh users you will not be able to import and convert ASF. However, you will be able to import MOV files with the addition of QuickTime.
Flash Video
Flash Video, FLV, is a new video standard specifically developed for Flash. The standard is specifically designed for video broadcast through the Flash Player. You will find later that as you broadcast live events that a native file type is essential.
The benefit of working with the Flash Video format is that you do not need to convert the video as you import it into Flash MX. You no doubt have noticed that when you import an Illustrator file or a Fireworks files that you are prompted to do something with the file. It may be to flatten layers or to leave certain elements of the imported file editable.
An additional benefit is that the FLV file format is the default media format for broadcasting video from Communication Server to the Flash Player.
With Flash Video you have no choices. You simply select a Flash Video file and import it. The best thing, however, is that there is no file conversion. The video shoots straight into Flash ready to work instantly.
To test this out you are going to import a video file formatted in the Flash Video format.
- Open Flash and create a new file. Save the file and name it flashVideo.fla.
- Select File --> Import To Library. Almost always I select Import To
Library as you never know when you will want to use a file again.
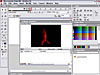
Figure 4 Flash Video inside of the Library.
- Select OK. The file will import directly into the Library. Notice there was not delay during the import? For file types other than FLV there is a conversion process.
- Open the Library and drag an instance of the newly imported video onto the Stage.
- Press CTRL+F12 to preview the movie. The files are converted and you will
begin to watch a video file directly inside of a Flash movie.

Figure 5 A Flash FLV Video file playing back through the Flash Player in a Flash Movie. It's such a cool, Flash kind of World.
- Save your work.
)
)
OK, that was the easy exercise. As you may have already seen, you do not have a lot of control over the video file. You are basically stuck with the file format that the native FLV file gives you.
This is where I introduce you to Squeeze.
Spark! Codec
The conversion process used to take video files and enable them to be broadcast through Flash is called a CODEC - a Compression and Decompression algorithm. It is used to compress files into their smallest size. The most popular CODEC you are probably aware of is a ZIP file. You can take a lot of files and place them into a ZIP file. The ZIP file is almost always much smaller than the original file format.
)
Figure 6 Sorenson Spark! is the mathematics algorithm, or CODEC, that compresses video into the Flash Video file format.
The CODEC used by Flash to compress video for the Flash Video format is called Spark! It is developed by Sorenson . Sorenson has been developing video compression algorithms for many years. The Spark! CODEC is just one of their new algorithms. Sorenson have also created the CODEC's for notable file formats such as QuickTime 6 and Window's AVI.
Any Flash Video file that you create will use the Spark! CODEC to compress the original video footage.
Sorenson Squeeze
You will not always be able to import Flash Video files directly into Flash. This may be because the files you are using have only been supplied to you in QuickTime or MPEG format and until Flash Video catches on, there are not too many video editing packages that allow you to export the Flash Video file format.
What you need to be able to do is compress video on the fly. An AVI file should be able to be pulled directly into Flash and be squeezed into the Flash Video file format. Hey, hang on...squeeze? That sounds like a great name, let's use a product called Squeeze to do the man power for us!
OK, so that was a bad lead in to Sorenson Squeeze. Macromedia must have realized that until third party software is available, you will need to have a product that will convert AVI, MOV and other video files into Flash Video. Within Flash is built a small program developed by Sorenson the makers of Spark! that will convert video files into Flash Video. The product is called Squeeze.
)
Figure 7 Sorenson Squeeze converts video into Flash Video format.
Squeeze is a program that sits in Flash. It only becomes active when you import a video file. So without much ado let's begin squeezing video files.
- Open Flash and create a new file. Name the file "importedVideo.fla"
- Select File --> Import to Library... Browse to the CD and locate the file testCard.avi. The AVI file is an uncompressed short video. If you are interested it shows some example test screens you can use. Not very exciting, but you can use you own video files as well. I am using AVI as a QuickTime MOV file will require that you have QuickTime installed. The video is made up of two main parts: the video image and the audio sound track.
- Select OK to import the file. The Import Video Settings window opens.

Figure 8 The Import Video Settings window compresses video into the Flash video format.
- Select the horizontal scroll bar under the black window in the top left of
the Import Video Settings window. The scrollbar is a playback handle that allows
you to scrub backwards and forwards through the AVI file. You can use this
preview to see if the movie file you have selected is correct.
The Import Video Settings allow you to change the settings of the original file. By default, the Spark! CODEC will compress an AVI file on a ratio of about 10:1, which is amazing. But, you are delivering files through Flash over the Internet. At this ration the final video exported out of Flash from the original AVI file (which is 47 Mb large) will still be a whopping 4 Mb. That is too much for delivering media over the Internet even with the prevalence of high speed Internet Access. You must be able to play around with the settings so that you can optimize your imported video for the Web.
- The first step you can do is to change the Quality level from 100% to 80%. There is a slight drop in quality. However, this will drop the file size down to 3.5 Mb. You need to measure the value for the web over quality.
- Changing the Keyframe Interval will reduce the number of frames of video. The current frame rate is 24 frames per second. Changing this to 12 frames per second will reduce the overall file size to 754 Kb.
- To further optimize the video you can convert the file size from 100% to 75%
of the original size. This will reduce the file 443 Kb.
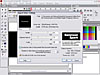
Figure 9 The Import Video Settings window settings have been tweaked to help produce the best quality video for delivery over the Internet.
- You can choose to remove the audio track to the video file if you want, however, if you are working with video footage then audio is likely to be the least of your worries. Video will always be larger in file size than audio. Removing the audio track will reduce the overall file by only a fraction - and then you have not voice to your movie!
- The video is imported into your Library. You will see that the video file
has a camera icon to show that it is a unique instance type in the Library. Drag
an instance of the video from the Library onto the Stage. Layer 1, the default
layer for a Flash movie, will immediately stretch to 205 frames. This is the
length of the video file. Changing the length of layer 1 will change the end
point of the video.
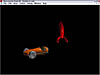
Figure 10 Flash Video embedded within a Flash movie.
- Preview your movie. Turn on the Bandwidth Profile, View-->Bandwidth Profiler, to analyze the size of the video. You will see that the once 47 Mb AVI video is now 445 Kb.
)
)
)
The full version of Sorenson Squeeze
It is hard to ignore the advert Sorenson placed in Import Video Settings window. Yes, you can buy an upgrade from Squeeze in Flash MX to Squeeze published by Sorenson .
The software is available at http://www.soresen.com. Not only can you get a copy of the video you can also view some of the slickest examples of video in Flash.
)
Figure 11 Squeeze can be purchased as http://www.sorenson.com/.
As will all good software you can download and install a 30 day evaluation of Squeeze. It is worth downloading and giving it is whirl.
What you will notice when you open Squeeze is that is it a relatively easy and intuitive tool. The only role it really has in life is the conversion of video from one file type to either Flash Video, Flash SWF or QuickTime.
)
Figure 12 Squeeze Pro.
I can guarantee that if you have some video files, you will be up and running with Squeeze in almost not time.
- The first step is to drag a video file onto the left screen. A preview of the video will be displayed to you in the screen. You can use the video controls to scrub through the video and play it.
- The next step is to choose which file type you would like to convert to. For Flash MX the easiest file type to use if FLV Flash Video. Select the FLV icon button.
- Finally you need to choose which audience file type you would like to export to. The seven buttons are preset definitions for different Internet connections. On the far left is a button that will optimize your video for broadcast to dial-up users. On the far right is a preset that will optimize the original video file for delivery over CD-ROM. You can choose multiple file types. Choose the far right button for CD.
- To convert the file into Flash Video press the "Squeeze It" button. The video is then converted. Encoding video can take some time depending on the length of the original video file.
- When the file conversion is complete you will have a file placed in the same
folder as the original video file. The file name will be the same as the
original file with the extension _cd.flv. The new Flash Video file can be
directly imported into Flash MX.
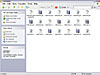
Figure 13 The final video file exported out of Squeeze.
You can batch export up to 7 different broadcast settings and 3 file types at once. As you might expect, you can also customize each setting. You can also modify the filter settings for the video. To do this you need to select the "spanner" icon.
- Selecting the "spanner" icon to open the Filter Settings window.
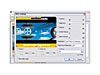
Figure 14 Squeeze's Filter Settings window.
- The main window in the Filter Window is the first frame of the video. Selecting any of the resize handles allows you to crop the video.
- You can customize the Contrast, Brightness, Gamma, White Restore and Black Restore to the video image.
- If the original video suffers from "noise," the annoying static that sparkles all over the video, then you can treat that by selecting the Video Noise Reduction.
- A useful tool tucked into the bottom left hand corner of the tools is the "Normalize Audio" check box. Selecting this check box will level all audio to the highest level without distorting the sound.
- You can also choose a simple Fade In/Fade Out transition.
- Encode a video to see your new settings take hold.
)
)
)
Flix
Macromedia has released the code that allows software companies to embed the Flash Video compressing CODEC into their products.
One product that has been around for a while is Flix. Flix, by Wildform, converts video for use with Flash. Earlier versions of Flix converted video in Vectors for use within Flash movies. The end result can be effective. However it is not true video.
The latest release of Flix does come fully Flash Video enabled.
Unlike Squeeze, Flix will not convert you video into QuickTime, but it will convert video files into Flash Video, SWF and convert the images within the video to Vectors.
)
Figure 15 Wildform's Flix.
If you are going to be using video a lot in Flash then you will want to consider purchasing either Squeeze or Flix.