This chapter is from the book
This chapter is from the book
This chapter is from the book
Working with List View
List view (Figure 2) displays a window's contents in an ordered list. Items cannot be moved around so there's no need for a Clean Up command or Arrange By options.
Windows displayed in list view also have a feature not found in other views: They can display the contents of folders within the window as an outline. This makes it possible to see and select the contents of more than one folder at a time.
To sort a window's contents
Click the column heading for the column you want to sort by. The list is sorted by that column (Figure 13).
)
Figure 13 Click a column heading to sort by that column.
TIPs
- You can identify the column by which a list is sorted by its colored column heading (Figures 2, 13, and 14).
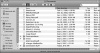
Figure 14 Click the same column heading to reverse that column's sort order.
- You can reverse a window's sort order by clicking the sort column's heading a second time (Figure 14).
- You can determine the sort direction by looking at the arrow in the sort column. When it points up, the items are sorted in ascending order (Figure 14); when it points down, the items are sorted in descending order (Figure 13).
- To properly sort by size, you must turn on the Calculate all sizes option for the window. I explain how later in this chapter.
- You can specify which columns should appear in a window by setting view options. I explain how to do that later in this chapter, too.
)
To display or hide a folder's contents in outline list view
- To display a folder's contents, use one of the following techniques:
- Click the right-pointing triangle beside the folder (Figure 15).
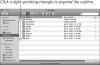
Figure 15 Right-pointing triangles indicate collapsed outlines.
- Click the folder once to select it, and press
 .
.
The items within that folder are listed below it, slightly indented (Figure 16).
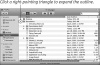
Figure 16 Folder contents can be displayed as an outline...
- Click the right-pointing triangle beside the folder (Figure 15).
)
)
- To hide a folder's contents, use one of the following techniques:
- Click the down-pointing triangle beside the folder (Figure 16).
- Click the folder once to select it, and press
 .
.
The outline collapses to hide the items in the folder (Figure 15).
TIP
)
To select multiple contiguous icons in list view
- Position the mouse pointer in front of the first icon you want to select (Figure 18).
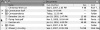
Figure 18 Position the mouse pointer in front of the first icon you want to select.
- Hold the mouse button down and drag over the other icons you want to select (Figure 19).
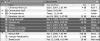
Figure 19 Drag over the other icons you want to select.
)
)
Or
- Click to select the first icon you want to select (Figure 20).
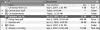
Figure 20 Select the first icon.
- Hold down
 and click the last icon in the group you want to select (Figure 21).
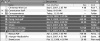
Figure 21 Hold down
and click the last icon.
)
)
To select multiple noncontiguous icons in list view
- Click to select the first icon you want to select (Figure 22).
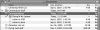
Figure 22 Click to select the first icon.
-
Hold down
 and click the next icon you want to select (Figure 23).
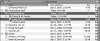
Figure 23 Hold down
and click another icon. - Repeat step 2 until all icons have been selected (Figure 24).
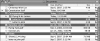
Figure 24 Continue holding down
and clicking icons until you've finished selecting the icons you want.
)
)
)
To deselect icons
Click anywhere in the window other than on an icon's line of information.
To change a column's width
- Position the mouse pointer on the line between the heading for the column whose width you want to change and the column to its right.
- Press the mouse button down. The mouse pointer turns into a vertical bar with two arrows (Figure 25).
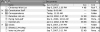
Figure 25 Position the mouse pointer on the column border.
- Drag as follows:
- When the column is displayed at the desired width, release the mouse button.
)
)
To change a column's position
- Position the mouse pointer on the heading for the column you want to move.
- Press the mouse button down and drag: As you drag, the other columns shift to make room for the column you're dragging.
- When the column is in the desired position, release the mouse button. The column changes its position (Figure 28).
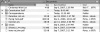
Figure 28 ...to change the column's position.
)
)
)