- What Is Raw, and Why Should You Use It?
- Processing Raw Images
- Saving Raw Files
This chapter is from the book
This chapter is from the book
This chapter is from the book
Processing Raw Images
For the most part, there’s little difference in workflow between working with Nikon raw files in Capture NX and working with non-raw files. As with non-raw files, you’ll need to transfer your raw images from your camera’s media card to your computer. You can use any of the methods discussed earlier to perform this transfer, and most of the browsers that I mentioned will be able to display thumbnails of your raw files. If your browser of choice can’t display your raw images, it may simply be that your camera is too new and you need to wait for an update.
Once you’ve transferred your images, sorted them, organized them, and made your selections, you’re ready to start editing. Open the raw file you want to edit using any of the normal file opening techniques.
What Happens When You Open a Raw File
Earlier in this chapter you learned about all of the steps that must be taken to produce a full-color image from the raw data that your camera collects. When you shoot in JPEG mode, your camera takes care of executing all of these steps.
When you open a raw file in Capture NX, the program goes through all of the steps that your camera would take if it were processing a JPEG file. It demosaics the data and performs colorimetric correction to compensate for the color filters on your camera’s image sensor, it maps the image into a color space, adjusts the white balance of your image according to the camera setting you were using, applies gamma correction and a little bit of color adjustment, noise reduction, and sharpening. It does not convert the image to 8-bit data.
When it has done all of this, it presents the image to you on-screen, just as if it were a JPEG or TIFF image. However, if you look at the Edit List, you’ll see a few new options. Above the Quick Fix edit, you’ll now see a Camera Settings edit, and in the Quick Fix edit itself you’ll see that the Exposure Compensation slider is now active. Finally, the Camera & Lens Correction edit will have two additional controls. With these added options, you’ll be able to make edits that aren’t possible with JPEG or TIFF files.
The Camera Settings Edit
With the Camera Settings edit you can control a few of the essential raw conversion parameters that Capture NX uses during its raw conversion. When you move any of the sliders in the Camera Settings edit, Capture NX goes back to the original raw file and reprocesses it with those new settings.
In the last chapter you saw how we performed fairly radical alterations to the color in an image by making adjustments to individual color channels. You also saw how these adjustments led to data loss, and you saw the resultant combing that appeared in the histogram. When you alter settings in the Camera Settings edit, there’s no risk of data loss, because when you make a change, Capture NX does not actually push and pull data around. Instead, it goes back to the original raw data and reconverts your image based on your new settings. Basically, when you change the White Balance sliders, you’re altering the program’s fundamental understanding of what red, green, and blue are. With this new understanding, it’s recalculating your raw conversion. This is why you’ll never see a combed histogram after you make a change to the Camera Settings edit—after every alteration, you’re getting brand new, unadulterated data.
In general, you can work through the Camera Settings edit in order and you’ll have a good editing workflow.
White Balance
At the top of the Camera Settings edit is the White Balance section. You’ve already learned that you can alter the white balance of a raw file after the fact, and these are the controls you’ll use to perform those changes (Figure 4.10).
)
Figure 4.10 At the top of the Camera Settings edit are Capture NX’s White Balance tools—essential controls for editing your raw files.
Initially, the White Balance edit shows you the white balance setting that was used by your camera when you took the picture. In the face of Figure 4.10, you can see that “Camera WB” was set to “Auto, 0” meaning the camera was set on Auto white balance. There are several ways you can change the white balance.
If the pop-up menu at the top of the White Balance controls is set to Set Color Temperature, then you can use the various sliders and controls to set the white balance of your image. If you choose Set Gray Point, then you can set white balance by using a special eyedropper tool.
Set Color Temperature. When Set Color Temperature is selected, you’ll see a pop-up menu beneath New WB that says Recorded Value. This indicates that the white balance is currently set to the white balance setting that the camera recorded in the file. If you open that menu, you’ll see a list of other white balance options (Figure 4.11).
)
Figure 4.11 You can choose from the same white balance presets that you probably have in your Nikon camera.
You should recognize some of these. Incandescent, Daylight, Standard Fluorescent, High Color Rendering Fluorescent, Flash, and Sodium Vapor Lamps are the same types of white balance presets that you’ll find in your camera. So, for example, if you choose Daylight, Capture NX will switch to a predefined white balance setting that Nikon has determined to be good for daylight shooting.
The Daylight setting, as well as the Fluorescent and Flash settings, includes a second menu with additional options. So, for example, if you choose Daylight, the secondary menu lets you choose between Direct sunlight, Shade, and Cloudy. Each of these will yield slightly different results (Figure 4.12)
)
Figure 4.12 When you choose Daylight, a secondary pop-up menu lets you pick from direct, shady, or cloudy daylight, which can each have slightly different color temperatures.
Once you pick a preset, the Fine Adjustment and Tint sliders will become active. These let you refine the white balance manually. The Fine Adjustment slider lets you make the image cooler (more blue) or warmer (more red). The Tint slider lets you tint the image more magenta, or more green (Figure 4.13).
)
Figure 4.13 On the left is the original Daylight white balance. In the middle you can see the effects of dragging the Fine Adjustment slider toward Warmer, and on the right you can see the effects of dragging Fine Adjustment toward Cooler.
You can’t use the Fine Adjustment and Tint sliders unless you choose a White Balance preset. So, if you shot with Auto White Balance and just want to warm up your image, you’ll first need to pick the preset that most closely matches the lighting conditions in your image. For example, if you shot outside in daylight using Auto White Balance but you want to warm the image, first set New WB to Daylight. Then you can use the Fine Adjustment and Tint sliders.
If you were shooting with a Nikon flash using colored filters from the Nikon Color Filter set, then choose Flash from the New WB pop-up. From the secondary white balance menu, select the filter type that you used.
The Sodium Vapor setting is appropriate for shooting in sports venues or under streetlights.
If you choose Calculate Automatically, then Capture NX will employ its own auto white balance algorithm to determine a white balance. Sometimes, this can do a better job than your in-camera auto setting.
Set Gray Point. If you choose Set Gray Point (which you can select from the New WB pop-up menu or the pop-up menu at the top of the White Balance controls), you’ll find the most accurate white balance control of all.
To correct white balance with a gray point eyedropper:
- Make sure the Set Gray Point controls are showing (Figure 4.14).
Figure 4.14 Using the Set Gray Point controls, you can set the white balance of your image by clicking within the image.
- Click the Start button.
- Click on something in your image that should be neutral gray. Capture NX automatically calculates a new White Balance setting (Figure 4.15).

Figure 4.15 With a single click on the spot indicated, we were able to correct the white balance in this image.
- If you want to refine your white balance—to warm it up or cool it down—adjust the Red and Blue sliders.
)
)
Capture NX will alter the curves in the curves swatch beneath the Start button (I know, they look like straight lines, but technically they’re curves) to show how it has adjusted each primary color. Remember, like all other edits, white balance is nondestructive, so you can always go back and change it later if you want to. Either click Start again and click on a new point with the dropper, or click Reset to return to the original white balance that your camera recorded.
Sometimes, a gray pattern in your image is actually composed of a number of slightly varying pixels, so it can be difficult to know if you’re clicking on the specific pixel that is the gray you want. This is especially true with noisier images. For these instances, click Marquee Selection. When you click Start, you’ll be able to drag a selection around a group of pixels. Capture NX then averages the selection to come up with a single, more accurate gray value.
Picture Control
Picture Control is Nikon’s proprietary scheme for sharing image processing settings between different cameras and pieces of software. If you have a Nikon camera that supports Picture Control, then you may have played with this feature. With Picture Control you can define different processing schemes that get applied to your images when you’re shooting JPEG. If you choose a Picture Control when shooting raw, then your camera will note in the file that you selected that Picture Control. When you open the image in NX 2, the Picture Control will automatically be selected, and NX 2 will process your image accordingly.
The idea with Picture Control is that it provides a simple way to apply consistent edits to your images. If your workflow demands quick processing, then Picture Control might be a boon. For example, if you’re a wedding photographer and you know that you always like to deliver images that have a certain level of warmth and saturation, then you can define a Picture Control with the characteristics that you like. Capture NX will automatically process those images according to the Picture Control setting you chose, just as if you’d been shooting JPEG images.
In Capture NX, you can change the Picture Control setting to a different Picture Control, disable it completely, or apply a Picture Control to an image that didn’t originally have one.
To add a Picture Control to a raw image:
- Scroll the Edit List until you can see the Picture Control portion of the Camera Settings edit.
- Set the pop-up menu at the top of the Picture Control area to Picture Control (Figure 4.16).
Figure 4.16 To add a Picture Control setting to a raw file, you must first select Picture Control, and then choose the Picture Control you want to apply.
- Choose the Picture Control that you want to apply from the lower pop-up menu in the Picture Control area. Your image will change according to the settings in the Picture Control that you choose.
- If you want to refine your image further, move the Quick Adjust slider, which alters the Sharpening, Contrast, and Saturation values according to parameters defined in the Picture Control that you have selected. Moving to the left decreases these values, while moving the slider to the right increases them.
- If you click on the Advanced options, you’ll gain access to individual sliders for each of the Quick Adjust parameters (Figure 4.17).
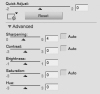
Figure 4.17 The Quick Adjust Advanced parameters let you fine tune the properties of a Picture Control that’s been applied to an image.
)
)
Managing Picture Control
At the bottom of the Picture Control area is a Reset button, which resets any Quick Adjust parameters you might have changed.
To the left of the Reset button is the Manage Picture Control pop-up menu (Figure 4.18).
)
Figure 4.18 The Manage Picture Control pop-up menu lets you choose to save, load, or edit Picture Control settings.
If you’ve used the Quick Adjust controls to make changes to a Picture Control, you can save the results as an entirely new Picture Control, by choosing Save as a new Custom Picture Control from the Manage Picture Control menu.
You can choose Load Custom Picture Control Settings to load picture controls that you’ve gotten from someone else, or launch the Nikon Picture Control Editor to design a new Picture Control that you can add to Capture NX or download to your camera.
Non-Picture Control
If you change the Picture Control menu to Non-Picture Control (Figure 4.19), you’ll gain access to the same Color Mode, Sharpening, Tone Compensation, and Saturation adjustments that you have in your Nikon camera. If you’re used to using these sliders in your camera to get a look that you like, then you can make the same adjustments here and get the same results. Also, when you’re shooting raw, these settings are stored with the raw file, and Capture NX will automatically read them and configure each of these options to match your in-camera configuration.
)
Figure 4.19 Choosing Non-Picture Control in the Camera Settings edit provides you with a different set of controls.
Noise Reduction
Earlier, you learned that after reading data off of the image sensor, the first thing your camera does is to amplify that data. Unfortunately, it’s impossible to amplify a signal without introducing noise. But, these days most digital cameras, when used at low ISOs, shoot images with extremely low noise. However, as you crank up to higher ISO settings, there’s a good chance that your images will get noisier.
As you saw earlier, noise is a speckled pattern that looks sort of like film grain, but isn’t always as attractive. There are two types of noise, luminance noise, which appears as bright speckles, and chrominance, or chroma noise, which appears as colored blobs and artifacts.
When you shoot JPEG images, your camera applies some noise reduction when it sees fit. With a raw file, of course, this noise reduction process is left in your control, and you can use the Noise Reduction controls in the Camera Settings edit to reduce the noise in your image (Figure 4.20).
)
Figure 4.20 The Noise Reduction controls let you tackle noise problems in your raw images.
To apply noise reduction, simply move the Intensity and Sharpness sliders. Noise reduction algorithms tend to work by introducing controlled, localized amounts of blurring in your image in an attempt to smear noise artifacts until they can’t be seen. As you drag the Intensity slider to the right, the amount of blurring will increase, and noise should be less visible.
Obviously, as you introduce blurring, you’ll be sacrificing sharpness and detail. The Sharpness slider lets you try to restore some of this detail loss. Finding a balance between noise reduction and sharpness loss is your goal when applying noise reduction.
If you change the Faster pop-up menu to Better Quality, then image processing will take a little longer, but you might find better results.
If you see a pronounced level of noise along edges in your image, then check the Edge Noise Reduction button.
As recommended beneath the noise reduction controls, it’s best to zoom in to 100 percent when performing your noise reduction corrections. This is mostly because any time you’re concerned about sharpness, you should view your image at 100 percent.
That said, be aware that it’s difficult to assess how bad a noise problem might be when you’re viewing your image at 100 percent. At full magnification you’re seeing individual pixels, and when you have an image with 8 million pixels—or more—an individual pixel is not actually significant if you’re printing a 4 × 6 or 8 × 10. So, before you get too concerned about correcting noise, take a look at your image in its intended final form. You may find that the noise is not as bad as you feared.
Quick Fix and Raw
After you’ve adjusted the Camera Settings to your liking, you can move on to the rest of your editing workflow. As discussed in the last chapter, you’ll first attack tonal corrections, and then move on to color. Whether you’re working with a raw or JPEG image, you use the same techniques: Add the edit that you want to the Edit List and then adjust its parameters.
However, some controls in the Quick Fix edit work a little differently with raw files, and allow some extra power.
Exposure Compensation
When you open a raw file, the Exposure Compensation slider in the Quick Fix edit becomes available (Figure 4.21).
)
Figure 4.21 The Exposure Compensation slider in the Quick Fix edit only becomes active when you are working on a raw file.
The Exposure Compensation control does just what shooting with an exposure compensation adjustment would do—it increases or decreases the overall exposure in your image. The slider goes from −2 stops to +2 stops. So, if you move the Exposure Compensation slider to .5, then your image will be half a stop brighter (Figure 4.22).
)
Figure 4.22 By moving the Exposure Compensation slider, we can dramatically change the exposure in an image. From left to right you can see −1, −.5, the original image, +.5, +1.
At first glance, Exposure Compensation seems to merely be brightening or darkening the image, just as you would do if you moved the white point in the Levels control (for brightening) or the black point (for darkening). But Exposure Compensation is more intelligent than that. Its algorithms mimic the way that an image brightens or darkens when exposure is changed. So, rather than just a straight white- or black-point change, when you move the Exposure Compensation slider, your image also gets a gamma adjustment so that the tonal relationships are correctly maintained.
So, if your first assessment of a raw file is that it’s over- or underexposed, try correcting it with the Exposure Compensation slider first. You can then refine with the Levels & Curves and other tonal controls later.
Exposure Compensation has an additional, very important feature.
Highlight recovery
As you most likely already know, when you overexpose an image with your digital camera, highlight areas can blow out to detail-less areas of complete white. With JPEG images, these areas are simply lost. You might be able to change the white to a lighter shade of gray, but there’s no way to restore detail to the area unless you clone or paint it in yourself.
With a raw file, though, there’s a good chance that you’ll be able to get some of that detail back.Consider the image in Figure 4.23.
)
Figure 4.23 This image plainly has some overexposed highlights. You can see them in the bright areas around the edges of the clouds. Note the huge spike on the right side of the histogram.
The bright areas around the edges of the clouds are blown out to complete white. On the right side of the histogram, you can see a large spike, indicating that highlights have been clipped to complete white. If this were a JPEG or TIFF file and we tried to darken the image using the Levels control, we would end up with an image that was, overall, darker, but the overexposed highlights would still be complete white, as you can you can see in Figure 4.24.
)
Figure 4.24 With a non-raw version of the clouds, we cannot recover the overexposed highlight areas of the clouds—they remain completely white.
With the raw file, though, we can move the Exposure Compensation slider to the left, which—as expected—darkens the image. But notice what happens to the highlights (Figure 4.25).
)
Figure 4.25 When we drag the Exposure Compensation slider to the left on a raw version of the clouds, something very different happens.
Many of the areas that were completely white now have detail in them. The image data and details that had been blown out to nothing but white pixels are back. Notice that, unlike with the image in Figure 4.25, when we lower Exposure Compensation on the raw image in Figure 4.24, the spike on the right side of the histogram gets much lower. Further, the resulting histogram is not combed. Plainly, something very different is going on here.
The first thing to understand is that when you overexpose an area, you don’t always overexpose all three color channels. You might only overexpose one or two channels—say, just the blue, or just the blue and the green channels. If there’s any data left over, Capture NX can analyze it and use that data to rebuild the missing channels. The result is what you see in Figure 4.25: image data where there previously did not appear to be any.
As Capture NX rebuilds these missing areas, their data is placed back within the normal bounds of the histogram, and so the spike begins to go away.
In many images, it’s possible to eliminate the overexposure spike completely. In our example image, though, some areas are blown out so far that it doesn’t matter how much we lower Exposure Compensation, there will still be a small spike on the right side. However, with this image it doesn’t matter so much, because it’s better to have the really bright part of the sun blown out to white.
Obviously, when you lower the Exposure Compensation slider to recover highlights, your entire image gets darker. However, you can then use the Levels & Curves controls in Quick Fix to brighten the rest of the image.
Many times, though, you’ll be able to use an additional recovery tool.
Highlight Protection and raw images
In the last chapter you saw how the Highlight Protection slider allows you to darken highlight areas in an image. An adaptive tool, the Highlight Protection slider automatically figures out what in your image is a highlight and it applies an intelligent darkening that blends in well with surrounding tones. However, as you may have already discovered, when you’re working with a non-raw file, Highlight Protection will never restore an area that’s been blown out to complete white—it will only darken the white tone that’s there.
When you’re working with a raw file, though, Highlight Protection turns into a highlight recovery tool. Using Highlight Protection for recovery differs from using Exposure Compensation, though. It recovers clipped highlights, just like Exposure Compensation, but it restricts its effects to only the upper-quarter tones in your image so that as little extra darkening as possible is introduced (Figure 4.26).
)
Figure 4.26 Clockwise from upper-left: the original image, which has some overexposed highlights in the clouds; the image after using Exposure Compensation to recover the highlights; finally, the image after recovering the clouds with the Highlight Protection slider. As you can see, Highlight Protection recovers highlights without darkening the entire image.
Highlight Protection can’t recover as much highlight detail as Exposure Compensation can—it’s only for slightly overexposed highlights. If you need to recover more, then you’ll need to switch to the Exposure Compensation slider.
Highlight recovery and workflow
If you have a raw file that needs highlight recovery, then that will be the first step in your editing workflow. Partly because you’ll want to see if it’s possible to recover the highlights to your satisfaction; if it’s not then you might want to abandon the image. But you’ll also want to do highlight recovery first, because if you need to use the Exposure Compensation slider to recover highlights, then you won’t be able to use it to perform any other brightening—you’ll want to know this so that you can plan your edits.
So, perform highlight recovery first, then the rest of your tonal corrections, then move on to color correction.
Color Correction
Your color correction chores will pretty much be exactly the same for a raw file as they are for a JPEG or TIFF. However, you should try to achieve as much color correction as possible through white balance adjustments. As you’ve seen, changes in white balance on a raw file don’t cause loss of data, so the more you can correct with White Balance, the better.
Camera & Lens Corrections
When you work with a raw file, the Camera and Lens Correction edit has two additional controls (Figure 4.27). Note that these two options are listed before the usual Camera & Lens Correction features. This is because these corrections are applied as the raw data is processed into an image. In other words, these are adjustments that your camera would normally perform on its own if you were shooting a JPEG image. As with all other raw adjustments, when you alter one of these parameters, Capture NX reconverts your raw image using your newly specified parameters.
)
Figure 4.27 When you work with a raw file, the Camera & Lens Correction edit contains two additional controls.
Color moiré reduction
Sometimes, color images that have lots of detail will have moiré artifacts. Turning on Color Moiré Reduction activates special noise reduction algorithms that can reduce moiré artifacts in the colored parts of your image.
Image dust off
If you regularly change lenses in the field, there will come a time when you’ll have images with visible sensor dust. Sensor dust appears as smudges or blotches in your image. If your Nikon camera supports it, you might be able to use a Dust Reference Image to automatically remove the dust from your image.
To automatically remove dust from an image:
- Shoot a dust reference photo. Consult your camera’s manual for details on how to do this. Dust reference photos have an extension of .NDF and can be transferred to your computer just like any other image.
- Place the dust reference photo in the same folder as the image you want to edit.
- Click the check box next to Image Dust Off in the Camera & Lens Correction edit. Capture NX should automatically locate the .NDF image and ask you if you want to use it. If it finds more than one image, it will ask you to choose the right one. Alternately, you can manually select an .NDF image by clicking the Change button in the Image Dust Off controls. Once you’ve selected an image, Capture NX automatically removes the dust from your image.
Dust can move and change, so it’s best to shoot a dust reference image close to the time when you took the picture or before you change lenses.
Vignette control
A vignette is a darkening of the corners in your image. You most often see vignetting when shooting with a wide-angle lens. The Vignette Control slider lets you eliminate vignettes by applying a brightening to the corners of your image. Move the Vignette Control’s Intensity slider to remove vignetting.
Note that you cannot add a vignette using this control—it is not a creative vignette tool, but rather a tool engineered to deal specifically with vignetting problems with particular Nikon lenses. Also, note that Vignette Control is always applied to the entire image. If you’ve cropped the image, you probably won’t see any change in the corners of your image, as the effects of the control will most likely occur outside of your crop.