- What Is Color Management Anyway?
- Color Management Systems Explained
- Choosing Your Working Spaces
- Handling Color-Space Conversions
- Photoshop and Your Monitor
- Assign Profile and Convert to Profile
- Soft-Proofing Other Color Spaces
- Converting Colors When You Print
- Printing to Desktop Printers
- Isolating Variables
This chapter is from the book
This chapter is from the book
This chapter is from the book
Handling Color-Space Conversions
Now that you've been introduced to the parts that make up a color management system, you're ready to think through what happens as you move documents through your workflow. If you intend to use Photoshop to its fullest potential, you'll be doing color-space conversions at some point. The three main tools you'll use are the Color Settings dialog for your defaults, the profile alerts when opening a document, the Convert to Profile and Assign Profile commands for converting colors at any time, and the Print dialog when you're sending output directly to a printer.
Setting Up Conversion Defaults (Policies)
You can set color-conversion defaults for each color mode and control how the documents you open relate to your working spaces. Adobe has given these the bureaucratic-sounding name color management policies. Don't let the name intimidate you; to set them up, just answer these questions:
-
What do you want Photoshop to do when you open or import an image that's missing a profile?
-
What do you want Photoshop to do when you open an image that has a different profile than the working space you chose?
-
Do you want Photoshop to let you know when a profile is missing or doesn't match your working space?
Now let's see how the pop-up menus and check boxes in the Color Management Policies section (see Figure 4-5) answer those questions.
)
Figure 4-5 Color Management Policies let you tell Photoshop how documents you open should relate to your working space.
Handling Existing Profiles. The three pop-up menus all do the same thing: They tell Photoshop what to do if the incoming image already has an embedded profile. When you have no doubt that incoming images are embedded with the correct profiles, Preserve Embedded Profiles is the safest choice, especially in a color-managed workflow. Consider choosing Convert to Working RGB/CMYK/Gray when you expect to receive many images with different profiles and you'd like to standardize them to your working space by converting their colors as you open them. In today's color-managed workflows, you typically do not want to choose Off unless you have a very good reason for deleting the profiles of all incoming images. When this option is set to Off, Photoshop also does not embed profiles by default when you choose the New (document) or Save As commands.
Getting Notified. The check boxes in the Color Management Policies section are concerned with one thing: Do you want Photoshop to ask you what to do when an incoming image doesn't match your color settings? If the answer is yes, check the boxes, and you'll get to approve every potential conversion. Although this lets you maintain control, if you work with many images the alert may appear with annoying frequency. If the answer is no, leave the boxes unchecked, and when there's a mismatch or missing profile Photoshop will simply execute the default handling you set up with the pop-up menus above the check boxes. Unchecking the boxes works best if you trust that incoming images should always do what the pop-up menus say in the event of a mismatch, because Photoshop is going to do that every time, without asking you.
Let's walk through an example. Suppose you turn off the check boxes, your RGB working space is Adobe RGB, and you set the RGB policy to Convert to Working RGB. Now let's say you open an sRGB image. The profile mismatch with your RGB working space causes Photoshop to implement your policy. Because you told Photoshop to convert images with mismatched profiles to your RGB working space, and you turned off the check boxes, Photoshop will go ahead and convert the sRGB image colors to Adobe RGB without telling you. If you had turned on the check boxes, Photoshop would have asked you before performing the conversion.
Handling Color When Opening an Image
The color management policies we just discussed control how color conversions occur as you open an image. If you checked the Ask When Opening check boxes in the Color Settings dialog, you'll have the opportunity to confirm the color management policy you set for the image's working space; if you didn't check the boxes, Photoshop will silently execute the policy (for example, converting the image colors into your working space). If you turned on Ask When Pasting, you'll also have an opportunity to control the conversion of images you paste or drag into an open Photoshop document.
Responding to Warning Dialogs. If you turned on the Missing Profiles or Profile Mismatch check boxes in Color Management Policies, you'll see an alert dialog whenever you open or import a document that has no profile or a different profile than your working space.
- Embedded Profile Mismatch means the incoming image has a different profile than your working space (see Figure 4-6). That doesn't necessarily mean anything's wrong. A profile is already embedded in the image, so the only question is whether you have a reason to change it. If you don't have a good reason to change it, select "Use the embedded profile" and move on. If your project requires that all images be saved in a specific color space, such as sRGB for digital video or a specific CMYK press profile, and you've already set your working space to that profile, select "Convert document colors to the working space." The last option, "Discard the embedded profile," may be used in prepress workflows where profiles aren't used. Otherwise, avoid that option in color-managed workflows, except when you're opening a printer profiling target. If you're not sure, click "Use the embedded profile," click OK to go ahead and open it, and then see "When You Have No Idea What to Do" later in this chapter to work out how to handle the image.

Figure 4-6 The Embedded Profile Mismatch warning offers three choices for handling images for which the embedded profile differs from the working space.
-
Missing Profile means what it says: The incoming file doesn't have an embedded profile (see Figure 4-7). If you are using a traditional non-color-managed CMYK workflow where profiles are not used, you'll probably choose "Leave as is." If you want to start color-managing the file, you get to assign a profile—either the current working space, or any profile on your computer—by choosing one from the "Assign profile" pop-up menu. If you need more help figuring out the right answer to a missing profile warning, click "Leave as is," click OK, and then see "When You Have No Idea What to Do" later in this chapter.
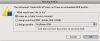
Figure 4-7 The Missing Profile warning offers three choices for handling images that don't contain an embedded profile.
"And then convert document to working space" is a check box in the Missing Profile dialog. It's useful when an image was previously edited in a color space that didn't match your working space. It lets you first assign the previous color space of the image so that the colors look normal. Then, by checking the box, you can convert the image into your working space. If you know that the image with the missing profile was previously edited in your working space, you don't need this check box, because you can simply select "Assign working space."
Be aware that if you choose "Discard the embedded profile" or "Leave as is," not only will the document be opened without a profile, but Photoshop will not embed a profile into the document when you save it. If you want a profile to be embedded without converting the colors, choose "Use the embedded profile" or an "Assign profile" option, depending on the alert.
- Paste Profile Mismatch may appear if you paste from a document that uses a different color space than the one you're pasting into (see Figure 4-8). Because it's coming from the Clipboard and not from a saved file, assigning isn't possible; the only option is whether or not to convert. In a color-managed workflow, you typically want to click Convert so that the appearance of the pasted data doesn't change.
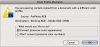
Figure 4-8 The Paste Profile Mismatch warning lets you choose whether to paste the numeric values or the perceived colors that those values represent.
)
)
)
Converting Colors for Output
When you print, the Print dialog uses the document space as the starting point and gives you the opportunity to convert to a print profile or any other profile. We cover this more specifically in "Converting Colors When You Print," later in this chapter.
There may be times when you need to convert colors for a Photoshop document for someone else to print. Since you're not going through the Print dialog yourself, you'd use the Convert to Profile command instead (see "Convert to Profile" later in this chapter). For example, you might be sending an image to a publication that requires that images be converted to their CMYK printer profile, while the document space of your images is Adobe RGB. To take care of this, you'd duplicate the original document and convert the copy's colors to the printer's CMYK profile.
When you use the Save for Web and Devices command, a Convert to sRGB check box in that dialog lets you convert colors to sRGB, so that you don't have to remember to use Convert to Profile in advance.
Rendering Intents
Each device has a fixed range of color that it can reproduce, dictated by the laws of physics. Your monitor can't reproduce a more saturated red than the red produced by the color filter or phosphor that a monitor uses to produce red. Your printer can't reproduce a cyan more saturated than the printer's cyan ink, or a white brighter than the white of the paper. The range of color a device can reproduce is called the color gamut. Colors present in the source space that aren't reproducible in the destination space are called out-of-gamut colors. Since you can't reproduce those colors in the destination space, you have to replace them with some other colors.
The ICC profile specification includes four different methods of handling out-of-gamut colors, called rendering intents. (You might see them referred to in Photoshop as simply "intents.") The four rendering intents act as follows:
- Perceptual. The Perceptual intent fits the gamut of the source space into the gamut of the destination space so that the overall color relationships, and hence the overall image appearance, are preserved, even though all the colors in the image may change somewhat in lightness and saturation. It's a good choice for images that contain significant out-of-gamut colors.
- Saturation. The Saturation intent maps fully saturated colors in the source to fully saturated colors in the destination without concerning itself with hue or lightness. It's mostly good for pie charts and such, where you just want vivid colors. However, you can also try it as an alternative method of perceptual rendering. It may be worth previewing a conversion using Saturation rendering to see if it does something useful. For more information on doing that, see "Soft-Proofing Other Color Spaces," later in this chapter.
- Relative Colorimetric. The Relative Colorimetric intent maps white in the source to white in the destination, so that white on your output is the white of the paper rather than the white of the source space, which may be different. It then reproduces all the in-gamut colors exactly, clipping out-of-gamut colors to the closest reproducible hue. For images that don't contain significant out-of-gamut colors, it's often a better choice than Perceptual because it preserves more of the original colors. But if an image has many out-of-gamut colors, they're simply clipped, so Perceptual might be a better choice for those types of images.
- Absolute Colorimetric. The Absolute Colorimetric intent is the same as Relative Colorimetric, except that it doesn't scale source white to destination white. If your source space has a bluish white and your output is on a yellowish-white paper, Absolute Colorimetric rendering makes the printer lay down some cyan ink in the white areas to simulate the white of the original. It's generally used only for proofing (see "Soft-Proofing Other Color Spaces" later in this chapter).
Embedding Profiles
Embedding a profile simply means you're including it in a document when you save it. In the Save As dialog (see Figure 4-9), the Embed Color Profile check box embeds the profile. When you create a Web image, the File > Save for Web & Devices dialog contains an Embed Color Profile check box. If you save or export a file and the profile option is unavailable, it means you've selected a format (such as GIF or BMP) that can't embed a profile.
)
Figure 4-9 To include a profile as you save a document, turn on the Embed Color Profile check box near the bottom of the Save As dialog. Photoshop always tells you which profile will be embedded.
When Not to Embed Profiles
We've been pushing embedded profiles so hard that you might think we always do it. Well, mostly, but there are a few cases where we don't.
For example, we didn't embed profiles in any of the CMYK images we used in this book, because they were all going to the same printing condition, and we set InDesign's CMYK working space to the profile that describes that printing condition. Our CMYK profile is about 2.8 MB, so by not embedding it in every image, we saved a huge amount of disk space and FTP transmission time. The CMYK numbers are unambiguous, because they're governed by the working space profile for the InDesign document.
For Web images, we usually don't embed profiles. Instead, we convert the images to sRGB and leave it at that. Most of the few Web browsers that use ICC profiles have that feature turned off by default, and when fast page loading is a priority, including profiles works against that goal by increasing the file size of images. We're keeping an eye on this, though; as typical Internet speeds increase and browsers mature, it may become more practical to include profiles in Web images. For now, we include profiles only if we know that the primary audience of the Web page uses a browser that's color-managed by default (such as Safari), or if the image is so large that including a profile would be a relatively small part of its file size.
When we work with profiling targets, the whole point of the exercise is to find out what colors the device in question produces when we feed it the numbers in the target, so there's no point in making any assumptions about the appearance represented by the numbers. Therefore, no profile.
Last but not least, if you're working in a closed-loop CMYK workflow, where you just don't want the CMYK numbers to change when sent to your printing process, there's no point in embedding a profile.
In all other situations, we strongly recommend embedding profiles in your images. This conveys your color intentions clearly to all the devices and all the people in your workflow. If you don't, the people downstream have to guess your intentions, causing extra work and frustration for all concerned.
Using Color Settings Presets
In the Settings pop-up menu at the top of the Color Settings dialog, you can choose a single preset that sets working spaces, policies, and warnings for you all at once (see Figure 4-10). The real power of the Settings pop-up menu isn't in the settings Photoshop provides, which is why we haven't really brought them up until now. Instead, it's in the ability it gives you to save your own settings to disk and then recall them quickly later. Even better, although you can always load a Color Settings preset from anywhere on your hard drive (using the Load button), if you save your settings in the right place, they become available from the Settings pop-up menu. (In Mac OS X, the "right place" is inside the Library\Application Support\Adobe\Color\Settings folder; in Windows, it's inside Program Files\Common Files\Adobe\Color\Settings.)
)
Figure 4-10 In the Color Settings dialog, clicking the More Options button extends the dialog and the choices in the pop-up menus.
Saving presets that appear in the Settings menu offers an easy way to configure Photoshop for an entire workgroup. And if you own the entire Creative Suite, you can even synchronize the color settings to the same preset across all the Creative Suite applications: In Bridge, choose Edit > Creative Suite Color Settings, and click Synchronize Color Settings.
The presets that Adobe offers fall into two broad categories: those that ignore color management and those that use it. As you can probably guess, we fall squarely into the "use it" camp.
General Purpose 2. The three General Purpose 2 presets (North America, Europe, and Japan) set the RGB working space to sRGB; they set the CMYK working space to U.S. Web Coated (SWOP) v.2 (North America), Euroscale Coated v2 (Europe), or Japan Color 2001 Coated (Japan); they set the Gray working space to Dot Gain 20%; and they set all the policies to Preserve Embedded Profiles while disabling the profile warnings.
What's the "2" all about? These presets are an improvement over the General Purpose Default settings that first appeared in Photoshop CS. The version 2 settings preserve embedded profiles for all color modes (which means the image is displayed in the same way it was when it was last saved), and they no longer use a different default rendering intent than all the other presets. The default rendering intent for all Photoshop CS4 presets is Relative Colorimetric with black-point compensation.
Prepress 2. The three prepress settings—Europe, Japan, and North America Prepress 2—tell Photoshop to use color management wherever possible and to turn on all the alerts for missing and mismatched profiles. They differ only in their choice of CMYK profiles and the dot gain for grayscale and spot colors (20 percent in the United States and 15 percent in Europe and Japan). If your work is destined for a printing press and you don't have a custom profile for your printing or proofing conditions, one of these choices may be a good starting point.
The North America and Japan Prepress 2 presets are identical to the prepress defaults that shipped with Photoshop CS. The Europe Prepress 2 preset uses the Europe ISO Coated FOGRA27 CMYK profile as the CMYK working space instead of the older Euroscale Coated v2, which, unlike the new profile, wasn't readily traceable to any standardized printing condition, so we have to consider it an improvement.
Monitor Color. As its name suggests, Monitor Color loads your monitor profile as the RGB working space and tells Photoshop not to use color management, setting all policies to Off. It treats all your documents as though they are in the working space for that color mode, ignoring any embedded profiles. For some inexplicable reason, though, it turns on the Profile Mismatches: Ask When Opening warning, which makes no sense, since the profile will be ignored anyway.
Web/Internet. If you prepare images exclusively for the World Wide Web, the new Web/Internet presets (one each for North America, Europe, and Japan) may be quite useful. The Web is, of course, the same in Japan as it is in North America or Europe: The only difference between the three presets is the CMYK working space, which is U.S. Web Coated (SWOP) v2 for North America, Japan Color 2001 Coated for Japan, and Europe ISO Coated FOGRA27 for Europe.
The dangerous aspect of the Web/Internet presets is that they set the policy for RGB to Convert to Working RGB. That's probably OK if all your work is destined for the Web, but since it automatically converts every RGB file to sRGB, you'll be unhappy when larger-gamut RGB images destined for print get squashed into sRGB! At least the profile mismatch warnings are turned on for this preset; pay attention when they appear.
The Obscure Color Settings Options
When you click the More Options button in the Color Settings dialog, you gain access to the Conversion Options and Advanced Controls, as well as to a wider range of profiles (we've discussed these earlier in this chapter). The Conversion Options can be useful in typical workflows, but the Advanced Controls are a grab bag of options that may be useful to a very small number of serious players and are dangerous for almost everyone else.
Conversion Options and Advanced Controls
The Conversion Options section of the dialog lets you control useful things like the default rendering intent in Photoshop and the color management module (CMM)—things you may never need to change (see Figure 4-11).
)
Figure 4-11 The Conversion Options let you fine-tune how Photoshop performs color conversions.
Engine. The Engine pop-up menu lets you select the CMM that Photoshop uses for all its color-space calculations. The options that appear on the menu depend on which CMMs are installed on your system. Unless you have really pressing reasons to use a different CMM, we recommend sticking with the Adobe (ACE) engine. When the engines work correctly, there is only a tiny change in pixel values among the different engines; except for the bugs, we've never noticed a visual difference. Mac users will notice separate entries for the Apple CMM and Apple ColorSync; Apple CMM means that the Apple CMM will always be used.
Intent. The Intent pop-up menu lets you choose the default rendering intent that Photoshop uses when you convert colors as you open a document or change the color mode on the Image > Mode submenu (such as when you convert from RGB to CMYK). It also affects Photoshop's calculation of color value readouts for color modes other than the document's, such as in the Info panel and the Color Picker.
While it's nice to be able to set the default rendering intent, intent is best treated as an image-specific and conversion-specific decision. In many places in Photoshop you can preview and change the rendering intent to suit the needs of the image at hand.
Use Black Point Compensation. The Use Black Point Compensation option, when selected, maps the black of the source profile to the black of the destination profile, ensuring that the entire dynamic range of the output device is used. In many cases you'll find no difference whether it's turned on or off, because it depends on the contents of the particular profiles involved. We recommend that you leave Use Black Point Compensation turned on at all times.
Use Dither (8-Bit/Channel Images). All color-space conversions in Photoshop are performed in a high-bit space. When Use Dither is turned on, Photoshop adds a small amount of noise when the 8-bit channels are converted into the high-bit space, making banding or posterization much less likely to occur (that's a good thing). But if your final output will be JPEG, this tiny dithering may cause a larger file size (because it adds discrete colors into the image), and if you're using Photoshop for scientific work, where you need to perform quantitative analysis on colors, you should turn this off, as it will introduce noise in your data. Otherwise, leave it on.
Compensate for Scene-Referred Profiles. If you use Photoshop to create documents for the Adobe After Effects motion-graphics application and After Effects is set to its default color management settings, you'll want to turn this option on. For everyone else, it doesn't matter how you set it.
The Advanced options are named Advanced for a reason; most users should not need to touch them.
Desaturate Monitor Colors By. Unless you're working with a very large space, like ProPhoto RGB, avoid touching this option. Monitor display is always Relative Colorimetric, so any working space colors that are outside the monitor's gamut must be clipped to the nearest equivalent the monitor can display. This option scales down the saturation of display colors to try to get around the problem. Even then, we don't use it—we find that the problem is much less severe than theory would lead one to expect. If you do want to try it, a setting in the 12 to 15 percent range seems somewhat useful for Kodak ProPhoto RGB.
Blend RGB Colors Using Gamma. To see the effect of this option, paint a bright green stroke on a red background with the check box turned off, and then again with the check box turned on and the value set to a gamma of 1.0. With the check box turned off, the edges of the stroke have a brownish hue, as they would if you were painting with paint. With it turned on, the edges are yellowish, as they would be if you were painting with light. You can think of the behavior with the check box off as artistically correct, and with it turned on as colorimetrically correct.