- Installing FlipShare
- Touring FlipShare
- Making Stuff
- Working with DVDs
This chapter is from the book
This chapter is from the book
This chapter is from the book
Working with DVDs
Most of today's computers are capable of creating movie DVDs, though not all come with the necessary software. Whereas new Macs ship with Apple's iDVD (part of the iLife suite) DVD-burning software, and Windows Vista includes Windows DVD Maker, Windows XP doesn't include a DVD-burning application. If one didn't come with your computer, you can pick up a copy of Roxio's MyDVD (www.roxio.com) or a disc-burning application from Nero (www.nero.com) for well under $100.
Regardless of which application you use to turn your movies into a DVD, FlipShare is willing to get the process started for you. It does this with the Burn Your Own DVD option. Select this option and click Save, and a folder is created on your computer's desktop, containing copies of your movies.
Nothing more?
No.
Really? No Video_TS folder? No hierarchy of movies you might put on the DVD's different screens? No artwork? No...
No. Nothing. Just a folder full of movies.
That's not a terrible thing. You can easily import those movies into your DVD-burning application. It's just that you'd expect a command like Burn Your Own DVD to do a little more than simply export your movies to a folder on the desktop. But it doesn't, so allow me once more to invoke the phrase quick and dirty.
You bought this book for something beyond the quick-and-dirty explanation, however, so I'll walk you through the basics of creating a DVD with Windows Vista, with a common Windows XP application, and with Apple's iDVD.
Burning your own DVDs in Windows Vista
Windows Vista includes an application called Windows DVD Maker, which you launch by choosing Start > All Programs > Windows DVD Maker. Here's how you use it to turn that folder full of movies into a DVD:
In the Share Your Memories on a DVD window, click the Choose Photos and Videos button.
The Add Pictures and Video to the DVD window opens.
Click the Add Items button.
An Add Item to DVD navigation window appears. Use it to navigate to where the folder of movies resides (by default, the desktop).
Open the folder created by FlipShare by double-clicking it, press Ctrl+A to select all the movies in it, and click the Add button.
The movies are added to Windows DVD Maker (Figure 4.13).
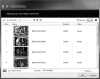
Figure 4.13 Adding movies to Windows DVD Maker.
Arrange the movies' order.
To arrange the order in which the movies will appear on the DVD, click a movie, and drag it up or down in the list.
Check out the options.
At the bottom of the window, you'll see an Options link. Click it, and you'll see options for how the DVD acts when you first insert it into a DVD player (displaying a DVD menu, starting play automatically and ending with the DVD menu, or playing videos in a continuous loop without a menu), aspect ratio (4:3 for a standard-definition TV or 16:9 for a wide-screen TV), and video format (NTSC for the United States or PAL for Europe). You can also choose the DVD burner speed. The slower the speed, the more accurate the burn is likely to be (but the longer it takes, of course).
Click Next to design the DVD.
When you click the Next button, you're taken to the Ready to Burn Disc screen (Figure 4.14), where you'll find options for editing the menu text, customizing menus (changing the font and button style, and choosing which video clips to show in the background and foreground), and choosing a menu style. After you've made these adjustments, you're welcome to click the Preview button at the top of the screen to see what your DVD will look like before you burn it.
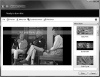
Figure 4.14 In the Ready to Burn screen, you can choose a style for your DVD.
Click the Burn button.
When you're satisfied with the design choices you've made, click the Burn button to create the DVD. You'll be prompted to insert a blank recordable DVD disc. When you do, the computer begins burning your DVD.
)
)
Burning your own DVDs in Windows XP
Windows XP doesn't include a DVD-making application, but plenty of them are on the market. For this example, I'll use Roxio's Creator 2009, a commonly used application that includes the tools necessary to burn a DVD. To use it, follow these steps:
- Launch Roxio Creator 2009.
In the Roxio Creator 2009 window that appears, select Video – Movies and click Create DVDs.
The MyDVD Express application launches. You'll use this application to burn a DVD of your Flip movies quickly.
Click New CineMagic.
This step opens Roxio Creator's quick-and-dirty (remember, it's all about the q-and-d) DVD-burning application, CineMagic (Figure 4.15). You'll use it to pull together your movies and burn them to a themed DVD.
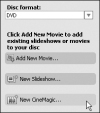
Figure 4.15 Choose CineMagic to start your quick-and-dirty DVD project.
Click Add Video/Photos.
In the window that appears, navigate to your folder full of videos, open it, and select everything in it (by pressing Ctrl+A, if you like).
Click the Open button.
The movies you've selected appear in the Create a CineMagic Movie window (Figure 4.16, on the next page). You can preview any movie by clicking the Play icon in the thumbnail. To edit a movie's name, just click the current title and enter a new one.
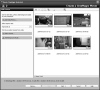
Figure 4.16 Movies added to the CineMagic movie window.
Choose an aspect ratio from the Select Aspect Ratio drop-down menu in the sidebar.
Your options are 4:3 (standard-definition television) and 16:9 (high-definition TV).
- Click the Next button to move to the Customize window.
- Choose a style (theme) for your DVD from the scrolling list in the sidebar (Figure 4.17).
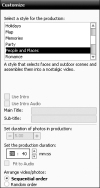
Figure 4.17 Select a style in CineMagic's sidebar.
Preview your project.
To see what your project will look like with a particular style, click the Preview button in the bottom-left corner of the Customize window. The program assembles the project and shows you (in a Preview window) what the interface will look like.
Click the Finish button.
The MyDVD Express window comes to the fore, with your project in it.
- Type the name of your DVD in the title field.
Click the Create Disc button.
The Burn to Disc window opens.
Insert a blank recordable DVD, and click Burn.
Your project is burned to the DVD.
)
)
)
Burning your own DVDs on a Macintosh
If you purchased a Mac in the past couple of years, that Mac has a copy of the iLife multimedia suite on it. iDVD is part of that suite. Here are the steps for burning a DVD quickly with the version of iDVD that came with iLife '08 and iLife '09:
In the Dock, click the iDVD icon to launch that program.
If the icon has been removed from the Dock, you'll find it in the Applications folder at the root level of your hard drive.
In the project window that appears when you launch iDVD, you have four choices: Create a New Project, Open an Existing Project, Magic iDVD, and OneStep DVD.
- Click Magic iDVD (Figure 4.18).
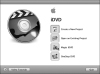
Figure 4.18 Choose iDVD's Magic iDVD to start a quick DVD project on a Mac.
Add your movies.
To add the movies to iDVD, simply drag the folder that contains them to the Drop Movies Here area of the Magic iDVD window. When you do, the movies appear as separate clips, each displaying the image in the clip's first frame (Figure 4.19).
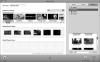
Figure 4.19 Drag movie clips into the Magic iDVD window to add them to your project.
Choose a theme.
In the Choose a Theme area, you can choose how your DVD will look. To see other themes, click the pop-up menu that by default reads 7.0 Themes, and choose All; then click a theme to choose it.
Preview your DVD.
If you'd like to see what your DVD will look like, click the Preview button in the bottom-left corner of the Magic iDVD window. In the iDVD Preview window that appears (Figure 4.20, on the next page), you can navigate through your DVD just as you can with a burned version (albeit more slowly, as all the navigation is done in software). Click the red Close Window button to dismiss the preview and return to the Magic iDVD window.
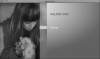
Figure 4.20 Previewing your project in iDVD.
Burn your DVD.
If you're ready to burn the disc, click the Burn button in the bottom-right corner of the Magic iDVD window. When you do, a standard DVD project window appears, prompting you to insert a blank recordable DVD. Do that, and your disc is burned.
)
)
)
Ordering a professionally produced DVD
The other option in FlipShare's Video Upload window (refer to "Making a DVD" earlier in this chapter) is to have Pure Digital make a DVD for you. Easy as it is to burn your own DVDs, you may have good reasons for taking this route instead. Maybe your computer doesn't have a media player that can record DVDs. If it can record DVDs, maybe you're running Windows XP, don't have a DVD-burning application, and don't care to purchase one just to create a single DVD for a family gift. Or maybe you can record a DVD but want one that has a professional-looking label and case. In all these cases, getting a DVD from Pure Digital is a viable option. Here's how you get it:
Select Order a Professionally Produced DVD, and click Go.
Your default Web browser launches and takes you to the Create DVD portion of Pure Digital's site (www.theflip.com/redirect/createdvd.shtml).
Click the Start New DVD link.
In the screen that appears, you'll learn that it takes just three steps to create your DVD: Upload, Create, and Order. Clicking Start New DVD begins that process.
Enter details.
The first screen asks for your name, e-mail address, DVD title, subtitle (optional), and producer information (Figure 4.21).
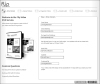
Figure 4.21 Pure Digital needs some details about you and your DVD project.
- Click Next to move to the Upload Videos screen, where you choose the videos you want to upload.
Click Add Videos.
You'll be presented with a navigation screen, which you use to choose the movies you'd like to place on the DVD. When you add those movies, they appear in a list in the Upload Videos screen. Progress bars and a counter tell you how long it will take to upload your videos. You can put as much as 60 minutes' worth of video on a DVD you create.
If you care to add more movies, click the Add More Videos link.
When you do, the navigation screen appears again.
Click Next.
When you click Next, you're taken to the screen where you organize and name your videos (Figure 4.22). On the right side of the screen, under the Step 3: Organize Videos heading, you can determine the order of your movies by dragging them up or down in the list. You can also choose to include or exclude the videos from your DVD. Finally, a text box appears below each video; type new names for your videos in these text boxes, if you like. At the bottom of the list, you'll see the total number of videos on the disc and their total playback time. On the left side of the screen is a preview of the DVD's main menu.
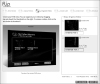
Figure 4.22 In this screen, you organize and preview your DVD's interface.
Click Next to create a label.
Clicking the Next button takes you to the Step 4: Create Label screen. On the right side of this screen, you'll see thumbnails of your movies. On the left side is a preview of the DVD's label. You can add two of these thumbnail images to the label—one in the top-left corner and one in the top-right corner. By default, the first two thumbnail images are applied to the label, but you can remove them easily by clicking the Clear Thumbnails link at the bottom of the screen. To add different images, just drag thumbnails from the right side of the screen to the positions on the label where you want them.
Click Next to create a cover.
Creating a cover works exactly the way that creating a label does. The cover can contain two thumbnail images, which you add by dragging them from the right side of the window to the preview of the cover on the left side of the screen. The bottom of the DVD's cover contains a plug for Flip video camcorders.
Click Next twice to pungle up.
This disc isn't free. Pure Digital rightly wants its one-penny-shy-of-twenty-bucks. In this screen and the next one, you'll provide the information necessary to pay for and receive your DVD.
The first screen is for your billing and shipping address. You also choose a shipping method here. Shipping is free if you have the DVD sent via the U.S. Postal Service and, as I write this chapter, just over $7 for second-day delivery from a delivery service.
When you click Next one more time, you'll be asked for credit card information: number, expiration date, and verification number (that three- or four-digit number on the back of the card).
- After you enter all that info, click the Place Order link at the bottom of the screen, and you're in business.
)
)