This chapter is from the book
This chapter is from the book
This chapter is from the book
This chapter is from the book
Animating Crop with Keyframes
To make the strip of vellum appear to open up, let’s animate its Crop parameter. Because the graphic comprises two layers, we will animate them in tandem.
- Stop playback, drag down on the top bar of the Timing pane to return it to its original size, and move the playhead to the start of the project.
- In the Layers list, Shift-select the torn_vellum_strip and torn_vellum_strip copy layers, and press Shift-K twice to move the playhead to the second keyframe at 5:00. In the Properties Inspector, a solid diamond appears in the Position Z Animation menu, confirming that the playhead is parked on a keyframe.
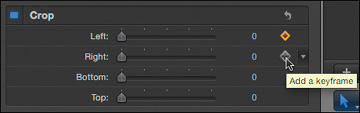
- In the Properties Inspector, select the Crop checkbox, and click the word Show to display the Crop parameters. Click the gray diamond next to the Animation pop-up menu for the Left and Right parameters to set keyframes.
Once again, you are working backward, first locking the final crop values. Now you’ll back up in time and crop the layers.
- Drag the playhead back to a point where the layers are still rotated, at about 4:00.
- Set keyframes for the Crop Left and Crop Right parameters, and then increase their values so that the crop lines cross in the middle and make the layers disappear, at just over 700 pixels each.
- Play the project.
It looks good, but let’s say you’d like to modify the keyframe interpolation.
- Press Command-8 to open the Keyframe Editor, and then from the Show Curve Set pop-up menu located above the list of parameters, choose Animated.
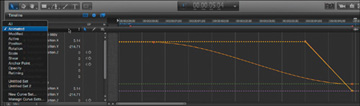
The Keyframe Editor shows the curves for all animated properties—in this case, Position and Crop. That’s great, but sometimes you want to focus on just one or two curves.
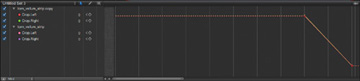
- In the Properties pane, from the Animation pop-up menu next to the Crop Left parameter, choose Show in Keyframe Editor.
- Do the same for the Crop Right parameter. Now only those two keyframe curves appear in the Keyframe Editor. Now you can focus on these curves without being distracted by other animated parameters of the selected layers.
- Shorten and reposition the zoom slider to center the curves and make them larger.
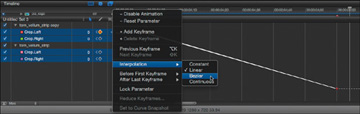
- Command-click the names of each parameter to select them all, and then use the Animation pop-up menu in the Keyframe Editor to change the curve interpolation to Bezier for all four curves at once.
- Drag a selection rectangle around the starting set of keyframes that are stacked on top of each other to select them all and use the Bezier handles to adjust the curves to your liking. Repeat this action for the ending keyframes.

- Save your work.
)
)
)
)
)
You now have a good understanding of recording keyframes and setting them manually, changing interpolation and adjusting Bezier curves, and adding and adjusting multiple keyframes at the same time.