- Why I Use Silver Efex Pro
- Understanding the SEP Interface
- Processing an Image: From Start to Finish
- Top Ten Tips for SEP2
This chapter is from the book
This chapter is from the book
This chapter is from the book
Understanding the SEP Interface
Before exploring the SEP interface in detail, you need to spend a few minutes getting to know your way around it and learning a few of the tools you’ll be using. Nik Software has done a great job of standardizing many of its plugin’s interfaces, so if you know your way around one, you’ll have a general feel for the rest of the plugins (Figure 4.10).
)
Figure 4.10. This main display is where you’ll be doing your editing.
Top Menu
In the top menu you’ll see a number of features, such as the browser control, image preview modes, the Zoom tool, and more. Most are depicted by icons. Let’s review these top-menu features, starting from left to right.
Browser control
The first three options in the menu control the left panel view primarily, but they also allow you to access important features, such as History. You can collapse the left panel by clicking the Hide Preset Browser icon (Figure 4.11). To navigate back to the Presets view, click the Show Preset Browser icon. To view image adjustment history, click the Show History Browser icon.
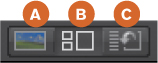
Figure 4.11. Change your browser by selecting one of the three options: Hide Preset Browser (a), Show Preset Browser (b), Show History Browser (c).
Image Preview modes
One of the first tasks you should do in SEP is set up how you’ll be viewing the images. You have the options of viewing your image in Single Image view, Split Preview, or Side-by-side Preview mode (Figure 4.12). You can alter your view simply by clicking any one of the three boxes. I begin most of my image edits in the default Split Preview mode, which allows me to make sure that I like the changes I’m making by seeing the before and after in split-screen mode. When I’ve decided on my processing direction, I’ll then select Single Image view to view the image larger and focus on details.

Figure 4.12. Click Single Image view (a) or one of the two image-compare views: Split Preview (b) or Side- by-side Preview (c).
Compare button
The Compare button allows you to toggle between the newly edited black-and-white image, the original converted image, or any of the states selected by the History State selector. Keep in mind that the Compare button works only in Single Image view. Simply click the button to compare the images (Figure 4.13).

Figure 4.13. Click the Compare button to toggle between the before-and-after views.
Zoom tool
The Zoom tool is excellent for reviewing images and identifying potential problems, such as dust, noise, or halos. To activate it, click the magnifying glass or press the spacebar; the Navigator window will pop up, enabling you to pan around the image (Figure 4.14). To toggle back to your original view or change your viewing percentage, click the magnifying glass a second time or press the spacebar. The default is 100%, but you can change the percentage to suit your needs.
)
Figure 4.14. Use the Zoom tool to magnify your image for inspection.
Background color
You can change the background color by clicking the Lightbulb icon (Figure 4.15) located directly to the right of the Zoom tool. The background options are black, gray, and white. I prefer to work with the black background because it helps me visualize the contrast within an image. You’ll want to set this option based on your preference.
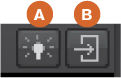
Figure 4.15. Click the Lightbulb icon (a) to change the background color. Click the right arrow (b) to close the Adjustments panel.
Hide/View Adjustments panel
The last tool in the top menu is the Hide or View Adjustments panel. You can choose to hide the right panel by clicking the right arrow icon (Figure 4.15), or you can press the Tab key to close both the left and right panels at the same time. This is very helpful when analyzing your image and reviewing your final edits, or whenever you just want a less-cluttered view. Click the right arrow icon or press the Tab key again to return the panels to the original view.
The Browser Panel
The Browser panel on the left is where you’ll find two very important tools: Presets and the History browser. Let’s review each of these features further.
History browser
The History browser is a valuable tool to use to review all the changes you’ve made to an image in chronological order. Clicking any adjustment will take you back to that state of your image. This is especially helpful if you get carried away and realize you don’t like the path you’re on. Just click a previous point where you were happy with your changes and continue editing from that point.
Comparing your edits using the History State selector
Another very helpful way to determine if you like the edits you’ve made is to use the History State selector (Figure 4.16) to compare your previous edits to your very last edit. To do this, slide your History State selector to a previous edit that you want to compare to the current image. You can even slide the History State selector as far back as the original color image (as discussed earlier in the chapter) or to its original, converted black-and-white state (000 Neutral) and compare it to your last edited state.
)
Figure 4.16. Use the History State selector to view and compare previous stages in the edit.
I like to use Split Preview when comparing edits using the History State selector. In Split Preview mode, the History State preference is displayed on the left side of the split screen, and the last known image edit (denoted by the orange highlighted text) is displayed on the right.
Presets
The Preset Categories panel on the left side of the screen organizes all of your standard presets as well as any newly imported or customized presets. SEP ships with nearly 40 presets, which are broken down into three categories: Modern, Classic, and Vintage. You can view all of the presets by clicking All (Figure 4.17) or just view Favorites. To add a preset to Favorites, simply click the star at the bottom of any preset and it will be added to your Favorites list.
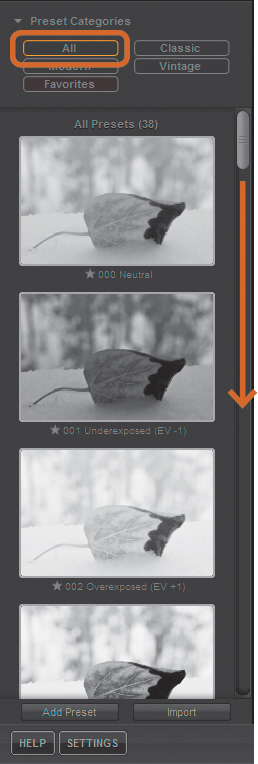
Figure 4.17. Choose to view a preset by category or peruse them all.
Any presets that you created or imported will be accessible by clicking Custom at the top of the Presets panel (Figure 4.18).
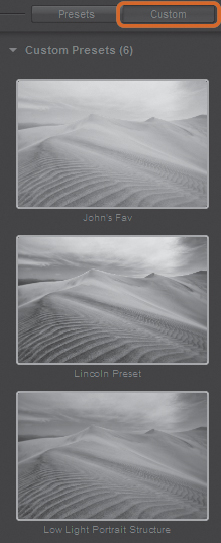
Figure 4.18. Click Custom to view presets you created or imported.
It’s important to note that your original imported image is always converted using the top preset labeled 000 Neutral. Think of this as the “reset preset.” At any point along the way, if you want to go back to your original image, click the Neutral preset and you’ll be taken back to your starting point.
Whenever you select a preset, it makes adjustments, which you can view in the right panel (Adjustments panel). In the image of the leaf in Figure 4.19, I selected the High Structure (smooth) preset. Notice the adjustments it made to the Structure slider. It increased the Structure and Midtones while decreasing Fine Structure.
)
Figure 4.19. The Structure slider is one of my favorite sliders. I use it on almost all of my images.
Each preset has a unique look and will affect the right panel differently. I’ll discuss the right panel controls in a bit, but it’s a good habit to select a preset and review its effects in the Adjustments panel. If you like the look of a given preset, you should note the changes that it makes to the Global Adjustments, Color Filters, Film Types, and so on. This information will be very helpful when you decide to go it alone without presets but still want to create a certain effect.
It is very easy to add more presets. You can create your own and save them as custom presets or import new presets from a number of sources. Start by downloading over 40 of Nik’s additional presets at www.niksoftware.com/ presets or at my blog at www.johnbatdorff.com/pluginwithnik.
Adjustments Panel
You can think of the right panel as the darkroom’s digital toolset. There is nothing wrong with clicking a preset and calling it good if you’re satisfied, but sometimes a preset just doesn’t get your image where you want it. In the Adjustments panel you can be creative and truly take control of your image. The Adjustments panel has been laid out with a typical workflow in mind, meaning that you make adjustments starting at the top (Global Adjustments) and work your way down (Finishing Adjustments). However, this shouldn’t stop you from jumping around the panel and making edits as your creative mind sees fit. Let’s review the tools in the Adjustments panel and then move to its practical use in processing an image.
Global Adjustments
The Global Adjustments tools—Brightness, Contrast, and Structure—make corrections to an entire image. You can adjust each slider independently, and for greater control within that slider, simply expand it by clicking the disclosure triangle (Figure 4.20). The Structure slider does a great job of adding texture to an image. This feature is unparalleled by any other black-and-white software. SEP’s unique algorithm maps your image into zones, so when you make an adjustment, it changes the pixels based on their individual placement, brightness, and an array of other factors. Remember that you can reset any adjustment you make by clicking the reset arrow on the right.
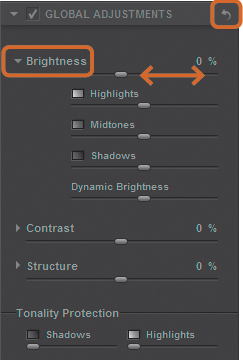
Figure 4.20. Make adjustments to an entire image by using the Brightness, Contrast, and Structure sliders.
Tonality Protection allows photographers to avoid loss of detail in an image’s shadows or highlights (Figure 4.21). This feature is very similar to using Lightroom’s Highlights or Shadow adjustment tool.
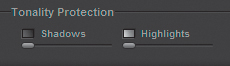
Figure 4.21. Make sure you’re not losing any details in your highlights or shadows by using the Tonality Protection feature.
Selective Adjustments
Moving down the panel, the Selective Adjustment section is next. This is probably my favorite tool in the entire Nik Software suite and especially in SEP. You can create a selective adjustment by clicking Add Control Point and positioning the control point on a desired location on your image (Figure 4.22). Using Nik Software’s U-Point technology, you’re able to control the tonality, structure, and selective color of any particular region of your image. The ease and precision with which you’re able to navigate these adjustments allows you to focus more on the image and worry less about the technical how-to.
)
Figure 4.22. Use any one or all of the eight fine-tuning sliders to make zoned adjustments to an image. Using the Control Points in the Selective Adjustment section (right panel) gives you ultimate processing control.
If you want to visualize the specific region of your image that is being affected by a particular control point, select that control point’s Show Selection check box (Figure 4.23). When you’re using the Selective Color option, always turn on this feature to see if you have any spillover in unintended areas of the image (more on that later in this chapter).
)
Figure 4.23. Select the Show Selection check box to see what area of the image you are isolating when making adjustments.
It’s helpful to group control points that are performing similar functions (such as Selective Color). To group the points, highlight the points in the panel by holding down the Shift key and selecting the points you want to group. Then click the Group Selected Control Point button (Figure 4.24), which we’ll abbreviate as Group, immediately below to group them. Now you can make your adjustments to the grouped control points using one master slider. To ungroup the control points, select the master point and click the Ungroup button. To duplicate a control point, highlight the control point you want to duplicate and press Ctrl+D (Command+D). You can delete a control point by selecting it and clicking the trash can, or by selecting the point and pressing the Delete key.
)
Figure 4.24. Grouping your control points can remove a lot of clutter. Use the Group button (a), the Ungroup button (b), the control point (c), and the trash can (d).
Using color filters
Black-and-white photographers have been using color filters to control contrast since long before the digital revolution. But with today’s digital cameras, it is no longer necessary to use a color filter at time of capture. SEP users have the ability to simulate color filters by taking advantage of available presets (Figure 4.25). Instead of carrying color filters, you can now use any of the six easy-to-use filter presets: Neutral (no color effect), Red, Orange, Yellow, Green, or Blue. Alternatively you can use one of the six Color Sensitivity sliders.
)
Figure 4.25. Silver Efex Pro 2 provides you with the best color filter control over your images. You can increase or decrease the effect of the filter with a simple slider.
The traditional black-and-white filter kit consists of red, yellow, green, and orange filters. These work by absorbing light and lightening colors similar to their own while darkening other colors. Lighter color filters will have minor effects on an image; darker colored filters will have more intense effects.
It’s useful to understand how each filter works, whether you’re using them on-camera or applying the effects in postprocessing. A red filter, for instance, lightens skin tone and darkens green foliage.
In FIGURES 4.26 through 4.29 you can see how the color image is processed in SEP once the filter has been applied. The left side of the image shows what the unaltered grayscale image looks like; the right side of the image shows what it looks like once the color filter is applied. I like to start by studying the color image. Pay attention to the areas that the filter should affect as well as the overall brightness of the image. All these filters have sliders that control the overall strength of the effect (Figure 4.30). That’s the beauty of using a digital filter.
)
Figure 4.26. This yellow filter absorbs blue, and will darken skies and green grass while lightening anything that is yellow.
)
Figure 4.27. This orange filter absorbs blue and blue/green, and creates contrast in many landscape images.
)
Figure 4.28. The red filter works by absorbing blue/green and will lighten skin tones.
)
Figure 4.29. This green filter absorbs red and lightens green grass.
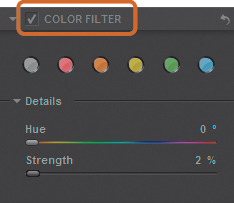
Figure 4.30. Personalize your color adjustment by using the Hue or Strength slider.
Remember that you can toggle the before/after preview by selecting the Color Filter check box (Figure 4.30).
Film Types
Those of you yearning for the good ol’ days of film will enjoy working with the Film Types section of SEP. Each of the 18 types of film to choose from simulates a film’s sensitivity to color, grain, and tone (Figure 4.31 and Figure 4.32). As with the other presets, you can click and be done with the edit, or customize it further by using the Grain and Hardness sliders. The Grain per pixel slider adds or reduces the amount of visible grain. The Hard/Soft slider adjusts the visible separation between the grain. You can think of these sliders in this way: If you want the image to look noisy or like an old-fashioned image, reduce the grains per pixel and hardness. If you want the image to look modern, do the opposite and increase the grains per pixel to 500 and maximize the hardness.
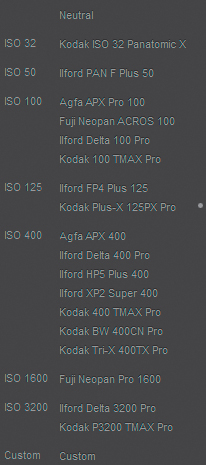
Figure 4.31. Use the Film presets to give your digital image the look of classic film.
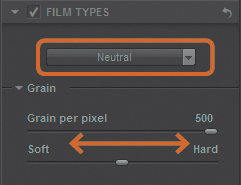
Figure 4.32. Add or reduce grain and size by using the sliders.
Color Sensitivity
You’ll love using the Color Sensitivity sliders to control certain colors and color cast within an image. As mentioned earlier, often I won’t set the white balance during my night photography and will instead use the yellowish color temperature to my advantage when converting the image to black and white. The Color Sensitivity sliders are a great way to lighten or darken a particular color by moving the sliders to the left to darken or the right to lighten (Figure 4.33).
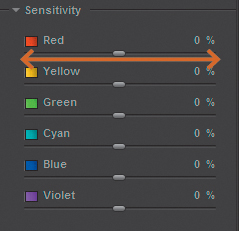
Figure 4.33. Use the Color Sensitivity sliders to control individual colors within an image.
Levels and Curves
The Levels and Curves feature (Figure 4.34) controls the brightness and contrast of an image’s tones. To add a point, either click the graph, or using my preferred method, click the line and drag it up or down. To remove a point, double-click the point. To be honest, this is one feature I don’t use very often while in SEP unless a preset that I’m using sets it for me. I prefer to work the tone curve in Lightroom or Photoshop after I’ve finished converting the image in SEP. The reasons for this are twofold: First, the tone curve in SEP seems to be a bit crude, whereas the one in Lightroom has a few more bells and whistles. Second, I don’t like being locked into my tone curve settings “forever,” which is the case for non-Photoshop users (I’ll explain that further in Chapter 7). Although it’s still best to do most of your postprocessing in SEP, leave the tone curve adjustments for Lightroom. You’ll gain the flexibility of being able to revisit the tone curve as often as you deem necessary.
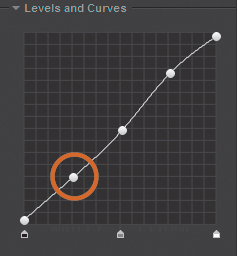
Figure 4.34. I’ll often create a gentle S with the tone curve setting.
Finishing Adjustments
The Finishing Adjustments allow you to get creative with your images by applying old-school darkroom techniques, such as toning, vignettes, borders, and burned edges. Toning is a term used in the darkroom for changing the color or tone of a print. Sepia and Selenium (Figure 4.35) are two popular examples of this technique. The beauty of today’s digital darkroom is that you no longer need chemicals to change the silver in an image or the color of the paper. You can use one of the 23 presets or create your own custom tone by using the Silver and Paper sliders. Although I don’t do a lot of toning in my images, I’ll show you one example and then move on to spend more time on vignettes, burned edges, and image borders—all of which I use often.
)
Figure 4.35. I used the Selenium (number 6) tone to add to the cool temperature of an early spring evening in Paris.
Finishing Adjustments Quick Tips
The Finishing Adjustments sliders have always been confusing, so you might find it helpful to think of them in these terms:
- Silver equals the dark areas of an image.
- Paper equals the light areas of an image.
- Strength (Figure 4.36) increases or decreases the saturation of the tone on the entire image.
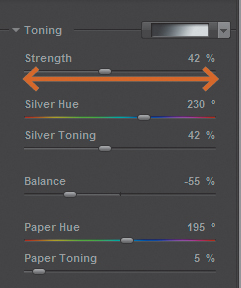
Figure 4.36. Use the Strength slider to increase or decrease the saturation of a tone.
- Silver Hue is the color that will be applied to the dark tones of an image.
- Silver (dark area) Toning is the overall strength of the hue’s dark tones.
- Balance is the blending of the effect between the dark and light areas of an image. Moving the slider to the left increases the effect applied to the dark areas of an image; moving the slider to the right affects the toning applied to the light areas of an image.
- Paper Hue is the tone applied to the light tones of an image.
- Paper toning is the overall strength of the hue on the light tones.
Vignettes, Burn Edges, and Image Borders
A vignette allows you to darken or lighten the edges of an image to give it a natural frame and draw the eye to the focus point. A vignette can be either circular or rectangular. In SEP you can use one of the seven presets or manually place the center location of the vignette exactly where you want it using the Place Center tool.
Burn Edges is an incredibly handy tool for directing viewers’ attention to your subject. In Figure 4.37 I burned in around the bottom to help draw attention to the tree shadows. This feature can also work like a Gradient tool to darken an overexposed sky.
)
Figure 4.37. Finishing Adjustments has a great set of tools for making your image stand out.
Using the Image Borders feature is a great way to polish your image’s presentation. I used a classic white border (Type 14) on the image of the Eiffel Tower. You can select from one of the 14 presets and customize the effect from there using the sliders. When you select certain presets, you have the option of using the Vary Border feature, which is a slick tool that generates variations of any particular style. Simply click through them to see the variations on your selected border.
Creating Your Own Presets
Presets are great for speeding up your workflow and guaranteeing a consistent look and feel. However, the downside is that everyone has the same presets available to them, so many of your images will have a “SEP” look to them. I’m guilty of this as well; so one of the ways to set your processing apart from the rest is to create presets that are unique to you. That, of course, doesn’t mean reinventing the wheel. There’s nothing wrong with starting off with a Nik preset, making a few tweaks, and saving it as your own.
Before you get started, locate an image you want to edit and follow the steps in the exercise as I work on my image. Any of your images that have a nice earthy or nostalgic feel will work wonderfully. I’ll create a preset using the image in Figure 4.38, which I shot in rural Jamaica a few years ago. I shot film for years, and although I don’t miss working in the darkroom, I do miss the look of a black-and-white image produced from film. SEP has done a great job of simulating many of the popular films, so let’s create a custom preset by starting with Film Types.
- Select the Agra APX Pro 100 film type. This film type is ideal for expressively reproducing scenes with action or moments of quiet.
- In the Finishing Adjustments, move the Toning Strength slider to the right until you achieve a nice sepia look.
- Apply a small vignette by using the lens Falloff 1 preset, and then reduce the effect by moving the slider to the right.
- To create a preset that you can use in the future based on these settings, select Add Preset in the Preset Browser’s left panel. A window appears in which you can enter your new preset’s name. Click OK. You now have that preset available to you in the custom presets window for future use (Figure 4.39).
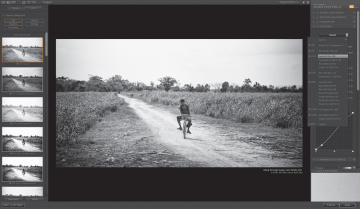
Figure 4.38. Film presets do a great job simulating film.
Figure 4.39. Creating your own preset takes only a few clicks of the mouse.
)
)
Using Selective Colorization
One of the best features in SEP is the ability to “selectively” introduce color back into a grayscale image. I don’t do a lot of selective color, but when I do, I try to make it really count. The trick is to not overdo it. Let’s take a look at the image of the leaves on the rock (Figure 4.40). Once again, select an image you want to edit, but this time focus on an image that has one or two dominant colors. Although I like how my image looks, it could really pop with a little color added back into it, so let’s explore that now.
)
Figure 4.40. High Structure (smooth) is one of my favorite presets.
- Select the High Structure (smooth) preset.
- When you’re using Selective Color, it’s critical to know which areas you want to select. Click the Show History Browser icon, click the Split Preview icon, and slide the History State selector to the top where it displays Original Image. Now you can identify the areas where you want to add color simply by moving the split-screen slider (red line) to the left or right (Figure 4.41).
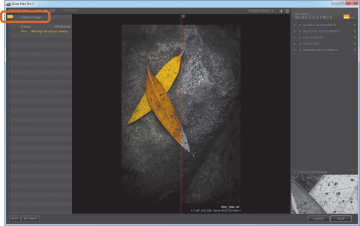
Figure 4.41. Seeing the original color image is very helpful when creating a Selective Color image.
- Close the left panel by clicking Show Image Only at the top and then head over to Selective Adjustments in the right panel. To add color back into your selected image area (in my example, the leaves), add a control point by clicking Add Control Point or by pressing Ctrl+Shift+A (Command+Shift+A). Because adding color may require several steps, place the control point in the center of the area where you want to add color. The Loupe view can be very helpful to pinpoint areas where you want to add control points. Make sure the control point’s boundary (size of circle) covers the areas of the object but doesn’t cover beyond the area where you intend to add color.
- “Turn on” the color by moving the Selective Colorization slider to the right. To mute the colors a bit, move the slider to 85%. As in the example, you might notice a little bit of overspray of color on other objects in the image, but don’t worry; you’ll fix that next (Figure 4.42).
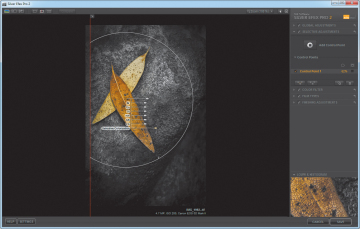
Figure 4.42. Make sure your boundary isn’t too large but that it covers just the area you want to affect.
- Select the Show Selection check box for Control Point 1 so you can see the area being affected (Figure 4.43).
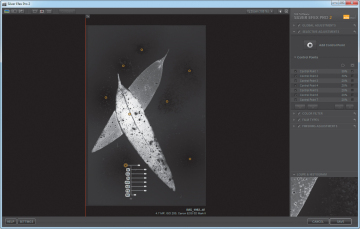
Figure 4.43z. Use neutral control points to chisel away areas where you don’t want color.
- Click a control point and place it on an area where you don’t want color. I refer to this as a neutral control point to help reduce the overspray of color. Repeat this step as many times as necessary.
- Deselect Show Selection so you can see your subject in color again. Notice that you’ve effectively eliminated any overspray. Neutral control points don’t work 100 percent of the time; therefore, you may need to revisit your image, place a new control point on the area where you want to add color, and increase the Selective Colorization slider again (Figure 4.44).
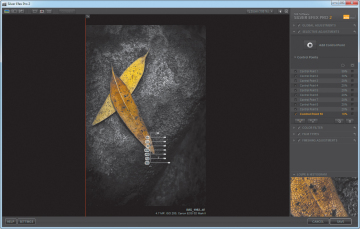
Figure 4.44. Repeat adding Selective Color points as needed to refine the image.
)
)
)
)
)
)
)
)
)
)
)
)
)
)
)
)
)
)