- Creating Daylight
- Working with Indoor Natural Light
- Practical Lights
- Night Scenes
- Distance and Depth
- Exercises
This chapter is from the book
This chapter is from the book
This chapter is from the book
Working with Indoor Natural Light
Indoor light can be a mix of natural light that comes in through windows, doors, and skylights, and artificial light sources. The artificial light sources simulated in the scene are called practical lights, and those are discussed in the next section. As a first step in moving indoors, start with the natural light—including sunlight, skylight, and indirect light—which you can add to interior scenes in almost the same way as you did outdoors.
Adding Skylight
When adding natural light to an indoor environment, it sometimes makes sense to start with the light from the sky rather than the sun. Sometimes you see a sunbeam coming through a window, other times you don’t. Direct sunlight only enters a window when it happens to come from the correct angle. Skylight, on the other hand, always enters through every window, as long as it is daylight outside and you can see out the window.
As it was when we were working with lighting outdoors, sky illumination is a broad, soft light that simulates all of the light coming from every visible part of the sky. It is possible (but not efficient) to put a full sky dome outside of your 3D building and let some of the light from that dome enter through the window; however, this approach can lead to very slow render times, because light from every possible direction is computed, even when most of the sky dome is not visible through the window.
Area Lights in the Windows
Area lights aligned with a window are often the most natural way to simulate sky illumination coming inside. Place a rectangular area light just outside of a window, door, or skylight, and give it a color matching the sky. Of course, if the window is round, you can use a disc-shaped area light, and you can use multiple area lights for more complex groups of windows.
If a background image is visible through the window, then use the color of the sky visible outside to guide the color of your area light. If the outdoor area is a 3D scene, use the color from the outdoor sky fill for the area light in your window.
Some renderers have a special kind of area light called a portal light, which is like a regular area light except that it gets the brightness and color from a corresponding sky dome that surrounds the scene. A portal light simulates getting light and color from a sky dome without the inefficiency associated with sampling a full sky dome when only a tiny part of the dome is visible.
Even if you only have one window in the scene, it’s OK to use more than one light to simulate skylight from that window. A rectangular area light, matching the shape of the window, is technically a good fit, but sometimes you want to use more lights to help fill more of the room with soft illumination. A spherical area light can create a nice, soft ball of light, emitting soft illumination from just outside the window. In the example kitchen scene, two windows are side by side, so two spherical area lights have been added outside the window, as shown in Figure 4.10.
)
[Figure 4.10] Rectangular and spherical area lights are both added to each window. This kitchen model is from Lighting Challenge #2, which you can download from www.3dRender.com/challenges in multiple file formats.
The spherical area lights in this window overlap with the rectangular area light, and they are partially inside the room to help the fill light spill out to a broader angle. Figure 4.11 shows what the window fill looks like from the rectangular area light by itself (left) compared to how the scene looks with the spherical area lights extending the sky illumination (right).
)
[Figure 4.11] Rectangular area lights in each window (left) simulate sky illumination around the window, but adding the spherical area lights (right) extends the illumination to fill more of the scene.
Usually it’s best to test-render the skylights without any GI activated. The scene will have high contrast but images can render faster, and such an image shows you what the sky fill looks like by itself, without any light in the scene. You may come across exceptions to this rule if a technical option on the area light or portal light requires GI to be turned on, but in general it’s best to get a clear look at what the light does by itself when you are first setting it up.
Check the area immediately around the window and make sure surfaces near the window appear to be convincingly lit by the window light. The light should spill out into the room so that any surfaces immediately above, below, or beside the window receive some light from outdoors.
Excluding Window Geometry
If you have a 3D model of glass in the window, then use light linking to remove the glass from your lights. Otherwise a light very close to the glass itself or intersecting with the glass might create unnatural highlights on the glass, or the glass might block or shadow the light.
You can sometimes use shadow linking to remove thin pieces of geometry in the window itself (such as window frames, bars on the window, or blinds) from the fill light’s shadow. When a soft area light illuminates the whole room, the shadow of a thin bar on the window spreads out so that it no longer looks like a shadow of a bar; instead it just creates extra noise in the area light, and can require more shadow samples if it isn’t removed from the shadow completely.
You may wish to set the clear glass in the window so it does not to cast any shadows. You should not do the same thing for window frames or other opaque geometry, however. Even if you prevent this geometry from casting shadows in the sky fill, you still want it to be able to cast shadows in a sunbeam if sunlight enters the window.
Adding Sunlight
Check your background image (or whatever you see through the window) to see what direction the sun seems to be coming from and if it’s sunny outside. Windows don’t always have a sunbeam, especially if the sun is coming from the other side of the building.
Create a bright, warm directional light, just as you did for sunlight outside. If you don’t want to use a directional light, a spherical or disk-shaped area light can work just as well, but make sure to position it far away from the window to achieve the kind of distant perspective that people expect from sunlight. Test-render your scene to see where the sunbeam is cast into your room, and rotate or move the light until it hits where you want. Figure 4.12 shows the room with a sunbeam added.
)
[Figure 4.12] A directional light adds a sunbeam to the room.
Adding Spill Light
The sunlight shouldn’t cut off completely at the edge of the sunbeam. Just like when you were working outside, the spill light should be outside the sunbeam, simulating the extra light that comes from the bright parts of the sky around the sun itself. Figure 4.13 shows the difference that spill light can make.
)
[Figure 4.13] Compare the sunlight by itself (left) to the addition of a spill light (right)–the spill light adds a warm outer glow around the sunbeam.
If you are using a directional light for your sun, then to create a spill light, you only need to duplicate the directional light, modify the shadows to be much softer, and reduce the intensity of the light. Often it looks good to use a rich, saturated color (more saturated than the sunlight itself) for the spill from the sun.
Adding Indirect Light
When light hits each surface in your interior scene, any brightly lit surface essentially functions as a light source, illuminating other objects with indirect light that has reflected off of it. The floor, the walls, and certainly any object hit by a sunbeam motivate indirect light that needs to illuminate the rest of the scene.
Adding Global Illumination
By far the easiest and most realistic way to render indirect light indoors is by using global illumination (GI). Turning on GI in your renderer allows the color and brightness of each surface in your scene to help illuminate other surfaces around it; this gives you naturalistic results without your having to work to set up extra lights to simulate indirect light.
Figure 4.14 shows the difference that GI makes to the scene. Using only the sky fill, sunlight, and sun spill lights coming through the window, GI extends the natural light from the window to fill the entire room.
)
[Figure 4.14] The sunlight and skylights through the window (top) are augmented by indirect light bounces (bottom) when global illumination is turned on.
When you turn on GI, it is not just another source of fill light. When you activate global illumination or indirect illumination in your renderer, you are fundamentally changing how the lighting in your scene works.
Consider a test scene illuminated by a single light source, as shown in Figure 4.15. Without GI, surfaces are only lit by the light source itself. Parts of the scene that don’t directly face the light remain black.
)
[Figure 4.15] With no global illumination, a scene lit by a single light source contains solidly black shadow areas.
Figure 4.16 shows the same scene rendered with GI. When you use GI, surfaces are lit by other surfaces. One brightly lit surface can indirectly brighten other surfaces that face it. This is why shadow areas of the scene are brightened and filled in.
)
[Figure 4.16] Global illumination adds indirect illumination bounced from the walls that fill in shadow areas, as well as adding secondary shadowing and color bleeding.
One nice feature you can achieve through GI is secondary levels of shadowing, where shadows are created even within other shadows. Look at the three balls in Figures 4.16. Without GI, there you would have only a single level of shadowing, and the balls would be hidden in the shadows cast by the cubes. With GI, you get secondary shadowing, even though the scene only has one light. Not only do the indirect light bounces make the balls visible, they also provide secondary shadowing, casting soft shadows from the balls onto the floor.
Also notice the colors of light that illuminate the three balls: The first ball appears red because of the light that has bounced off of the red wall; the second ball appears green because of light that has bounced off the two green cubes; and the third ball appears blue from the light that has bounced off the blue wall. This feature of GI, the way the indirect light picks up the colors of surfaces that it bounces off of, is called color bleeding.
One area where you can inspect any architectural rendering for quality is in the corners, where two walls meet, or where a wall meets the floor or the ceiling. Corners are the areas where light most closely inter-reflects between walls. As a result, your scene should show continuity at the corners—a continuation of tones from one wall to another, rather than a sudden jump in brightness. GI tends to provide this, so that you can see a smooth, continuous sharing of illumination where two walls meet. When you are lighting without GI, even if you add extra bounce lights to the scene, you need to put in a lot of effort to achieve really convincing corners.
We use the term local illumination to describe rendering without GI, and call GI global illumination, which refers to how many other surfaces in the scene are taken into account when a surface’s illumination is rendered. Without GI, each surface is rendered by itself; this process takes the light sources into account but not the brightness of nearby objects. With GI, illumination is computed taking all the geometry in the scene into account, so light hitting any surface may indirectly brighten other surfaces in the scene. The inclusion of all the geometry in the scene is what gives the “global” perspective to the illumination process.
GI rendering allows indirect light to contribute to diffuse illumination. In other words, GI can indirectly brighten even matte-finished surfaces—surfaces that are not shiny or reflective. With GI turned off, you can still use conventional raytraced reflections for reflective objects, but raytraced reflections by themselves don’t transport light from diffuse surfaces to other diffuse surfaces. Only GI gives you true diffuse-to-diffuse light transport. Only GI allows any brightly lit surface to brighten other objects, not just as a reflection but as a light source.
The idea that reflected, indirect light can function as a light source is something that GI lighting has in common with live-action filmmaking. Especially when working outdoors, where bounced sunlight can be a brighter light source than many types of artificial light, filmmakers often use bounce cards or reflectors to light their scenes, instead of doing all of their lighting with lights. On a sunny day, reflectors, as shown in Figure 4.17, can provide all of the fill light filmmakers need when filming scenes outdoors.
)
[Figure 4.17] Reflectors are used to bounce light onto actors or sets.
Chapter 9 will come back to global illumination to discuss the different types of GI algorithms that your software may support. Although these algorithms can add to the quality of your imagery and may save you many hours of work as a lighting artist, they all come at the expense of slower overall rendering times. As computers get faster and software becomes more advanced and efficient, there are fewer and fewer reasons to render architectural interiors or realistic indoor scenes without using GI. However, for some extremely complex scenes, short-deadline projects, and some types of subject matter—such as hair, fur, grass, and vegetation, which are difficult to include in a full GI solution—the limited nature of rendering time still makes some people work without GI.
Working Without GI
If you want to simulate indirect light without using GI, often the easiest starting point is the occlusion sandwich approach, which was discussed in Chapter 3.
Figure 4.18 shows a fill light layer that includes two light colors: Blue light is coming from the window area and warmer light is coming from inside the room where the sunbeam would be hitting.
)
[Figure 4.18] A fill light pass is evenly lit, but it does feature some color variation.
The fill light layer is a great place to add bounce lighting, because it does not need to include shadows. The occlusion layer adds shading later, but for this layer you can use area lights positioned outside each wall to light the scene. A blue area light is positioned outside of the window and warm colored lights illuminate the scene from other directions. The bright area where the sunbeam hits the table and walls motivates extra bounce light, so extra area lights are added coming from those parts of the scene. Figure 4.19 shows the area lights used in rendering the fill layer.
)
[Figure 4.19] Area lights from every major surface are used to illuminate the fill pass.
As a quality-control check on your fill light layer, take a look at the corners where two walls meet, or where the walls meet the ceiling or floor. The illumination on the different surfaces should be roughly equal, without any big jump in brightness between the connected surfaces. Although some variation in color and tone is good, the fill light pass should be smoothly, evenly lit, without any high-contrast jumps in the brightness.
Also check your fill light layer to make sure no noticeable specular highlights or extremely bright spots are in the scene. By using broad, soft area lights as fills instead of tiny point-source lights, you help avoid unmotivated highlights that come from what should be bounce light from a wall. The fill layer also should not have any completely black areas unless you are sure an area in your scene would receive absolutely no fill or bounce light.
The middle layer in the occlusion sandwich is the occlusion pass of the room, as shown in Figure 4.20. Note that corners are softly darkened, and alcoves, such as the area under the upper cabinets, go much darker. This shading helps your bounce lighting look more like real global illumination.
)
[Figure 4.20] The occlusion pass is the middle layer of the occlusion sandwich.
We already have the lights that go into the key layer of the occlusion sandwich. We render an image lit by the sunlight, sun spill, and sky fill lights, all as described earlier. The result still has dark areas because of the lack of GI, but otherwise it should be a fully lit scene, as shown in Figure 4.21.
)
[Figure 4.21] The light pass is mainly just the sunbeam and other direct illumination.
Assemble the occlusion sandwich in your compositing software or a paint program starting with the fill layer as the base. Multiply the occlusion layer and then add the key layer on top. Figure 4.22 shows the occlusion sandwich assembled in Photoshop.
)
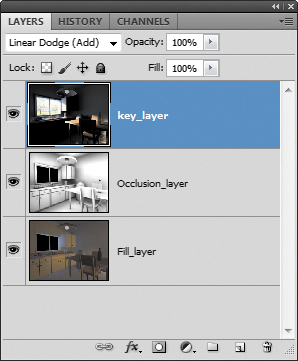
[Figure 4.22] The occlusion sandwich assembled as layers in Photoshop. Blend modes are Normal for the Fill layer, Multiply for the Occlusion layer, and Linear Dodge (Add) for the Key layer.
The result is shown in Figure 4.23. Although it might not match the output with global illumination, it gets pretty close, and the scene can be rendered much more quickly.
)
[Figure 4.23] The result of the occlusion sandwich looks somewhat similar to global illumination, but it is produced in a fraction of the rendering time.