Effective Macintosh Troubleshooting
Effective Troubleshooting
By John Christopher, contributor to The Macintosh Bible, 8th Edition
 Troubleshooting your Macintosh is easier than you might think. You can solve
the most common problems on your own without any prior experience or computer
knowledge. You only need a little time, some patience, this guide at your side,
and maybe a paper clip.
Troubleshooting Procedures
Fundamentally speaking, you can't get past square one without knowing the fundamentals for effective troubleshooting.
What went wrong? Whenever something appears to have gone wrong while working on your Mac, stop and review the following steps to resolve whatever ails your Mac:
-
Take notes! Refamiliarize yourself with pen and pad.
-
Don't get in too deep! Take a break after 20 minutes.
-
Think about what you were doing just before and while the Mac crashed.
-
What has changed since the last time you used the system?
-
What software or hardware did you recently install?
-
How would you describe the problem?
Question the usual suspects. Before you do any troubleshooting, always start here. Although these suggestions may seem obvious, you'd be surprised how often they solve the problem. When you can answer "yes" to each of these questions--and only then--proceed to the next section.
-
Is everything plugged in? Believe it or not, this is the most common reason that a component doesn't work. Do yourself a favor and make sure all your cables are securely attached and snug in their sockets. Go ahead and check them out--we'll wait here for your return.
-
Are the keyboard and mouse plugged in? (OK, who unplugged the mouse? Oh, that's right--it was me, doing some late-night spring cleaning.)
-
Are the monitor, external drive, scanner, and all other external devices plugged in and switched on? Do you see any dark indicator lights? If you have external peripherals, you need to do double duty to ensure that your devices are properly attached and are getting power.
If you are using any external SCSI devices, ask yourself these questions too:
-
Are the SCSI devices properly terminated?
-
Does each SCSI device have its own separate address? (If you're not sure what this means, you really need to visit Chapter 5 of The Macintosh Bible, 8th Ed. now.)
How to force-quit an application. If your Mac experiences a crash and the cursor is not frozen, you can try using the force-quit command to close the application.
This is the preferred method if you are running Mac OS X: Press and hold Command-Option and then, holding them down, press Esc.
If you are running Mac OS 9 and earlier, the message in the dialog box will read: "Are you sure you want to Force Quit?" Click OK. Once the offending program has quit, you should restart your Mac to guard against further crashes. Be aware that you will lose any unsaved changes or additions made to a document you had open during the crash.
![]() Mac OS
X users have a real advantage here. Specifically, Mac OS X features protected
memory, which means you can quit a frozen application and continue working as
though nothing happened. Use the same key combinations listed above to force-quit
an unruly application, or select the Force Quit command from the Apple menu
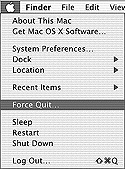
(Figure 1). A window will appear, displaying a list of all currently
running applications. Just choose the varmint that crashed your Mac, and click
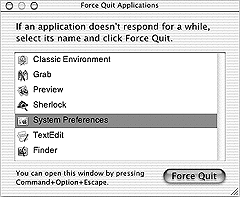
the Force Quit button (Figure 2). From there, you can ignore the event
and go about your computing life, free from needless repetitive restarts.
Mac OS
X users have a real advantage here. Specifically, Mac OS X features protected
memory, which means you can quit a frozen application and continue working as
though nothing happened. Use the same key combinations listed above to force-quit
an unruly application, or select the Force Quit command from the Apple menu
(Figure 1). A window will appear, displaying a list of all currently
running applications. Just choose the varmint that crashed your Mac, and click
the Force Quit button (Figure 2). From there, you can ignore the event
and go about your computing life, free from needless repetitive restarts.
![]()

Figure 1 Got Mac OS X? You'll find the Force Quit command in the Apple menu.

Figure 2 In Mac OS X, just choose the application that's causing you grief and force it to quit.
Restarting your Mac during a crash or freeze. You should use the following method--sometimes known as a hard restart--only if the cursor is frozen or you cannot restart your Mac using the proper command in the Special menu (Mac OS 9 and earlier) or the Apple menu (Mac OS X).
-
For most desktop Macs and many PowerBooks and iBooks, press Command-Control-Power On.
-
For first-generation iMacs (Bondi Blue) and early PowerBooks, use your trusty straightened paper clip and locate the reset hole. On iMacs, it's located next to the power cable.
-
For Blue-and-White Power Mac G3s and Power Mac G4s, use the reset button, located on the front panel of the Macintosh and marked with a triangle symbol.
-
For PowerBook G3s that don't have a reset button, press Shift-Function-Control and the Power On key.
-
If all else fails, gently unplug the power cord from your Mac, being careful not to jar or move the computer.
Starting up the Mac using the system-installer CD. If you experience a flashing question mark or see a broken-folder icon (a folder icon with a jagged line running through it) when you attempt to start up your Mac, you may have to use your system-installer CD to access the hard disk. (Since many of the newer Macs include a DVD drive, we will use the term CD/DVD here to identify both types of drives.)
If the Macintosh is on and a flashing question mark or broken-folder icon appears, simply press the CD/DVD eject button to open the loading tray. Insert the CD and close the tray. If you have a slot-loading Macintosh such as the iMac DV, simply insert the CD. You should see the happy Mac icon in a few moments. If not, restart while holding down C on the keyboard to force the Mac to start from the CD.
If the Macintosh is off, press the power key and then immediately press the CD/DVD door on the front of the drive. Once the tray opens, insert the CD and close the tray. Press C on the keyboard. The happy Mac should appear, and you may notice a different Desktop pattern from what you are used to seeing.
Another startup method is available to owners of Power Mac G4 models, iBooks, PowerBooks (FireWire and later), and iMacs (slot-loading and later models). Start up your Mac and hold down Option until the Startup Manager window appears. You should see a group of icons that includes circular and straight arrows, a CD icon, and a hard-disk icon. The circular arrow on the left scans for disks capable of starting up your Mac. Click the CD icon and then the straight arrow to continue the startup process.
As a last resort if all keyboard commands fail to make your Mac start from the CD, try holding down Command-Option-Shift-Delete. This procedure will force the Mac to ignore the hard disk during startup.
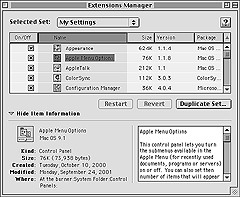
Keeping the peace with Apple's Extensions Manager. When it comes to troubleshooting startup problems when running Mac OS 9 or earlier, nothing comes close to the simplicity of Apple's Extensions Manager. If your Mac freezes while starting up and extensions are loading, you most likely have an extension conflict. The fastest way to resolve the problem is to restart and hold down the spacebar until the Extensions Manager window appears (Figure 3).
![]() Because
Mac OS X runs Classic programs using Mac OS 9, you can control the way extensions
load (or prevent them from loading at all). As part of System Preferences, the
Classic pane's Advanced tab offers Startup Options that turn extensions on or
off as well as launch Extensions Manager.
Because
Mac OS X runs Classic programs using Mac OS 9, you can control the way extensions
load (or prevent them from loading at all). As part of System Preferences, the
Classic pane's Advanced tab offers Startup Options that turn extensions on or
off as well as launch Extensions Manager.

Figure 3 Manage extensions and control panels with Extensions Manager.
The first column displays a checkmark for every extension or control panel that is on or off. Keep in mind that these items load in alphabetical order, with extensions first, followed by control panels. Be aware of which icon appeared on the screen just before the freeze occurred--you may need to restart again and write down what you see. Because most freezes happen just after new software is installed, try removing the checkmark next to any recently installed items and then clicking the Continue button. If you successfully reach the Desktop without freezing, you have identified the suspect. The next steps are to rename and reenable the item to change the loading order.
From the Apple menu, choose Control Panels and open Extensions Manager. When the window opens, scroll down the list until you find the disabled item and then select it. Now, from the Edit menu, choose the Get Info command. The item's Get Info panel will appear. Click its name and add the letter A or Z at the beginning of the name. This forces it to load earlier or later, depending on the letter you choose. For example, if you want the DialAssist control panel to load later, you might change the name to ZDialAssist. After you rename the item, go back to the Extensions Manager window, check the box next to that item, and restart. If all goes well, that should fix your frozen Mac!
Although the Extensions Manager is a useful tool for resolving conflicts, its features are somewhat basic compared to those of a program such as Casady & Greene's Conflict Catcher.
With Mac OS X, Apple created a new utility that combines its Drive Setup and Disk First Aid programs. To repair and verify Mac OS X hard disks, launch the Disk Utility application, located in the Utilities folder. From the main pane, select Disk First Aid and then choose the function you want to use. The First Aid program is identical to Apple's Disk First Aid, so you would take exactly the same steps in either program to repair your damaged directory. |
Fixing a damaged directory with Apple's Disk First Aid. Both Disk First Aid (in Mac OS 9 and earlier) and First Aid (part of Disk Utility in Mac OS X) are low-power utilities included on the system-installer CD. When you launch these utilities, the top window panel displays your hard-disk icon and any other connected storage devices. You may choose to verify the hard disk's directory structure or repair it if the utility finds a problem--choose the disk icon in the top panel and click the Verify or Repair button. When the program is done, the displayed report identifies any found or fixed problems.
In the past, you had to start up your Mac from the system installer CD to run Disk First Aid on your hard disk, but now in Mac OS 9 you can run it anytime. In Mac OS X, you must still start up from your installer CD to repair your startup disk. The Save Results command in the File menu allows you to save the report in case you want to share it with a technical-support representative, consultant, or any fellow troubleshooter.
Using Apple's Drive Setup.
Drive Setup is a hard-disk formatter for Mac OS 9 and earlier that creates logical structures on your hard disk. The main functions of the program are to set up the Macintosh file system, install a disk driver, and test media. Use this application with caution because it can erase your hard disk. This section details its two troubleshooting features.
You can find Drive Setup in two places: on your hard disk and on the software-installer CD. In both cases, it is located in the folder called Utilities. You may launch the program from either location, but you will not be able to initialize the drive or create partitions unless you start up from the CD.
-
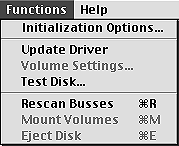
Use Drive Setup's Test Disk command--located in the Functions menu (Figure 4)--to check the physical functions of your hard disk. This operation will read every sector to find out whether the disk has any bad blocks.
-
The Update Driver command replaces the current disk driver that controls communication between the hard disk and your Macintosh. Select the disk in the List of Drives window and then choose Update Driver from the Functions menu. You must restart your Mac after the procedure is completed.

Figure 4 Use Drive Setup's Test Disk command in the program's Functions menu to check your hard disk.
Mac OS X's Disk Utility includes the Drive Setup program. This subset of the application differs radically from the stand-alone version of Drive Setup. For one thing, the program no longer includes the Update Driver function. However, it can still scan the hard-disk media for bad blocks. To test your hard disk, launch Disk Utility, click the first Aid tab, and select your hard disk in the panel to the left. Then click Verify. |
Zapping the PRAM. The PRAM--pronounced "pea-ram"--is a separate clock chip that retains settings for some control panels, such as Date & Time, and keeps track of the designated startup disk. When the computer shuts down, a small battery located inside the Macintosh maintains these settings. Occasionally, they become corrupt, which can cause noticeable problems with the Date & Time, Mouse, Monitors, and Keyboard control panels, as well as make your Mac lose track of the startup disk.
If you ever want to impress a fellow Mac user, just mention zapping the PRAM in casual conversation and watch the reaction. The zapping process returns your Mac's settings to the Apple factory defaults that were assigned to your Macintosh when it was new. Although this description sounds extreme, the operation will not damage your Macintosh or its data in any way. You will, however, have to change various settings in the control panels back to your specific preferences once the process is complete.
Zapping the PRAM may require you to grow a third hand or request assistance from a family member, neighbor, coworker, or household pet. For an easy, no-hassle method, use Micromat's TechTool Pro program. Otherwise, follow the steps below.
-
Make sure your Macintosh is turned off.
-
Locate the following four keys on the keyboard: Command, Option, P, and R.
-
Try holding down Command-Option with your left thumb.
-
Press R with your left index finger.
-
With your right hand, switch on the Macintosh and immediately press P. Continue to hold down the four keys.
-
The Macintosh will chime once when you turn it on and then a second time as it resets the PRAM. You can release the keys when you hear it chime at least twice. Depending on the model of Macintosh you have, the screen will either remain gray or display the happy Macintosh icon. If the Mac hasn't chimed a second time, you'll have to try the operation again, as the exact timing can be tricky.