- iPhoto: Organize and Share Your Digital Photos
- First, install iPhoto
- Open iPhoto
- Import your photos to iPhoto
- Viewing your photos
- iPhoto Preferences
- Create an Album and add photos to it
- The Organize view
- Arrange the order of the photos
- Keywords and searching
- The Edit view
- The Book view
- The Share view
- Export copies of your photos in various formats
- Extra tips and information
This chapter is from the book
This chapter is from the book
This chapter is from the book
The Share view
The Share pane contains tools that let you share your photos with others in a variety of ways. You can print your photos in various formats, create a Slide Show to play on your computer, export a QuickTime slide show for others, order professional prints over the Internet, order a professionally bound, hard-cover book, create a web site and publish it with blinding speed, burn your photos to a CD, and more.
Print your photos to your desktop printer

Select a single photo, multiple photos, an Album, or the Photo Library.
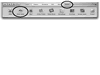
Click the "Share" button (beneath the Viewing area).
Click the "Print" button in the Share pane.
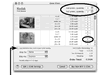
In the Print window, click the "Style" pop-up menu and choose Contact Sheet, Full Page, Greeting Card, or Standard Prints. Each option will display different parameters; check it out.
Enter the number of copies to print.
Put photo-quality paper in your printer and click "Print."

)
)
Create a Slide Show to view on your iMac

With the Slide Show tool in the Share pane you can quickly create a slide show with a sound track that will play full-screen on your monitor.
Select an Album, the Photo Library, or a group of photos within either collection.
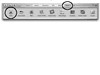
Click the "Share" button to display the Share pane, as shown below
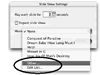
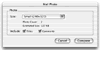
Click the "Slide Show" button. The "Slide Show Settings" window will open, as shown below.

Enter the number of seconds for each photo to play.
Choose if you want the Slide Show to repeat.
Select the music you want to use for a sound track: From the "Music" pop-up menu, select one of the few sound tracks that Apple has provided for you, or choose "Other..." so you can select any MP3 or WAV file you have on your computer.
Click OK to start the Slide Show.
)
)
)
Slide Show quick-play
You don't have to go through the Settings window to play a Slide Show, or even be in the Share view: Just select an Album while in any view (or a group of photos in the main viewing area), then click the "Play" button. You might have to wait a few seconds while iPhoto prepares the show.
) Play Slide Show.
Play Slide Show.
Preferences settings
You can also set up the Slide Show settings in the Preferences window. All Slide Shows will play with the same preferences, whether you choose them in the Settings window as on the previous page, or here in the iPhoto Preferences.
To set the Preferences, go to the iPhoto menu and choose "Preferences...." Adjust the settings at the bottom of the window, then close the window.
) This will pick up the settings
you made on the previous page,
and that window will pick up
any settings you choose here.
This will pick up the settings
you made on the previous page,
and that window will pick up
any settings you choose here.
Slide show keyboard commands
Use keyboard commands to control the playback of your iPhoto Slide Show:
Up arrow: Speeds up the Slide Show.
Down arrow: Slows down the Slide Show.
Spacebar: Toggles the Slide Show between Play and Pause.
Left and right arrow keys: Shows the previous slide or next slide.
Mouse: Stops the Slide Show.
Send your photos through email
One way to share your photos is to send them to someone through email. iPhoto makes it incredibly easy to do just that.
Select one or more photos in the viewing area; you can choose photos from any Album or from the Library.
 To select multiple photos, hold the Command key as you click on your photo selections.
NOTE
People using the current versions of America Online (version 5.0 for Macs, version 7.0 for PCs) will not see the iPhotos you send this way. Dang. I hope they fix that.
Click the "Share" view button. are send the photos. Amazing.
Click "Mail" in the lower pane to open the "Mail Photo" window.
In the "Mail Photo" window, choose a photo size from the pop-up menu, and choose whether to include titles and comments that you may have added to photos (as explained on page 279). Click the "Compose" button.
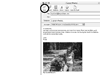
Compose your email message in the "New Message" window that opens (as shown to he right). Your photos are already sized and placed in the message area.
Click the "Send" icon in the email window Toolbar. Your iMac will connect to the Internet (if it isn't already) and send the photos. Amazing.
)
)
)
Order traditional prints of your photos

You can order regular, real, hold-in-your-hand prints of any photo or collection of photos. Your first ten 4 x 6 prints are free!
Make sure you're connected to the Internet.
Select an Album or a group of photos within an Album or the Photo Library.
Click the "Share" view button (if it isn't already).
Click the "Order Prints" button in the lower pane.
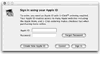
If the button in the lower right says, "Enable 1- Click Ordering," click it. You will be asked to start an Apple account and provide your name, address, and credit card information, as well as your shipping preferences.
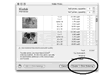
If you already have an Apple account, you will be asked to turn on 1-Click Ordering. Click OK.
If necessary, click the "Order Prints" button again in the Share pane to reopen the Order Prints window.
Select the size and quantity you want of each photo in the "Order Prints" window:
In the top-right corner you have options of 4 x 6 and 5 x 7 prints. Any quantities you enter in these two boxes will apply to every photo you selected; that is, if you enter "2" in the 4 x 6 box, you will get 2 prints of every picture.
 Notice there is a warning that one or more of the photos in the collection are low resolution
(the photo will appear with a warning icon displayed in the corner). The larger the photo, the
more important it is that you originally shot the photo in the highest resolution. You can get
away with creating small prints from low-resolution photos.
Notice there is a warning that one or more of the photos in the collection are low resolution
(the photo will appear with a warning icon displayed in the corner). The larger the photo, the
more important it is that you originally shot the photo in the highest resolution. You can get
away with creating small prints from low-resolution photos.
In addition to or instead of the above, you can select individual photos and buy separate prints, like a 16 x 20 or a collection of four wallet-sized.
As you enter a number to order each photo, the amount is instantly calculated in the window. You can always type in "0" to change your mind.
Click the "Buy Now With 1-Click" button. Wow.
)
)
)
Build a web site with your photos and put it on the web—free

If you signed up for a free Apple iTools account (see Chapter 19), iPhoto will automatically create and publish a web site of your selected photos and store it free on Apple's Internet servers. It's really incredible.
Select an Album or a group of photos within an Album. The order in which photos appear in the Album determines the order in which they appear on the web page that iPhoto creates. To rearrange photos, drag-and-drop them into new positions.
Click the "Share" view button.
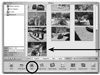
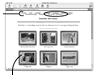
Click the "HomePage" button in the lower pane. Your iMac will connect to the Internet and open the "Publish HomePage" window, as shown below. Your selected images are displayed on a web page template that you can customize.
 If your web page appears with
only one photo on it, perhaps
you accidentally had one
photo selected in the Album.
Click ÒCancelÓ and go check.
If your web page appears with
only one photo on it, perhaps
you accidentally had one
photo selected in the Album.
Click ÒCancelÓ and go check.
TIP
If you want to create a web page with your photos that you can upload to a site you already wn, see page 301.
Click one of the thumbnail images at the bottom of the window to choose a style for the frames that will border your photos. The same frame will border every photo on the page.
Select the existing captions on the page (press-and-drag over the text) and replace them with your own words. If you had given titles to photos (explained on pages 275 and 279), those titles would appear as captions.
TIP
To remove a HomePage Photo Album, log in to your iTools account, then click the "HomePage" button. You'll see a list of the Albums you have posted. Single-click on the name, then click the minus sign right below the list.
From the "Publish to" pop-up menu at the bottom of the window (shown on the previous page), select your iTools account name.
Click the "Publish" button. After the files have been transferred to Apple's iTools server, a notice will appear telling you the web address of your new web site; this notice has a button called "Visit Page Now." Click it to open your brand new HomePage Photo Album.
 This is the iPhoto HomePage
Photo Album as it appears
on the web. As you add other
Albums, each one will have
its own link, as shown here.
This is the iPhoto HomePage
Photo Album as it appears
on the web. As you add other
Albums, each one will have
its own link, as shown here.
 Click any photo and it will open to a new web
page with that photo
shown enlarged.
In the bottom-right corner
are Back and Forward
buttons to cycle the visitor
through the Album.
Notice there are no scroll
barsÑyou cannot reduce
the size of the page (and
it fills your entire screen).
But this page actually sits
in a completely separate
window above your main
web site; just close or move
this window to get back to
your main window.
Click any photo and it will open to a new web
page with that photo
shown enlarged.
In the bottom-right corner
are Back and Forward
buttons to cycle the visitor
through the Album.
Notice there are no scroll
barsÑyou cannot reduce
the size of the page (and
it fills your entire screen).
But this page actually sits
in a completely separate
window above your main
web site; just close or move
this window to get back to
your main window.
)
)
)
Use a photo as your Desktop background

Select one of your photos to use as a Desktop image. It's a great way to personalize the appearance of your iMac. Any photo you choose will fill the Desktop space.
Single-click one photo in any Album or from the Photo Library.
Click the "Share" view button.
Click the "Desktop" icon in the lower pane. The selected photo displays instantly on your Desktop.
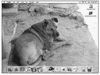 This is a picture of Mac The Dog as an
iMac Desktop image. Notice I selected
a photo that wonÕt interfere with the
visibility of the Desktop icons in the
upper-right corner of the screen.
This is a picture of Mac The Dog as an
iMac Desktop image. Notice I selected
a photo that wonÕt interfere with the
visibility of the Desktop icons in the
upper-right corner of the screen.
)
Make a Screen Saver from your photos

Create your own Screen Saver that will activate after the amount of time you set (see pages 217–218 on how to set the Screen Saver preferences). The images will appear on the screen, move forward, recede, and fade into each other. Way cool.
Click the "Share" view button, if it isn't already.
Click the "Screen Saver" icon in the lower pane.
In the "Screen Saver" dialog box, a menu contains the names of all your Albums. Choose the Album you want to use as a screen saver, or choose the option of "All Albums."
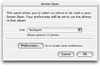
Click OK. Your Slide Show will play when your monitor sleeps, or when you move your pointer to the "Hot Corner" of the screen (as explained on page 218).
)