- Getting started
- Creating a new Web site
- Adding files to the Web site
- Creating a component to be used as a navigation bar
- Adding a layout grid
- Aligning and distributing multiple objects
- Adding text using a table
- Creating a custom color palette and adding color to text
- Specifying keywords
- Adding a component to an existing Web page
- Updating the custom color palette
- Designing a Web page using floating boxes
- Editing a component
- Previewing in GoLive
- Review questions
- Review answers
This chapter is from the book
This chapter is from the book
This chapter is from the book
Adding a layout grid
GoLive layout grids make it easy for you to create table-based designs in your pages. Instead of setting up multiple table cells, you can add a single layout grid to a page and position objects anywhere on the grid with 1-pixel accuracy. You can easily add text to a grid by dragging a layout text box onto the grid and entering text into the layout text box.
Click the navbar.html window to make it active.
 Drag the Layout Grid icon from the Basic set (
 ) in the
Objects palette to the page.
) in the
Objects palette to the page.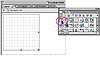
(You can also double-click the Layout Grid icon to place a layout grid at the insertion point on the page.)
A layout grid is added to the page. Now you'll specify a width for the layout grid.
Choose Window > Inspector to open the Inspector, or click the tab if the Inspector is collapsed.
In the Layout Grid Inspector, enter 600 for Width. Press Enter or Return.
To resize a layout grid, you can also select it and drag one of its handles.
)
)
Now that you've added a layout grid to the page, you can add objects, such as images, to it.
Adding an image using the Point and Shoot button
Traditionally when you create an image for use on the Web, you work in a program such as Illustrator or Photoshop, and then save the image in a Web-safe format such as GIF or JPEG. It's also a good idea to maintain the source file in its original format and resolution, in case you need to make changes to the image in the future. In GoLive, you can add Web-formatted images to the page using a variety of methods.
You can also add images to a page using GoLive Smart Objects, which can save you both time and effort. Using Smart Objects, you can drag an image's source file (such as an .ai or a .psd file) to a page and optimize the image for the Web directly in GoLive. GoLive creates a Web-formatted version of the image in a target file that it adds to the page. When you update the source file, GoLive automatically regenerates the target file to update the image on the page (see Lesson 6, "Using Smart Objects").
Now you'll add four Web-formatted images to the page using different methods. First you'll add a company logo using the Point and Shoot button in the Image Inspector.
 Drag the Image icon from the Basic set (
 ) in the Objects
palette to the upper left corner of the layout grid. Don't worry about the
exact placement of the placeholder; you'll precisely position each image
later in this lesson.
) in the Objects
palette to the upper left corner of the layout grid. Don't worry about the
exact placement of the placeholder; you'll precisely position each image
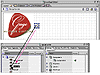
later in this lesson. Adding image placeholder to page
An image placeholder appears on the layout grid, and the Inspector changes to the Image Inspector. If needed, you can adjust the position of the placeholder, as well as any other object on the grid, by dragging it.
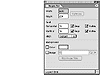
In the Basic tab of the Image Inspector, notice that the Source text box shows "Empty Reference!" This indicates that the image placeholder doesn't reference an image file yet.
Now you'll use the Point and Shoot button to link an image file in the site window with the placeholder on the page.
In the Files tab of the site window, make sure that the images folder is open and the logo.gif file is visible.
Drag from the Point and Shoot button (
 ) in the Image Inspector
to logo.gif in the images folder within the site window.
) in the Image Inspector
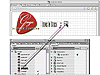
to logo.gif in the images folder within the site window.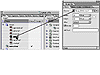 Using Point and Shoot button to specify image
The company logo is added to the page, and the path to the logo.gif file appears in the Source text box in the Image Inspector.
GoLive supports the use of low-resolution images that appear in the browser while high-resolution images are loading. You can generate low-resolution images quickly using GoLive, which you'll do now.
In the More tab of the Image Inspector, click Generate. The image must be selected in the document window for this tab to be available.
A low-resolution (low-source) image file named logols.gif appears in the images folder in the site window in addition to the logo.gif file, and the Low option in the Image Inspector is automatically selected.
Now you'll add alternative text for the image. In browsers that don't support images or have image loading turned off, the text is displayed instead of the image. This text may also be used by text reading machines for the visually impaired.
In the Basic tab of the Image Inspector, enter Gage Vintage Guitars Logo in the Alt Text box.
Choose File > Save to save navbar.html.
)
)
Adding an image using a keyboard shortcut
Now you'll add a second image to the page using a keyboard shortcut. This image is part of the navigation bar for the site.
 Drag the Image icon from the Basic set (
 ) in the Objects
palette to the right of the company logo on the page.
) in the Objects
palette to the right of the company logo on the page.Hold down Alt (Windows) or Command (Mac OS), and drag from the image placeholder on the page to items.gif in the images folder within the site window.
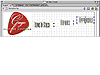
 Using keyboard shortcut to specify image
In the Basic tab of the Image Inspector, enter Items In Stock in the Alt Text box to add alternative text for the image you just added.
Because items.gif is small in file size (1K), you don't need to create a low-source (low-resolution) image.
)
Adding images by dragging
Now you'll add a third and then a fourth image to the page by dragging. These images also are part of the navigation bar for the site. You don't need to worry about aligning these images perfectly; you'll do that in a later section of the lesson.
 Drag the Image icon from the Basic set (
 ) in the Objects
palette to the right of the Items In Stock image on the page.
) in the Objects
palette to the right of the Items In Stock image on the page.Drag repairs.gif from the images folder in the site window to the image placeholder on the page.
Click the newly added image in the document window to select it.
 Dragging image file from site window to placeholder
In the Basic tab of the Image Inspector, enter Repairs in the Alt text box.
Now you'll add the fourth image to the page.
Drag the Image icon from the Basic set in the Objects palette to the right of the Repairs image on the page.
Drag appraisals.gif from the images folder in the site window to the image placeholder on the page.
Click the newly added image to select it.
In the Basic tab of the Image Inspector, enter Appraisals in the Alt text box.
Choose File > Save to save navbar.html.
Note
To add an image to a page, you can also drag the image file from the site window to the page, without using an image placeholder. Using a placeholder, however, gives you more control over the placement of the image.
)
)
Creating Web pages using Photoshop-based designs
The majority of Web design firms and professionals create their Web page layouts in Adobe Photoshop, including rollovers and animated GIFs, and then bring the designs into their Web pages. When you design a page layout in Photoshop, you can slice it into a table of individual images and GoLive will automatically put the slices into a custom HTML table in your page. When you save the Photoshop image for the Web, you can reformat the HTML and JavaScript code so that any rollovers are fully editable in GoLive. You can use any of these methods to add your Photoshop designs to your Web pages in GoLive:
Dragging a Photoshop image file from the site window into the page automatically creates a Smart Object link between Photoshop and GoLive. If the image is sliced, GoLive places the slices into a new table and saves each slice as a separate Web image. You can continue to update the design in Photoshop and GoLive automatically optimizes the sliced images for the Web. (See "Working with a sliced Photoshop image" in the Adobe GoLive 6.0 online Help.)
If you want to preserve multiple layers of a Photoshop design, you can import the layers of the image as individual Web images in floating boxes (DHTML layers). Because the Web images are displayed in floating boxes, you can completely reposition them, overlap them, and apply other actions to them such as the Show Hide action. (See "Hiding and showing floating boxes" and "Working with Photoshop layered files" in the Adobe GoLive 6.0 online Help.)
You can use your Photoshop-based design as a tracing image and save individual cutouts as Web images in floating boxes. If you want, you can create a duplicate page that places the tracings in a table-based design by converting the floating boxes to a layout grid. (See "Converting floating boxes into layout grids" and "Building a Web page using tracing images" in the Adobe GoLive 6.0 online Help.)