- Preparing for this lesson
- Photo editing in Lightroom
- The Develop module workspace
- Developing photographs
- Review questions
- Review answers
This chapter is from the book
This chapter is from the book
This chapter is from the book
The Develop module workspace
This section introduces the Develop module workspace and offers some tips for working efficiently in this module. The Develop module looks and behaves a lot like the Library module. Some of the Develop module features mentioned here are covered in more depth in the context of the Library module in the Lesson 3 section “The Library module workspace.”
Interface overview
The Develop module interface is similar to the Library module interface. The main elements of the Develop module interface are:
The center work area with a live preview of the photograph you’re adjusting.
A column of adjustment panels and tools on the right side of the module.
You’ll spend a lot of time working in the right panel column. This column contains a live histogram that updates as you adjust a photograph, a tool strip of local adjustment tools, the important Basic panel, and other panels with adjustment controls for correcting and enhancing photographs.
A column of panels on the left side of the module.
The left panel column contains the Navigator panel for zooming and panning, the Presets panel for applying pre-built sets of adjustments, the Snapshots panel for saving adjustments at a particular point in time, the History panel for stepping forward and backward through adjustments over time, and the Collections panel for accessing photographs in collections without jumping back to the Library module.
The Filmstrip at the bottom of the module, which displays thumbnails of photographs in the current source.
The Filmstrip plays an important role in the Develop module. It allows you to select a different image to work on from the current source without jumping back to the Library module.
The bar at the top of the Filmstrip, which offers access to filename and folder information, other image sources, and some filters, so you don’t have to switch to the Library module for those items.
TIP

To access sources of other photographs without switching to the Library module, click the down-facing arrow on the bar at the top of the Filmstrip. From the pop-up menu, choose Recent Sources, All Photographs, Quick Collection, Previous Import, or sources you’ve marked as favorites.
TIP
If the toolbar goes missing from the Develop module, press T to bring it back into view.
The toolbar above the Filmstrip, in which the features change depending on whether you’re making global adjustments or working with particular local adjustment tools.
The menu bar at the top of the screen.
The Module Picker bar at the top of the module (which is closed in the following illustration).
)
Customizing the Develop module
You can customize the layout and panel behavior of the Develop module to your taste. Try these tips to make your workspace more user-friendly.
In the Library module, with the Lesson 4 subfolder selected in the Folders panel, select DSC0149.dng (a photograph of rooftops in Paris).
In the Library module, press D on the keyboard (or click Develop in the Module Picker) to switch to the Develop module.
The Develop module opens with the selected image in the center work area.
If the left panel column, the Filmstrip, or the Module Picker bar is open, click the thin black border outside each of those open items.
This is a useful setup for working in the Develop module. If you need to access the left column, click its outer border again to bring it back into view. If you need to access the Filmstrip, click its outer border again (or press F6 or fn-F6).
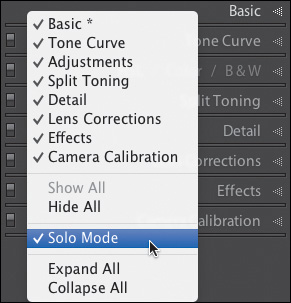
Right-click/Control-click the header of any panel in the column on the right, and choose Solo Mode from the panel list pop-up menu. (Or Alt/Option-click the header of any panel in that column.)
This puts all the panels in the column in Solo mode, which means that only one panel will stay open at a time. This reduces the amount of scrolling you’ll do to access the many panels and controls in this column, particularly if you’re working on a small screen.
)
)
)
TIP
If a panel that you expect to see in a Develop module column is missing, right-click/Control-click the header of any panel in that column to open the panel list pop-up menu. Select the missing panel name in that menu.
Zooming and panning in the Develop module
Zooming and panning in the Develop module is similar to zooming and panning in the Library module.
With DSC0149.dng still open in the Develop module, click the thin black border on the far left to open the left panel column, and click the Navigator header at the top of that column to open the Navigator panel.
Zoom-level options are listed along the top of the Navigator panel and in a pop-up menu at the top right of that panel.
Make sure the zoom level in the Navigator panel is set to its default option, Fit.
The Fit zoom level automatically zooms to a ratio that displays the entire photograph in the center work area.
Click the photograph in the center work area (or press the spacebar). This magnifies the photograph to the 1:1 zoom level by default.
The 1:1 zoom level displays one image pixel in one screen pixel, which is critical for evaluating sharpness and noise.
When the photograph is zoomed in so close that you can’t see all of it in the work area, the cursor automatically changes to the Hand tool.
With the Hand tool, drag the photograph around in the center work area so you can view different parts of it. This is known as panning.
Another way to pan the photograph in the center work area is to drag the edge of the frame overlay inside the Navigator panel.
Each time you click the photograph (or press the spacebar) the zoom level will toggle between Fit and 1:1 until you change one or both of these zoom levels.
Click the triangle icons at the top right of the Navigator panel to open a menu of additional zoom levels. Choose 3:1 from that menu. The photograph zooms in to a 3:1 ratio of screen pixels to image pixels.
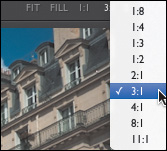
Click the photograph again, and it zooms out to Fit view. Now each time you click the photograph (or press the spacebar) the zoom level will toggle between Fit and 3:1.
To reinstate the default behavior (toggling between the Fit and 1:1 zoom levels), click the 1:1 icon at the top of the Navigator panel. Switch to Fit view for the next section.
)
)
)
Undoing adjustments
As you adjust a photograph in the Develop module, you’ll often want to undo an adjustment or reinstate a previously made adjustment. The Develop module is very flexible in this regard. It offers the History panel, the Snapshots panel, and multiple ways to undo and reset.
With DSC0149.dng still open in the Develop module, in the panel column on the left, click the header of the Presets panel to open that panel.
The Presets panel contains Develop presets, which are groups of saved settings. Presets are a quick way to apply adjustments, so you’ll use them to set up these exercises about undoing adjustments.
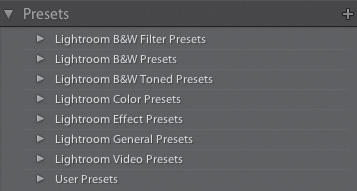
In the Presets panel, click the triangle to the left of the Lightroom B&W Filter Presets folder to expand that folder. Click the Yellow Filter preset. This black and white Develop preset is applied to the photograph.
Choose Edit > Undo (or press Ctrl-Z/Command-Z) to remove the Yellow Filter preset from the photograph.
The Undo command undoes your last action. Each time you apply the Undo command it moves back one more step. Undo is most useful when you want to roll back no more than a few steps.
Choose Edit > Redo (Shift-Ctrl-Z/Shift-Command-Z). The black and white Yellow Filter preset is re-applied.
The Redo command reinstates steps you’ve undone, one step at a time.
In the Presets panel, click the triangle to the left of the Lightroom B&W Toned Presets folder to expand that folder. Click the Sepia Tone preset. That preset is applied to the photograph.
Click the Reset button at the bottom right of the Develop module. This takes the photograph all the way back to its default settings, removing all the Develop adjustments you’ve applied.
The Reset command is useful for those times when you want to start over from the beginning.

In the Presets folder, click the triangle to the left of the Lightroom Color Presets folder to expand that folder. Click the Aged Photo preset.
In the Presets folder, click the triangle to the left of the Lightroom Effect Presets folder to expand that folder. Click the Grain–Heavy preset. Click the header of the Presets panel to close the Presets panel.
The Grain–Heavy preset and the Aged Photo preset display cumulative effects on the photograph. They do not cancel each other out, like multiple presets sometimes do, because they are composed of different adjustments.
Go to the Snapshots panel in the left panel column. Click the Create Snapshot (+) button on the right side of the Snapshots panel to capture a snapshot of the current edited state of the photograph.
In the New Snapshot dialog, you can accept the default name (the date and time of the snapshot) or type over it with a more meaningful name, like Aged Photo + Grain Heavy.
Click Create in the New Snapshot dialog. The snapshot appears by name in the Snapshots panel.

TIP
A snapshot is useful if you want to hold onto an edit that you like but experiment with other adjustments too. You can quickly reapply a state you captured in a snapshot by opening the same photograph in the Develop module at any time and clicking the snapshot name in the Snapshots panel. All the snapshots you retain in the Snapshots panel will be available in the future, even after you close and reopen Lightroom.
TIP
If you no longer need a snapshot, select it in the Snapshots panel and click the Minus icon at the top right of the Snapshots panel to delete it from the panel.
Click the triangle to the left of the History panel in the left panel column to open that panel.
The History panel keeps track of all Develop adjustments you make to a photograph—including individual settings—as chronological states in editing history. You can go backward or forward in the editing history of a photograph, re-applying any of its history states.

NOTE

The History panel in Lightroom, unlike the History panel in Photoshop, is persistent. All existing history states for this photograph will be available in the History panel whenever this photograph is open in the Develop module—even after you close and reopen Lightroom.
In the History panel, click the history state labeled Preset: Sepia Tone. This applies that history state to the photograph in the work area.
TIP
Hover over history states one by one in the History panel to see them previewed on the photograph in the Navigator panel.
In the History panel, there are more states above the one that is currently selected. If you make any other adjustment at this point, those states will disappear from the History panel, which keeps track only of linear history. To retain all the history to date, click the topmost history state before continuing to develop a photograph. Or to retain a particular state, take a snapshot of it.
If you ever want to remove all history states from the History panel, click the Clear All (x) icon at the top right of the History panel.
)
)
)
)
)
)
)
Comparing Before and After views
The best way to evaluate adjustments you’ve made to a photograph is often to compare the adjusted photograph to the photograph you started with. There are several ways to do that in the Develop module.
With DSC0149.dng still open in the Develop module, click the Reset button at the bottom right of the Develop module to reset the photograph to its default appearance before you applied any adjustments.

In the Presets panel in the left panel column, click the arrow to the left of the Lightroom Color Presets folder to open that folder. Click the Old Polar preset to apply it to the photograph.
Press the Backslash key (\) on your keyboard to switch to Before view—a view of the photograph as it looked just after importing, before develop adjustments were applied.
The Backslash key is a shortcut for View > Before/After > Before Only.
Press the Backslash key (\) again to return to After view—a view with the current adjustments (the Old Polar preset) applied.
Toggling between Before and After views can help you evaluate adjustments you’ve made. Another way to compare Before and After views is to see them together on the screen, as you’ll do in the next steps.
If your toolbar isn’t showing at the bottom of the module, press T on the keyboard.
The default view in the Develop module is Loupe view, a single After view that updates as you apply adjustments. To switch from Loupe view to Before and After views of the open photograph, click the Before and After Views button (the button with the YY icon) in the toolbar (or press Y on the keyboard).
When a Before and After view is active, the toolbar displays additional Before & After buttons for copying and swapping settings between Before and After versions.
There are four Before and After views to choose from: Left/Right, Left/Right Split, Top/Bottom, and Top/Bottom Split. Click the Before and After Views button in the toolbar several times to cycle through the Before and After views. Or click the triangle to the right of the Before and After Views button and choose a view option from the pop-up menu.
Before/After Left/Right
Before/After Left/Right Split
Before/After Top/Bottom
Before/After Top/Bottom Split
To return to Loupe view from any of the Before and After views, click the Loupe view button in the toolbar (or press D on the keyboard).
)
)
)
)
)
)
)
You can also access Before and After views of all the adjustments made in a panel, all the adjustments made in a panel section, and individual adjustments, as covered in “Working with the sliders” in this lesson.