Applied jQuery: Being Effective with AJAX
- Using AJAX for Validation
- Using AJAX to Update Content
- Securing AJAX Requests
- Wrapping Up
This chapter is from the book
This chapter is from the book
This chapter is from the book
AJAX, one of the hottest technology combinations to enter the Web development landscape in years, has fueled a surge in interactive Web design with its ability to load new content into an existing DOM structure.
jQuery simplifies using AJAX with several shorthand methods for the basic AJAX methods. For most developers and designers, these shorthand methods will be all that they ever need to use. The jQuery AJAX shorthand methods post, get, and load are featured in this chapter. jQuery also provides a robust feature set, including callbacks, for developers who want to customize their AJAX calls to provide richer interactive experiences. I'll show you how to use several of jQuery's AJAX features to enhance Web sites and applications. Let's start by completing the form validation that you started in Chapter 3.
Using AJAX for Validation
Simply put, AJAX (Asynchronous JavaScript and XML) lets you use JavaScript to send and receive information from the server asynchronously without page redirection or refreshes. You can use AJAX to grab information and update the Web page that your user is currently viewing with that information. Complex requests can be made to databases operating in the background.
When new users register to use the Web site, they need to have unique user names. Their user name will be associated with other information, such as photos they upload or articles they write. It will be the key that lets them update information about the photos they submit.
Make sure that you first set up the database for the Web site by running the SQL file chap4/sql/peuser.sql on your database. Running this script in MySQL or any other database platform will create the Web-site's database, a user for that database, and the table that will be used to store Web-site visitor registration information. You can then start building the PHP file that will respond to the actions the AJAX functions will request.
Building the PHP Registration and Validation File
Photographers who want to share their images and perhaps write articles on photography will need a way to register information with the site that will allow them to log in and gain access to site features not accessible to nonregistered users.
You can create an interaction for this that will appear very slick to the user. With jQuery's AJAX functionality, you can avoid page reloads or redirections to other pages (Figure 4.1). The AJAX engine will send the requests to the PHP scripts on the server without disruption to the user experience.
)
Figure 4.1 The difference between a typical HTTP request and the XMLHttpRequest utilized by jQuery's AJAX methods.
Using PHP and jQuery, you'll create the functions that will support the registration interaction.
- Open a new text file and save it as chap4/inc/peRegister.php .
Set up the database connection for the PHP function, including a method for returning errors if no connection can be made:
         if(!$dbc = mysql_connect('servername', 'username', 'password')){
    echo mysql_error() . "\n";
    exit();
}
Contained in this PHP file are three actions: one to complete registration, one to validate the user name, and a method to allow registered users to log in. The proper function will be called based on the name of the form used in the AJAX function.
- Use PHP's switch method to determine which form is submitted and set up the first case for the registration form:
<
pre> switch($_POST['formName']) { case 'register': - Check to see if the user name and password are set:
if(isset($_POST['penewuser']) && isset($_POST['penewpass'])) { - If the user name and password are set, use the data from the form to complete a SQL statement that will insert the new user's information into the database:
$peuserInsert = "INSERT INTO `photoex`.`peuser` "; $peuserInsert .= "(`username`, `userpass`, `userfirst`, `userlast`, `useremail`"; - Because users can choose a number of photographic interests when they register, you must set up a loop to handle the check boxes that are selected in the registration form:
if(isset($_POST['interests'])){ - The loop used here counts the number of interests selected and properly formats the SQL statement to name those interests. Insert commas in the correct place, and close the initial statement with a closing parenthesis:
$peuserInsert .= ","; for($i = 0; $i < count($_POST['interests']); $i++){ if($i == (count($_POST['interests']) - 1)){ $peuserInsert .= "`".$_POST['interests'][$i]."`"; } else { $peuserInsert .= "`".$_POST['interests'][$i]."`, "; } } } $peuserInsert .=")"; - Place the values from the registration form into the SQL statement in the correct order:
$peuserInsert .= "VALUES ("; $peuserInsert .= "'".$_POST['penewuser']."', "; $peuserInsert .= "'".$_POST['penewpass']."', "; $peuserInsert .= "'".$_POST['pefirstname']."', "; $peuserInsert .= "'".$_POST['pelastname']."', "; $peuserInsert .= "'".$_POST['email']."' "; - Inserting the correct values includes looping through any interests selected in the form and inserting the value "yes" for those interests:
         if(isset($_POST['interests'])){
                $peuserInsert .= ",";
                    for($i = 0; $i < count($_POST['interests']); $i++){
                        if($i == (count($_POST['interests']) - 1)){
                            $peuserInsert .= "'yes'";
                        } else {
                            $peuserInsert .= "'yes', ";
                        }
                    }
                }
Close the SQL statement properly:
$peuserInsert .=")";
If you were to print out the resulting SQL statement contained in the variable $peuserInsert, it would look something like this:
INSERT INTO `photoex`.`peuser`(`username`, `userpass`, `userfirst`, `userlast`, `useremail`,`landscape`, `astronomy`,`wildlife`) VALUES ('Bob.Johnson','ph0t0man','Bob','Johnson','photoman@gmail.com','yes','yes','yes','yes')- Use the PHP function mysql_query to insert the data into the database, and the user will be registered:
         if(!($peuInsert = mysql_query($peuserInsert, $dbc))){
                    echo mysql_errno();
                    exit();
                }
Checking the User Name for Availability
Because the new user will typically fill out the user name first, the password and user name will not be set, so the else statement will be invoked. This is the PHP code that checks the user name to see if it exists in the database.
Create a SQL query that selects the user name typed into the registration form from the user database:
           } else {
        $peCheckUser = "SELECT `username` ";
        $peCheckUser .= "FROM `photoex`.`peuser` ";
        $peCheckUser .= "WHERE `username` = '".$_POST['penewuser']."' ";
        if(!($peuCheck = mysql_query($peCheckUser, $dbc))){
             echo mysql_errno();
             exit();
        }
If the name the user entered into the registration form is already in the database, the query will return a row count of 1. If the name is not in the database, the row count is 0.
- Assign the count of the number of rows returned by the query to the database:
$userCount = mysql_num_rows($peuCheck);
- Echo the count value to be returned by the AJAX function for use by jQuery to determine if the user should enter a new user name in the registration form:
echo $userCount; } - Complete the case statement for the registration form:
break;
Creating the PHP for User Login
After registering, the user can log in to the site and begin uploading photos and writing articles. Let's complete the login section of the PHP file.
- Set up the case statement for the login code:
case 'login': - Check to see if the user name and password are set:
if(isset($_POST['pename']) && isset($_POST['pepass'])){ - If they are set, send a query to the database with the user name and password information:
$peLoginQ = "SELECT `username`, `userpass` "; $peLoginQ .= "FROM `photoex`.`peuser` "; $peLoginQ .= "WHERE `username` = '".$_POST['pename']."' "; $peLoginQ .= "AND `userpass` = '".$_POST['pepass']."' "; if(!($peLogin = mysql_query($peLoginQ, $dbc))){ echo mysql_errno(); exit(); } Set the variable $loginCount to the number of rows returned from the database query. If the user name and password are correct, this value will be 1:
$loginCount = mysql_num_rows($peLogin);
Next, you'll set up a cookie depending on the user's preference. A cookie is a small file that is placed on the visitor's computer that contains information relevant to a particular Web site. If the user wants to be remembered on the computer accessing the site, the user can select the check box shown in Figure 4.2.
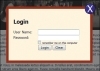
Figure 4.2 The check box a user can click to be remembered. The user will not have to log in again until the cookie associated with this action expires or is removed from the computer.
- If the login attempt is good, determine what information should be stored in the cookie:
if(1 == $loginCount){ Set up a cookie containing the user's name to expire one year from the current date if the "remember me" check box was selected:
         if(isset($_POST['remember'])){
                $peCookieValue = $_POST['pename'];
                $peCookieExpire = time()+(60*60*24*365);
                $domain = ($_SERVER['HTTP_HOST'] != 'localhost') ? $_SERVER['HTTP_HOST'] : false;
The math for the time() function sets the expiration date for one year from the current date expressed in seconds, 31,536,000. A year is usually sufficient time for any cookie designed to remember the user. The information in the $domain variable ensures that the cookie will work on a localhost as well as any other proper domain.
- Create the cookie and echo the $loginCount for AJAX to use:
setcookie('photoex', $peCookieValue, $peCookieExpire, '/', $domain, false); echo $loginCount; - Set a cookie to expire when the browser closes if the user has not selected the remember option:
} else { $peCookieValue = $_POST['pename']; $peCookieExpire = 0; $domain = ($_SERVER['HTTP_HOST'] != 'localhost') ? $_SERVER['HTTP_HOST'] : false; setcookie('photoex', $peCookieValue, $peCookieExpire, '/', $domain, false); echo $loginCount; } - Echo out the login count if the user name and password are not set. The value should be 0:
   } else {
        echo $loginCount;
    }
}
break;
)
With the PHP file ready to go, it is time to build the jQuery AJAX functions.
Setting Up the jQuery Validation and Registration Functions
Checking the new user name should be as seamless as possible for the registrant. The form should provide immediate feedback to users and prompt them to make changes to their information prior to the form being submitted. The form input (in chap4/4-1.php) element for the user name will be bound to the blur method:
<label class="labelLong" for="penewuser">Please choose a user name: </label><input type="text" name="penewuser" id="penewuser" size="24" /><span class="error">name taken, please choose another</span>
- Bind the form input for the user name to jQuery's blur method:
$('#penewuser').blur(function() { - Capture the value of the user name in the newName variable:
var newName = $(this).val();
Next, you'll validate with the post method.
Call the post method with the URL of the PHP script, data representing the name of the form that is being filled out, and the newName variable:
$.post('inc/peRegister.php', {
        formName: 'register',
        penewuser: newName
Note that the data passed by the post method is in name: value pairs. The value in each pair is quoted when sending the raw data. Variables such as newName do not need the quotes.
The results of calling the inc/peRegister.php script will automatically be stored for later processing in the data variable.
Define the callback for the post function and pass the data variable to the function, so that the results can be processed:
}, function(data){The PHP function returns only the row count based on the query that was used to see if the user name was in the database.
- Set up a variable to hold the information returned in the data variable:
var usernameCount = data;
- Create a conditional statement that will display or hide the error message based on the data returned by the AJAX method. You'll recognize most of this conditional statement because it is similar to how validation error messages were delivered in Chapter 3:
        if(1 == usernameCount){
            $('#penewuser').next('.error').css('display', 'inline');
        } else {
            $('#penewuser').next('.error').css('display', 'none');
        }
Close out the post function by citing the data type you expect the server-side function to return:
    }, 'html');
});
If the PHP function returns a 1, the error span is displayed, as illustrated in Figure 4.3.
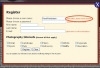
Figure 4.3 The user name FrankFarklestein is already in use by someone else. Who knew there were two of them?
)
The registration function needs to submit the user's data or let the user know if there are still errors with the submission. If there are errors, the user needs to be prompted to fix the registration.
Start the registration function by binding the registration form to the submit method:
$('#registerForm').submit(function(e) {The variable e holds information about the event object, in this case the submit event.
- Because you will be using AJAX to submit the form, you do not want the submit event to perform as it normally would. To stop that from happening, you set the event to preventDefault:
e.preventDefault();
- Serialize the form data. The serializing creates a text string with standard URL-encoded notation. For most forms, this notation is in the form of key=value pairs:
var formData = $(this).serialize();
Now you can invoke the jQuery AJAX post method by providing the URL to post to and the serialized form data, and setting up a callback function:
$.post('inc/peRegister.php', formData, function(data) {The PHP code will return 0 if the query to add the user is successful. If not, it will return a higher number, indicating that the user could not be added.
Store the information returned by the AJAX function in the mysqlErrorNum variable:
var mysqlErrorNum = data;
If an error is returned, you'll want to provide users with a prompt to let them know that they need to correct the information. The information is provided in a modal window as you have done before. Figure 4.4 shows the modal window that you will set up next.
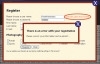
Figure 4.4 The modal prompt letting users know that they need to correct their registration information. In the background you can see that the user name is already taken; this must be changed.
- Test the value of the variable mysqlErrorNum to set up a conditional statement:
if(mysqlErrorNum > 0){ - If mysqlErrorNum is greater than 0, append a modal window to the body of the Web page:
$('body').append('<div id="re" class="errorModal"><h3>There is an error with your registration</h3><p>Please correct your information and re-submit...</div>'); - Calculate and apply the margins for the new modal window just as you did before:
var modalMarginTop = ($('#re').height() + 60) / 2; var modalMarginLeft = ($('#re').width() + 60) / 2; $('#re').css({ 'margin-top' : -modalMarginTop, 'margin-left' : -modalMarginLeft }); - Add the code that will fade in the modal window:
$('#re').fadeIn().prepend('<a href="#" class="close_error"><img src="grfx/close_button.png" class="close_button" title="Close Window" alt="Close" /></a>'); - Provide a method to close the modal window containing the error warning:
$('a.close_error').live('click', function() { $('#re').fadeOut(function() { $('a.close_error, #re').remove(); }); }); - If no error was returned, fade out the registration window and clear the form:
} else { $('#registerWindow, #modalShade').fadeOut(function() { $('#registerForm input[input*="pe"]').val(''); }); } - Close the post method by providing the data type that you expect the PHP function to return:
    }, 'html');
});
)
Logging in the User
The last step you need to do in the validation procedures is to give users a way to log in to their account.
The jQuery for the login function is nearly a duplicate of the registration, so I'll present it in its entirety:
$('#loginForm').submit(function(e){
    e.preventDefault();
    var formData = $(this).serialize();
    $.post('inc/peRegister.php', formData, function(data) {
        var returnValue = data;
        if(1 == returnValue){
            $('#loginWindow, #modalShade').fadeOut(function() {
                $('#loginForm input[name*="pe"]').val('');
                window.location = "4-2.php";
            });
        } else {
            $('body').append('<div id="li" class="errorModal"><h3>There is an error with your login</h3><p>Please try again...</div>');
            var modalMarginTop = ($('#li').height() + 60) / 2;
            var modalMarginLeft = ($('#li').width() + 60) / 2;
            $('#li').css({
                'margin-top' : -modalMarginTop,
                'margin-left' : -modalMarginLeft
            });
            $('#li').fadeIn().prepend('<a href="#" class="close_error"><img src="grfx/close_button.png" class="close_button" title="Close Window" alt="Close" /></a>');
            $('a.close_error').live('click', function() {
                $('#li').fadeOut(function() {
                    $('a.close_error, #li').remove();
                });
            });
        }
    }, 'html');
});
If the login is successful, the browser loads chap4/4-2.php (Figure 4.5), the user's account page.
)
Figure 4.5 The user's account page is displayed on a successful login.
Now that you are comfortable with basic jQuery AJAX, let's move on to using the jQuery AJAX functions to update content in the browser.